Danny Fenton Posted January 25, 2016 Share Posted January 25, 2016 That spinner looks great Nev I had seen the idea of cutting the skirt off before, can you let us all know the spinner make you used so others can find one?CheersDanny Quote Link to comment Share on other sites More sharing options...
Nev Posted January 25, 2016 Author Share Posted January 25, 2016 Not sure I can give you a make, this was just one of the cheep plastic ones you find in model shop bins, mine came from Leeds but everybody has them, shows etc. Pretty sure it was 2 1/2 inch before I cut the skirt off, just happens to be a good shape. Quote Link to comment Share on other sites More sharing options...
Danny Fenton Posted January 25, 2016 Share Posted January 25, 2016 Hi Nev, I must confess I looked through a few stands at Gaydon trying to find one and failed miserably, which is why I asked Cheers Danny Quote Link to comment Share on other sites More sharing options...
Nev Posted January 26, 2016 Author Share Posted January 26, 2016 Mine came from Leeds model shop, they have them listed as "Radio Active" although the generic photo shows random shapes, they all seemed to be the same type that came to a point when I was in, although it was quite a while ago. Quote Link to comment Share on other sites More sharing options...
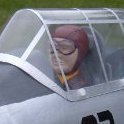
Nev Posted February 7, 2016 Author Share Posted February 7, 2016 A bit more done. I think this is the last of the building jobs. I didn’t want to build it completely of foam, I needed it to be a bit more rugged, so I rummaged around for some light balsa and build up the tail cone Sanded down and a bit of filler to smooth it out it came out better than expected. I’m not usually very good at all these curvy bits, wing fillets etc. but they have turned out ok this time. I have even put some foil around the cockpit ready the some paint and weathering. Haven’t gone mad with the foil. Pilot in the front, seat cushion in the back will cover up most of the bare bits. Now I have run out of things to do, so am going to have to get the covering done before I can carry on. Still a lot to do with the covering and finishing but if I’d realised how close I was to finishing the build I might not have left it so long before picking this back up again. Nev. Quote Link to comment Share on other sites More sharing options...
Danny Fenton Posted February 7, 2016 Share Posted February 7, 2016 Looks terrific Nev, soon be rivetting Cheers Danny Quote Link to comment Share on other sites More sharing options...
Silver Wolf Posted February 7, 2016 Share Posted February 7, 2016 Looking very neat Nev. Keep up the good work. SW Quote Link to comment Share on other sites More sharing options...
Colin Leighfield Posted February 7, 2016 Share Posted February 7, 2016 Super smart Nev. It's going to look great when finished. Quote Link to comment Share on other sites More sharing options...
Nev Posted February 7, 2016 Author Share Posted February 7, 2016 Thanks lads, you will notice my closeup's aren't as close as some of yours but if I keep posting now and again it keeps the incentive going. Nev. Quote Link to comment Share on other sites More sharing options...
Terry Walters Posted February 8, 2016 Share Posted February 8, 2016 Nice Nev - keep it up! Terry Quote Link to comment Share on other sites More sharing options...
Nev Posted December 11, 2016 Author Share Posted December 11, 2016 Hi all. Well it’s been a funny old year to say the least but look what I’ve been up to lately. The rib tapes are hand cut from offcuts ( not as time consuming as you might think ) so have a straight edge but I can live with that at this scale and it keeps the cost down a bit. I also have the wings covered but not painted yet. Hopefully thing have steadied down now for a while and the plan is to get this flying for the summer. So more soon. Nev Quote Link to comment Share on other sites More sharing options...
Martyn K Posted December 11, 2016 Share Posted December 11, 2016 That looks very tidy indeed, Very neat work Edit - is that silver solartex? Edited By Martyn K on 11/12/2016 21:25:17 Quote Link to comment Share on other sites More sharing options...
Danny Fenton Posted December 11, 2016 Share Posted December 11, 2016 Looks great! Well done Quote Link to comment Share on other sites More sharing options...
Martyn K Posted December 11, 2016 Share Posted December 11, 2016 Nev What did you cover the fuselage with? It looks superb. Martyn Quote Link to comment Share on other sites More sharing options...
John Timmis Posted December 12, 2016 Share Posted December 12, 2016 Nice job Nev. Welcome back. Looking forward to future posts. John Quote Link to comment Share on other sites More sharing options...
Terry Walters Posted December 12, 2016 Share Posted December 12, 2016 Very nice Nev. Terry Quote Link to comment Share on other sites More sharing options...
Nev Posted December 12, 2016 Author Share Posted December 12, 2016 Cheers folks. The fuselage isn’t covered yet Martyn, I rely on a soft focus to improve the build quality. Not sure what I am going to cover it with yet but it will be something simple. Tail feathers are covered in White solartex and sprayed with Halfords - Aluminium rattle can. It’s simple and I think the colour is quite realistic. Nev. Quote Link to comment Share on other sites More sharing options...
Martyn K Posted December 12, 2016 Share Posted December 12, 2016 Posted by Nev on 12/12/2016 14:02:29: I rely on a soft focus to improve the build quality. LOL - so do I - and they say the camera never lies Quote Link to comment Share on other sites More sharing options...
Danny Fenton Posted December 12, 2016 Share Posted December 12, 2016 Shhh you guys.... stop giving away the secret to neat building Quote Link to comment Share on other sites More sharing options...
Nev Posted January 1, 2017 Author Share Posted January 1, 2017 Hi all. I have been trying out some brown paper covering and so far I’m pleased with the way it’s going. Now if you’re practised in glass cloth and epoxy resin then you are not going to be convinced by brown paper but without too much effort you do get a pretty smooth finish. I practised on this little bit under the tail first, I’ve been sanding down the edge as I go so as not to get to much of an overlap and it will need a coat of varnish and a very light sanding before painting but glad I tried it. Have a Happy New Year everybody. Nev. Quote Link to comment Share on other sites More sharing options...
Danny Fenton Posted January 2, 2017 Share Posted January 2, 2017 Looks great Nev, I have never tried brown paper, but the finish you have achieved looks impressive Cheers Danny Quote Link to comment Share on other sites More sharing options...
Trevor Rushton Posted January 2, 2017 Share Posted January 2, 2017 Nev, the brown paper treatment looks really good - are you ironing it on? I tried it once on a homemade foam wing and it seemed to take ages; I used diluted pva which made the paper go very wrinkly but I then used my film iron to smooth it out - the heat dried the paper and it shrunk as I did so. I was pleased with the result but cant help but think I went about it the wrong way. I'd be interested to hear how you did it. Presumably you can overlap the joints and rub them down with wet or dry afterwards - does that affect the surface texture or do you then varnish over the whole thing? Best wishes Trevor Edited By Trevor Rushton on 02/01/2017 09:38:17 Quote Link to comment Share on other sites More sharing options...
Nev Posted January 2, 2017 Author Share Posted January 2, 2017 Hi. I’m no expert, as this is the first time I’ve done this. All I’m doing is wetting the paper on the dull side ( don’t be afraid to dip it into a bowl of water !) paint slightly watered down PVA onto the model, lay it on, smooth out with a credit card and let it dry. I’ve only used an iron to stick down the odd tricky edge I’m not going over the whole thing. Yes I am sanding over the overlaps and I will varnish it to hopefully bring back the finish but I’ll let you know how that goes after I’ve done it. The advantage with this for me is that it’s not a big commitment time wise, 10 – 20 minutes at a go and you can progress you way down the model. Once you get set up it is quite quick, whilst I’ve been posting this I could have put another couple of pieces on but then I let things dry. Slow maybe but at least its progress. If you were doing a foamy maybe don’t thin the PVA, just make sure the paper is wet so it goes around the curves and then let it dry, a lot of the wrinkle’s will go as it dries and shrinks. It shrinks a lot so if you are doing a wing do both sides together and keep it flat. Nev. Edited By Nev on 02/01/2017 11:58:00 Quote Link to comment Share on other sites More sharing options...
Trevor Rushton Posted January 2, 2017 Share Posted January 2, 2017 Thanks Nev; I will give it a try at some point - like you, my model building tends to be a few minutes to an hour at a go, so short bites is good. I suppose if you were really keen you could contrive panel lines with careful cutting. Trevor Quote Link to comment Share on other sites More sharing options...
Nigel Day Posted January 4, 2017 Share Posted January 4, 2017 Looks great Nev. Good to see that you're sticking with it. Quote Link to comment Share on other sites More sharing options...

Recommended Posts
Join the conversation
You can post now and register later. If you have an account, sign in now to post with your account.
Note: Your post will require moderator approval before it will be visible.