Nev Posted January 8, 2017 Author Share Posted January 8, 2017 Hi all. I now have the Chippy all covered and pleased with the outcome. The photos don’t really do the brown paper justice. I know you can see the joins where the paper has overlapped but they have actually sanded back very smooth. Not saying it’s a perfect finish because it’s not, with a bit more work it could be but then that’s not really the point of doing it in brown paper. I’m not going to put on much in the way of surface detail maybe the odd access panel, so I don’t need a perfect finish. We will see what it looks like when the paint goes on. I’m actually running out of jobs. Some more to do on the canopy but I need it painting first and for that I need a nice dry weekend. Think I’ll fit out the wings next for a bit of fun and contemplate how I’m going to cut up the cowl to get the batteries in. Nev. Quote Link to comment Share on other sites More sharing options...
john stones 1 - Moderator Posted January 8, 2017 Share Posted January 8, 2017 Looks real good Nev John Quote Link to comment Share on other sites More sharing options...
Danny Fenton Posted January 8, 2017 Share Posted January 8, 2017 Lovely work Nev, you have a blank canvas just begging for some detail CheersDanny Quote Link to comment Share on other sites More sharing options...
Colin Leighfield Posted January 8, 2017 Share Posted January 8, 2017 I keep telling myself I'll try brown paper, it's probably a better "leveller" than glass-cloth. Quote Link to comment Share on other sites More sharing options...
Nev Posted January 8, 2017 Author Share Posted January 8, 2017 No rivets you said we didn't have to do the rivets ! Brown papers not for everything Colin but it's another tool in the box. It could be a quick way to get a smooth finish on foam though. Nev. Quote Link to comment Share on other sites More sharing options...
Danny Fenton Posted January 8, 2017 Share Posted January 8, 2017 Okay no rivets... but you must put that joiner band around the fus just behind the cockpits as compensation Cheers Danny Quote Link to comment Share on other sites More sharing options...
Nev Posted January 8, 2017 Author Share Posted January 8, 2017 Yes I will do that bit at least and treads on the wings. Nev. Quote Link to comment Share on other sites More sharing options...
Martyn K Posted January 9, 2017 Share Posted January 9, 2017 Posted by Nev on 02/01/2017 11:52:03: Hi. I’m no expert, as this is the first time I’ve done this. All I’m doing is wetting the paper on the dull side ( don’t be afraid to dip it into a bowl of water !) paint slightly watered down PVA onto the model, lay it on, smooth out with a credit card and let it dry. I’ve only used an iron to stick down the odd tricky edge I’m not going over the whole thing. Yes I am sanding over the overlaps and I will varnish it to hopefully bring back the finish but I’ll let you know how that goes after I’ve done it. The advantage with this for me is that it’s not a big commitment time wise, 10 – 20 minutes at a go and you can progress you way down the model. Once you get set up it is quite quick, whilst I’ve been posting this I could have put another couple of pieces on but then I let things dry. Slow maybe but at least its progress. If you were doing a foamy maybe don’t thin the PVA, just make sure the paper is wet so it goes around the curves and then let it dry, a lot of the wrinkle’s will go as it dries and shrinks. It shrinks a lot so if you are doing a wing do both sides together and keep it flat. Nev. Edited By Nev on 02/01/2017 11:58:00 Hi Nev This really interesting. Do you need to prep the wood before you apply the water soaked brown paper. I am thinking of how you stop the underlying balsa from buckling. This was a problem that I had when I used a water based covering on my Magic Martyn. Quote Link to comment Share on other sites More sharing options...
Nigel Day Posted January 9, 2017 Share Posted January 9, 2017 DF's a hard taskmaster isn't he Nev? Quote Link to comment Share on other sites More sharing options...
Danny Fenton Posted January 9, 2017 Share Posted January 9, 2017 Who me? Quote Link to comment Share on other sites More sharing options...
Nev Posted January 9, 2017 Author Share Posted January 9, 2017 You’re not kidding Nigel, he doesn’t let up on anything, you think after all this time he would have forgotten what we said on page 1 I think he has a thing about Spitfire as well so you’re in for it. Nev. Quote Link to comment Share on other sites More sharing options...
Nev Posted January 9, 2017 Author Share Posted January 9, 2017 I didn’t prepare the wood with anything Martyn. I’m sure you know with your own Chippy the planked fuselage and sheeted tail surfaces are very rigid anyway, not sure I would have tried it on a built up wing. When I say I soaked the paper, I floated it onto the surface of the water for about 10 seconds or so, then lifted it out and left it wet side up while I applied the pva. In the end I hardly diluted the pva at all, it worked better if it still had a bit of grab. By this time the paper will have soaked up most of the water left on the surface. After you put the paper on, smooth out any wrinkles with a credit card, this squeegees out any excess pva/water. I would say that this “wets” the wood less than covering in glass cloth and Poly C as most of the moisture is retained by the paper. Maybe I got lucky. It was all trial and error, the first parts I tried were some servo covers made from 1/16 obeche sheet, these did warp as I would have expected but have straightened out since left under weights. They actually bowed inwards, pulled in by the shrinking paper, not bowing out by the swelling of the wood on the wet surface. But I think I’m overthinking this now. Nev. Quote Link to comment Share on other sites More sharing options...
John Timmis Posted January 9, 2017 Share Posted January 9, 2017 Well if you think about it........we would only need a Dakota & a Lanc to have our own BBMF. Is there a cunning plan???? John Quote Link to comment Share on other sites More sharing options...
Nev Posted January 9, 2017 Author Share Posted January 9, 2017 I,m not doing 4 engine necells but would love to bo a Dakota sometime, could be a long wait though. Nev. Quote Link to comment Share on other sites More sharing options...
Nigel Day Posted January 10, 2017 Share Posted January 10, 2017 Didn't someone looking over all our shoulders mention a Mossie sometime? Quote Link to comment Share on other sites More sharing options...
Danny Fenton Posted January 10, 2017 Share Posted January 10, 2017 Still mulling over options Nigel...... Quote Link to comment Share on other sites More sharing options...
Shane Sunday Posted January 11, 2017 Share Posted January 11, 2017 This is brilliant work Nev. I may try brown paper on my Corsair. Personally I'm with Danny on this one... I think one big rivet on either side should be enough. Then you can start on something with a bent wing. Quote Link to comment Share on other sites More sharing options...
Nev Posted February 20, 2017 Author Share Posted February 20, 2017 Hi. I haven’t updated for a while but I now have the wings finished. These are fiddley little things. Don’t really like these hinges but it’s too late now. All in and working. No rib tapes on the bottom but I’m glad I had a go on the top. Nev. Quote Link to comment Share on other sites More sharing options...
john stones 1 - Moderator Posted February 20, 2017 Share Posted February 20, 2017 That looks great Nev, you're a proper modeller John Quote Link to comment Share on other sites More sharing options...
Nev Posted February 20, 2017 Author Share Posted February 20, 2017 You wait till you see the next bit. It’s probably fair to say I have been putting this bit off. But I committed quite early on to have a go at the side opening hatch that Danny showed. I glued the stiffening bands in well over a year ago but just didn’t want to face cutting up the cowl. I was convinced it would weaken it too much. I only cut down the hinge line first, I figured I might stand a better chance of getting it all back together again straight if I didn’t cut the hatch out completely. But now I have access. Bit more work to do yet, magnets to keep it closed I think, but it’s a lot more ridged than I thought it was going to be. Be flying in the summer at this rate ! Nev. Quote Link to comment Share on other sites More sharing options...
john stones 1 - Moderator Posted February 20, 2017 Share Posted February 20, 2017 Nowt wrong with that Nev, it's a pretty well made cowl, nice n stiff Quote Link to comment Share on other sites More sharing options...
Danny Fenton Posted February 20, 2017 Share Posted February 20, 2017 Brilliant Nev! You have cracked the hardest parts in this. You can tackle anything now!CheersDanny Quote Link to comment Share on other sites More sharing options...
Nigel Day Posted February 21, 2017 Share Posted February 21, 2017 That's the biz Nev! Nice work. Quote Link to comment Share on other sites More sharing options...
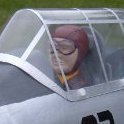
Nev Posted April 2, 2017 Author Share Posted April 2, 2017 Hi all, thanks for the comments. Nearly finished all the building jobs and got the base silver on, so time for a bit of bench flying. It will never be as detailed as some of the other builds but I think I have got a few of the basics that make it a Chipmunk. Just the internal cockpit framework to make and a chap in the front. The other reason to put the cockpit and cowl on was to try and mark up for the rest of the painting, stripes etc. if anybody has any tips on hand painting big roundels and lettering, please let me know. More soon. Nev. Quote Link to comment Share on other sites More sharing options...
Danny Fenton Posted April 2, 2017 Share Posted April 2, 2017 That looks fabulous Nev, really well done I tend to use masks and an airbrush. I am pants at brushing them so cant help i am afraid..... Quote Link to comment Share on other sites More sharing options...

Recommended Posts
Join the conversation
You can post now and register later. If you have an account, sign in now to post with your account.
Note: Your post will require moderator approval before it will be visible.