onetenor Posted October 12, 2017 Share Posted October 12, 2017 Super job and what a cracking workshop and so tidy. Puts me to shame. At least use organic filter units on the mask. Edited By onetenor on 12/10/2017 05:23:37 Quote Link to comment Share on other sites More sharing options...
MikeQ Posted October 12, 2017 Author Share Posted October 12, 2017 Hi Word back from KlassKote is that the paint doesn't contain any isocyanates. Also got the SafetyDataSheet. Looking at the mask it has both P2 and AB1 filters so good for organic/inorganic and particles. Obviously makes sense to be well ventiallated, shower cap, goggle and long sleeved shirt etc and strip out of same as soon as finished. But considering the amount of dope, Cyano fumes, nitro, balsa dust and god knows what else many AeroModellers breathe 0ver the years it's a wonder anyone's left alive. There seems to be enough old codgers at the Bowden Trophy each year! Happy to listen to anyone with definitive advice though. Mike Edited By MikeQ on 12/10/2017 18:43:04 Edited By MikeQ on 12/10/2017 18:46:17 Quote Link to comment Share on other sites More sharing options...
TartanMac Posted October 12, 2017 Share Posted October 12, 2017 That air frame looks great I like that painting gives the ability to have concave curves and a seamless Finnish looks good in white. Quote Link to comment Share on other sites More sharing options...
TartanMac Posted April 26, 2018 Share Posted April 26, 2018 I have just glassed my Super Sportster 40 ARTF horizontal stab and 2 elevators as practice for my Uno Wot which I will be getting back into very soon. I painted the elevators exactly as you stated you would do. I have only used filler primer so far and it looks good after using 400 grit wet and dry between coats. But after around 3 days the parts still smell of paint it seems the paint is hard but still smells quite a bit. I used Autotek filler primer as I got it for £2.75 free postage for 500ml spray tin. Should I leave it for a while before putting the colour on ? I have a tin of flair white supposedly it is fuel proof was going to put it over the filler primer. Quote Link to comment Share on other sites More sharing options...
MikeQ Posted February 17, 2019 Author Share Posted February 17, 2019 After a break to start but not finish about 5 other models including a ffree flight rubber powered 22" Chambermaid, free flight Veron DF Sabre, Fresh RES glider etc ... decided to finish these two models once and for all. Some notes for me. Tamiya 5mm flexible masking tape, KlassKote blue, Fastmover HVLP (paint 3/4 turn from fully closed, fa on 50%, air 1/2 turn from fully closed, 25-30psi). Distance 15-25cm. First coat 1:1:1 paint:catalyst:reducer. After 1hr second flow coat 1:1:1.25. Remove masking after 1hr. Use the filter as had flecks of old white paint from cup screw thread got in. Took about 2/3 mini jame jar to do LE top and bottom two coats as per pics. Looks better in reality then in photos. Time to stop being terrified of making a total botch crack on with rest. cheers Edited By MikeQ on 17/02/2019 19:52:26 Edited By MikeQ on 17/02/2019 19:53:59 Edited By MikeQ on 17/02/2019 20:00:15 Edited By MikeQ on 17/02/2019 20:01:14 Quote Link to comment Share on other sites More sharing options...
Andrew767 Posted February 17, 2019 Share Posted February 17, 2019 Keep going Mike I didn't see this thread first time around but it's fascinating. The LD has to be one of the all time great planes. Andrew Edited By Andrew767 on 17/02/2019 21:12:56 Quote Link to comment Share on other sites More sharing options...
MikeQ Posted February 19, 2019 Author Share Posted February 19, 2019 Bit more progress ... fuselage and stab painted blue. Use panel wipe to clean before spraying. Same settings as above. Paint was 48hrs old ... stored in fridge fine then just added a little bit of reducer once it had warmed up to room temp. Edges with the flexible tamiya tape are pretty good but need to concentrate on creep where it crosses over. Can probably sharpen up when dry dry. Stripped the masking off after 60 minutes. Left the 'canopy' mask in place to see what effect it will have taking the masking off once fully dry. Two coats again, 60mins between. The masking made with yellow Tamiya tape not so good ... won't use for hard edges again. Pencil lines should wash off with panel wipe. Edited By MikeQ on 19/02/2019 18:58:55 Quote Link to comment Share on other sites More sharing options...
MikeQ Posted February 19, 2019 Author Share Posted February 19, 2019 I've also got a TopFlite Gold Edition Corsair that's 25yrs old and stalled because I couldn't get on with the the glassing. I started glassing this after the two above and would have to say I've changed my approach to glassing. Use peel ply along with the epoxy ... makes it a doddle although still some work but a lot more consistent and easier to get good results. Quote Link to comment Share on other sites More sharing options...
MikeQ Posted February 22, 2019 Author Share Posted February 22, 2019 Bit moreore progress ... masking this thing off is actually the biggest pain. Edited By MikeQ on 22/02/2019 21:42:55 Quote Link to comment Share on other sites More sharing options...
MikeQ Posted February 22, 2019 Author Share Posted February 22, 2019 Better read the FAQ on why my pics are upside down! Quote Link to comment Share on other sites More sharing options...
MikeQ Posted February 26, 2019 Author Share Posted February 26, 2019 Sprayed Fluor pink Oracolor direct onto finished white KlassKote. No surface prep other than wiping with Oracolor thinners. Oracolor mixed 3:1 paint v hardener. Then 20% by volume of thinners on top of the 4 part mix. Sprayed on bloody awful compared to KlassKote. Think it was too thin. Won't add thinners next time. Also, might have been better if lightly keyed the KlassKote. Came out alrightish in the end ... maybe another coat would be good. The Fastmover spray gun with 0.8mm nozzle on 30psi probably too big for relatively small area. Might have been better with a smaller touch up gun ... 0.5mm? Or maybe my 0.3mm ish Clarke airbrush. Expensive this Oracolor ... can't be wasting it painting masking paper. Edited By MikeQ on 26/02/2019 16:27:36 Quote Link to comment Share on other sites More sharing options...
Denis Watkins Posted February 26, 2019 Share Posted February 26, 2019 Yes Mike, 0.5mm but nearer 20lb, even 15lb at 0.3mm tip, then definitely 15lb pressure At 30lb, you are getting paint on faster than you can react to seeing too much paint on Page 1 always says, more coats, less paint, more control, in a nice way Edited By Denis Watkins on 26/02/2019 16:37:27 Quote Link to comment Share on other sites More sharing options...
Denis Watkins Posted February 26, 2019 Share Posted February 26, 2019 I missed the edit deadline, and should have said More thin coats, to build up the colour Quote Link to comment Share on other sites More sharing options...
MikeQ Posted February 26, 2019 Author Share Posted February 26, 2019 Hello The Fastmover manual was saying around 30psi but I think I'll try it around 20psi. Does that sound ok for a HVLP gun and 0.8mm nozzle? I think the Oracolor might have been too thin. Won't add thinner on next shoot and will key the surface by lightly sanding and degreasing. This model was for experimenting on so not too precious about trying different things. Might try my 0.3mm Clarke gravity fed cheapo for the aileron and elevator tips. Don't think it would be up to bigger areas. Any advice welcome. mike Edited By MikeQ on 26/02/2019 20:28:08 Edited By MikeQ on 26/02/2019 20:28:39 Quote Link to comment Share on other sites More sharing options...
Denis Watkins Posted February 26, 2019 Share Posted February 26, 2019 Mike Has the gun a metal bottle or plastic bottle? HVLP, do low pressure work and are low pressure, and even the .8mm tip can be adjusted to your needle for good flow, so thin coats, built up Try 20lb Oracolor comes with spray hardener, or brush hardener, so hopefully you have spray hardener The 0.3mm gravity fed can produce professional looking results, and definitely at 15lb, will need thinning to milk consistency Quote Link to comment Share on other sites More sharing options...
MikeQ Posted February 27, 2019 Author Share Posted February 27, 2019 Hello Plastic bottle ... is that a factort? Bit big to be honest ... smaller one would be better from a cleaning point of view. Yep ... used the hardener for spraying and the appropriate thinner. Cheers Mike Edited By MikeQ on 27/02/2019 07:43:14 Quote Link to comment Share on other sites More sharing options...
Denis Watkins Posted February 27, 2019 Share Posted February 27, 2019 I was just trying to get an angle on your gear Mike, and it is all good enough to do a really good job. The primary design of that spray gun was its ability to blow wide and narrow areas, fences and doors etc, using emulsions and water based paints So with some cheapo colour, adjust your spray pattern to suit the area such as a wing, to cover the wing chord for instance in nice steady sweeps. The pattern can be a small to a large circle, or an angled bar shape. Limber up, and flex your arm for smooth too and fro motion Don't go all in one go, take a look then, sweep again, on a test piece still Then your other control, the density and amount of paint, turn it out, getting too much colour, then test turning in to get a nice thin coat On thinning, stay on or under 10% thinners, and test at 20lb pressure With your airbrush, stay at 15lb, and yes, just for small areas To add Plastic or Aluminium bottle is a factor with aggressive solvents Some thinners and paint solvents can melt the bottle The spray gun can tolerate most of stuff we use Edited By Denis Watkins on 27/02/2019 08:14:52 Quote Link to comment Share on other sites More sharing options...
MikeQ Posted February 27, 2019 Author Share Posted February 27, 2019 I'll try on some paper stuck to the garage door (inside ). I've got a bolt of 'blank newspaper off cuts' ... the stack of sheets they wrap fish and chips in at the chippie, although they all seem to use cardboard cartoons these days! I'll try the 0.3mm airbrush on the smaller parts. Unfortunately can't do much about getting the odd dust spec on the work what with it being a garage and the door open. Cheers Mike Quote Link to comment Share on other sites More sharing options...
Engine Doctor Posted February 27, 2019 Share Posted February 27, 2019 Hi MikeQ . What method of application are you using ? With most two pack paints you should first apply a Ghost coat (very thin )and allow to partly dry . Then a wet on wet coat until the coverage is good .I have found that a gravity fed touch in gun is ideal for our model spraying . I bought mine back in my car spraying days and only now use an airbrush for tiny parts or detailing . External mix airbrush's are not good unless the finish is unimportant as they always spatter. Re the dust specs . I now spray either in the open or with garage doors open Most specs are stuck on with electro- static charge and are so and so's to remove . Have you used a "Tack Rag" prior to spraying /Again these are cheap items from car paint factors . You can get them I believe from Halfords but probably cost a fortune . Its always advisable to key any painted area before applying another coat or design as most two pack paint once cured will not allow another coat to etch onto it. Fine abrasive pads from car paint factors are available in various grades and are cheap. Looks great . Quote Link to comment Share on other sites More sharing options...
MikeQ Posted February 27, 2019 Author Share Posted February 27, 2019 Hello used a tack cloth then wiped with the Oracolor thinners. The fact that the base white Klasskote had some very mild orange peel probably doesn't help. That was brought on during the spraying of the Klasskote and my obvious in-experience. So problems will compound themselves. I did do a mist coat but didn't really leave it too long before going over it a second time. Maybe 5 mins. I was worrying about the working time of this Oracolor paint. I'll key the area to be sprayed on the next try. Like I say ... this model is for learning on ... and even once I get it flying, there's nothing to stop me rubbing it back in the future to start from scratch if I want to try something. lol ... I can see it ending up in a few years as a patchwork of high gloss fluro and mottled weathered 1945 german camo colours. Cheers Edited By MikeQ on 27/02/2019 09:33:42 Quote Link to comment Share on other sites More sharing options...
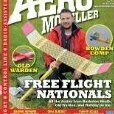
MikeQ Posted March 5, 2019 Author Share Posted March 5, 2019 Hello bit more progress ... getting more familiar with the spray gun. Main colours sprayed. Still need to add extra bits and bobs along the real LoadedDice lines. cheers mike Quote Link to comment Share on other sites More sharing options...
MikeQ Posted May 4, 2019 Author Share Posted May 4, 2019 Nearly there ... just waiting for elevator servo before final assembly and sorting. Quite pleased with results for a first effort. Plenty of mild orange peel here and there plus dust specs. Final thing I'm going to try, on underside of tail plane just in case I muck it up ... is to flat it all back with wet W&D, apply a 2K clear coat plus maybe then try and buff it up with T-cut .... just to see how shiny drippy gloss wet Look I can get it, or not. If this works fine then might do rest of model as the edges of the colour panels are raised a little and I'd rather have it as smooth as possible. Edited By MikeQ on 04/05/2019 14:56:50 Quote Link to comment Share on other sites More sharing options...
Kim Taylor Posted May 4, 2019 Share Posted May 4, 2019 I don't know if weight is an issue here, but be careful if going for the drippy wet look with 2k clearcoat - it gets heavy really quickly!! Kim Quote Link to comment Share on other sites More sharing options...
MikeQ Posted May 4, 2019 Author Share Posted May 4, 2019 Hi Agreed ... I've weighed it but lost my notes for now. It is a little higher wing loading than say the 46-60 sized pattern models I e had in the past ... but maybe only 5-7%, albeit on a smaller wing area. Even with a few ounces more it's should still be OK. This is the first time I've fully glassed a model and 2K sprayed so it is very much a learning vehicle. Even if piles in first flight it's served its purpose. I reckon next time round I could achieve a better finish for a lighter finish. I'll update with weights etc later. Cheers Mike PS lol ... I'm used to weighing components on a 0.1g digital scale for FreeFlight competition duration models! I need a bigger set of scales! Quote Link to comment Share on other sites More sharing options...

Recommended Posts
Join the conversation
You can post now and register later. If you have an account, sign in now to post with your account.
Note: Your post will require moderator approval before it will be visible.