Martin Gay Posted November 28, 2019 Author Share Posted November 28, 2019 Robk, I used cheap Turnigy 9018 MG servos in the prototype and Gamma build. Model flies well without rudder, but makes aerobatics easier, and keeps the turns flatter in the landing approach. Martin. Quote Link to comment Share on other sites More sharing options...
robk Posted November 28, 2019 Share Posted November 28, 2019 Thanks Martin Thats very helpful. Rob Quote Link to comment Share on other sites More sharing options...
Phil Beard Posted November 30, 2019 Share Posted November 30, 2019 Martin, Did you use Servi Tape to mount your servos onto that thin piece of ply that you can remove? All the Best Phil B Quote Link to comment Share on other sites More sharing options...
Martin Gay Posted November 30, 2019 Author Share Posted November 30, 2019 Hi Phil, Those bits of ply are the hatches in the bottom wing skins. One the top skins were fitted blocks were added either side of the servo mounting lugs and a strip over the tops of the blocks held the servo securely. Martin. Edited By Martin Gay on 30/11/2019 22:50:32 Quote Link to comment Share on other sites More sharing options...
dirk tinck Posted December 1, 2019 Share Posted December 1, 2019 Hi Martin , did you have to put in lead in the nose of the prototype? Would it be usefull to lighten up the battery-box ? Thanks, best regards, Dirk Quote Link to comment Share on other sites More sharing options...
Martin Gay Posted December 1, 2019 Author Share Posted December 1, 2019 Hi Dirk, I have 109g in the prototypes nose with the CG now at 172mm from F4. Martin. Quote Link to comment Share on other sites More sharing options...
Phil Beard Posted December 1, 2019 Share Posted December 1, 2019 Martin, Could you please send a photo of your installation as I'm not visualizing fully how you've installed your servos. All the Best Phil B Quote Link to comment Share on other sites More sharing options...
Martin Gay Posted December 1, 2019 Author Share Posted December 1, 2019 Okay. The model is with Gordon having the paintwork weathered. I will ask for some photos of the servo install in this model. Quote Link to comment Share on other sites More sharing options...
Martin Gay Posted December 1, 2019 Author Share Posted December 1, 2019 This photo shows the blocks that hold the servos looking down from the top of the wing. The top skin is not yet fitted. The blocks ended up being packed out and glued to the shear webs and ribs as well as the top skin. A thin ply strip holds the servo in and is accessed through the hatch in the bottom skin. Quote Link to comment Share on other sites More sharing options...
Peter Garsden Posted December 2, 2019 Share Posted December 2, 2019 I think I have found an important cutting error. All the ribs are about 3mm too long at the leading edge even accounting for extra needed for the swept back wing. Martin am I correct? Suggest you cut them down before laying as it is much easier. Quote Link to comment Share on other sites More sharing options...
Peter Garsden Posted December 2, 2019 Share Posted December 2, 2019 Posted by Martin Gay on 01/12/2019 21:19:50: This photo shows the blocks that hold the servos looking down from the top of the wing. The top skin is not yet fitted. The blocks ended up being packed out and glued to the shear webs and ribs as well as the top skin. A thin ply strip holds the servo in and is accessed through the hatch in the bottom skin. I would advocate gluing the servo to the ply backing plate with a mixture of Epoxy Finishing Resin (NOT GLUE) and microballoons being careful not to glue the rotating pot as well. I have tried this method. It is a fiddle and the servo can move, or break the supports in extremis. I know Andy Blackburn has moved to this method because he recommended it on his Canberra. Mouldies glue the servo to top and bottom skins for extra support. I never have but you can do so. Incidentally if you are worried about removing the servo, it can be easily prized off the ply plate with a screwdriver as long as you use the correct resin, otherwise it is there till hell freezes over (-2 degrees here in th'ills) Edited By Peter Garsden on 02/12/2019 09:57:47 Quote Link to comment Share on other sites More sharing options...
Martin Gay Posted December 2, 2019 Author Share Posted December 2, 2019 Peter, The ribs need an angled chamfer on the leading and trailing edges. This is the reason for the extra length. Martin. Quote Link to comment Share on other sites More sharing options...
robk Posted December 28, 2019 Share Posted December 28, 2019 Hi Martin I have just realised the full-size Sabre ailerons go to the end of the wing tips (see these two images) but the ones on the model plan don't - any particular reason for this change from scale? Cheers Rob Quote Link to comment Share on other sites More sharing options...
Andy Meade Posted December 28, 2019 Share Posted December 28, 2019 I'm no sure if there's a difference in wing modelled by Martin, but I can say that especially on a low wing sloper, it's usually not a great idea to have the ailerons terminate at the tip. Very often you'll fine grass snags here on landing and will either ground loop your airframe for you at best, or tare off the aileron at worst. Quote Link to comment Share on other sites More sharing options...
Martin Gay Posted December 28, 2019 Author Share Posted December 28, 2019 Hi Rob, As Andy says, there is a risk that the ailerons can be torn off on landing if they go all the way to the wingtips. Martin. Quote Link to comment Share on other sites More sharing options...
robk Posted December 28, 2019 Share Posted December 28, 2019 Thanks Martin and Andy. My pal Graham has sent me an interesting image reproduced here which clarifies this issue. The Sabre had ailerons that reached the tips and ones that didn't, depending on the variant. My chosen aircraft is 86F entering service in October 1953. The 86F had both aileron configurations so it could have been either Im going with what I have built and what is on the plan and what works best for a slope soarer. Phew!. Quote Link to comment Share on other sites More sharing options...
robk Posted December 29, 2019 Share Posted December 29, 2019 By the way Martin - I cant see a hatch. How do you fit and turn off and on your flight battery? Quote Link to comment Share on other sites More sharing options...
Martin Gay Posted December 29, 2019 Author Share Posted December 29, 2019 I use a magnetic switch. Connect the battery then fit the wing. Use the mag switch between flights and disconnect the battery at the end of the day when the wing is removed! Quote Link to comment Share on other sites More sharing options...
robk Posted December 30, 2019 Share Posted December 30, 2019 Thanks Martin - I hadnt heard about those until now! Inspired by your solution I have figured out a way to do it without the hatch so watch this space. Quote Link to comment Share on other sites More sharing options...
Peter Garsden Posted December 30, 2019 Share Posted December 30, 2019 I am a big magnetic switch fan having crashed both my Hawk and JP with scale type switches operated with wire. You can get them from either T9 Hobbysport **LINK** or Pico Switches **LINK** Quote Link to comment Share on other sites More sharing options...
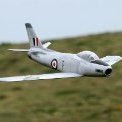
Martin Gay Posted January 3, 2020 Author Share Posted January 3, 2020 "Gamma" build is now complete - awaiting the maiden flight! Quote Link to comment Share on other sites More sharing options...
Martin Gay Posted January 3, 2020 Author Share Posted January 3, 2020 More photos: Quote Link to comment Share on other sites More sharing options...
Martin Gay Posted January 3, 2020 Author Share Posted January 3, 2020 Undersides showing the "hidden" linkages on the "Gamma" build compared to the prototype where the linkages hang out in the breeze! Quote Link to comment Share on other sites More sharing options...
robk Posted January 3, 2020 Share Posted January 3, 2020 Looks great Martin - those hidden linkages are excellent. Edited By robk on 03/01/2020 19:29:22 Quote Link to comment Share on other sites More sharing options...
Martin Gay Posted January 3, 2020 Author Share Posted January 3, 2020 Close up of the top hinged/bottom actuated aileron linkage: Edited By Martin Gay on 03/01/2020 19:39:19 Quote Link to comment Share on other sites More sharing options...

Recommended Posts
Join the conversation
You can post now and register later. If you have an account, sign in now to post with your account.
Note: Your post will require moderator approval before it will be visible.