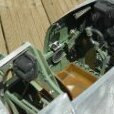
david tilbury Posted January 17, 2023 Author Share Posted January 17, 2023 Ended up doing other things today, happens sometimes.........but i did make the standoffs for the baffle/cowl.....ordered some 5mm brass inserts that will go in the smaller hole on the loose piece of beech, a aluminum brace may connect the two standoffs as well.... There are 3 but the lower one will probably be a aluminum tube. Quote Link to comment Share on other sites More sharing options...
david tilbury Posted January 20, 2023 Author Share Posted January 20, 2023 Brass inserts glued in.....made the round standoff using a M5 cap head screw one end and an insert the other.... Finished off the gun cover ready to take a female mold......not too worried about the finish of the mold as i can work on it after it's pulled off.....will use cling film or something as a release. Cheers Quote Link to comment Share on other sites More sharing options...
david tilbury Posted January 20, 2023 Author Share Posted January 20, 2023 As well as the airframe, i've been working on a new instrument panel, as the Ta differs slightly from the Fw 190 series.......more to come as this isn't a 5 min job....:-) 1 Quote Link to comment Share on other sites More sharing options...
david tilbury Posted January 22, 2023 Author Share Posted January 22, 2023 Some more CAD work on the panel.....more to follow.....:-) 1 Quote Link to comment Share on other sites More sharing options...
david tilbury Posted January 23, 2023 Author Share Posted January 23, 2023 lower cowl stand off finished.....also started adding the instruments to the CAD.....makes a big difference...:-).....cowl lines up with the fuz ok 3 Quote Link to comment Share on other sites More sharing options...
Cliff Bastow Posted January 23, 2023 Share Posted January 23, 2023 This is looking amazing Dave, I can not wait to see this in the the flesh at the the field, Cheers Cliff. Quote Link to comment Share on other sites More sharing options...
david tilbury Posted January 27, 2023 Author Share Posted January 27, 2023 Thanks Cliff......all the best Dave Finally got back into the workshop.....as the temp is a little warmer today .........so back on with the wings.....sanded down the new 1/4" spar for the flaps on both wings took a good couple of hours filling the gaps in the wing ribs......but happy now everything is flat and ready for the 2.5mm light ply top and underside. Lined the alerion up that came with the laser cut parts ......the total width at the tip across the wing is fine but will replace the balsa parts with my own....looking down the back edge of the wing it's pretty much a straight line.... Still haven't glassed the gun cover as it's still too cold for that.... Also been advancing the CAD on the Revi gunsight which is looking great... Quote Link to comment Share on other sites More sharing options...
stu knowles Posted January 27, 2023 Share Posted January 27, 2023 Hi David, Do you find the liteply a suitable material for wing skinning? I have been pondering the same question recently. What bit of feedback I have been able to gain is that it might be a heavy alternative to a balsa skin. It has also been suggested that Proskin is good especially as it needs no further finishing. (Not used it myself) Thanks for posting your build(s) always interesting to follow. regards Stu K Quote Link to comment Share on other sites More sharing options...
david tilbury Posted January 27, 2023 Author Share Posted January 27, 2023 Hi Stu, Thanks for popping in....:-)..... The light ply is only over the flap area which is quite long on the Ta 152, in actual fact it's 2 flaps per side.......the rest of the wing will be skinned in balsa.....the reason for this is i need something stronger than balsa to cover the void......i did think of Proskin but i would have to pack the ribs out to allow for the difference in thicknesses.....the balsa sheeting is 1/8" thick... There is a guy in Spain building the same aircraft at 1:5 and he has used proskin on the entire wing......never used it in anger on a whole wing ......getting it wrong would be a nightmare.....balsa is much easier in my mind....:-) Once i have the underside of the flap finished you will see what i'm up too.... All the best Dave 1 Quote Link to comment Share on other sites More sharing options...
david tilbury Posted January 28, 2023 Author Share Posted January 28, 2023 CAD so far on the Revi gunsight.....the rear light box to do and glass housing.... Hopefully back in the workshop today....:-) Quote Link to comment Share on other sites More sharing options...
david tilbury Posted January 28, 2023 Author Share Posted January 28, 2023 Started laying the top sheeting....one thing i will work on is the butting edges of the outer wing panel to the center section.....needs a hard edge rather than balsa Using 1/8" sheet as plan.....nice thing is it's slightly higher than the 2.5mm light ply so will be easy to sand down and match... New wing joining line working well. Quote Link to comment Share on other sites More sharing options...
david tilbury Posted January 28, 2023 Author Share Posted January 28, 2023 Setting out the underside of the flaps (lots to think about before actually gluing)......new ribs and light ply sheet....the ply will end up being about 25mm wide not as shown Need to mark the offsets of the ribs....i think there are 18 or so per side Quote Link to comment Share on other sites More sharing options...
david tilbury Posted January 30, 2023 Author Share Posted January 30, 2023 some more....... 1 Quote Link to comment Share on other sites More sharing options...
david tilbury Posted January 31, 2023 Author Share Posted January 31, 2023 getting closer Quote Link to comment Share on other sites More sharing options...
David Ovenden Posted February 1, 2023 Share Posted February 1, 2023 Amazing work Dave. As usual! Quote Link to comment Share on other sites More sharing options...
david tilbury Posted February 1, 2023 Author Share Posted February 1, 2023 Thanks David......:-)....cheers Another day in the office......planking....finished off the flap underside....been working on hinges this afternoon for the flaps.....3 will be added to each section, these will be hidden under a lithoplate skin.....the full size has 2 per flap.. also got sometime on the gunsight which is nearly finished..........one thing i need to do pretty soon is shape the center section at the moment when both center sections are joined like in the photo they give a 'V' ridge down the center this needs to be removed and a soft curve adding Quote Link to comment Share on other sites More sharing options...
Nick Somerville Posted February 1, 2023 Share Posted February 1, 2023 Fabulous looking wing, David and the gun sight is superb. Interested to note the V you need to remove/soften at the lower wing joint. That’s been bothering me a bit on my 190. I am hoping to disguise most of it with the bomb rack, but the rear portion will still need some work. Quote Link to comment Share on other sites More sharing options...
david tilbury Posted February 5, 2023 Author Share Posted February 5, 2023 Thanks Nick.....:-).......cheers update.....wing center glued......working on the cockpit instrument top......prints of the Revi-16B gunsight came out ok.....some smaller parts to add... 2 Quote Link to comment Share on other sites More sharing options...
david tilbury Posted February 6, 2023 Author Share Posted February 6, 2023 Turned the glass dome for the gunsight from perspex.....also there wasn't a former for the rear of the cockpit, shame as i think this would have been a good addition anyway made a template of the fuz.....then cut and sanded light to fit.....this former isn't vertical it's at a slight angle.....the seat will go against this once made 1 Quote Link to comment Share on other sites More sharing options...
david tilbury Posted February 6, 2023 Author Share Posted February 6, 2023 drew up and had laser cut new front canopy frame today 4 Quote Link to comment Share on other sites More sharing options...
Martian Posted February 6, 2023 Share Posted February 6, 2023 Wonderful workmanship Quote Link to comment Share on other sites More sharing options...
david tilbury Posted February 16, 2023 Author Share Posted February 16, 2023 (edited) Thanks Martian..........:-) Been slow over the past couple of weeks as i've been making some 1:3 scale Spitfire parts for a UK model builder......but hope to get back on the project soon....:-) If the weather's ok next week. i'll make the glass mold of the gun cover... cheers Edited February 16, 2023 by david tilbury 1 Quote Link to comment Share on other sites More sharing options...
david tilbury Posted February 18, 2023 Author Share Posted February 18, 2023 As the weather wasn't too bad today ....quite mild for the year i made the gun cover mold. I'd had a go yesterday but it wasn't great.....so a quick phone call to Brian Wood...fellow uk scale bud......he put me straight.....glassing is something i don't a lot of.....any way hope the result works.... Used West Systems epoxy and 2 layers of light skinning cloth then 3 layers of 100g.. Also this is the first time i've seen the shape as it's a semi gloss finish.....rather than the grey/wood as before.....looks pretty good See what happens tomorrow when i de-mold... Quote Link to comment Share on other sites More sharing options...
david tilbury Posted February 20, 2023 Author Share Posted February 20, 2023 (edited) Prints came out ok, some minor work required but ready for painting....:-) Edited February 20, 2023 by david tilbury Quote Link to comment Share on other sites More sharing options...
Jon H Posted February 20, 2023 Share Posted February 20, 2023 I might need to have another go at the glass on my home made Spitfire cowl as the resin has stayed rather soft. Its not tacky and had fully cured, its just soft and the cowl is rather floppy as a consequence. I suspect it is down to my new epoxy thinner not behaving like my old one used to. I may need to hit the resin with a heat gun during the cure to evaporate it off next time. Quote Link to comment Share on other sites More sharing options...

Recommended Posts
Join the conversation
You can post now and register later. If you have an account, sign in now to post with your account.
Note: Your post will require moderator approval before it will be visible.