david tilbury Posted January 12, 2023 Share Posted January 12, 2023 I started this project some years ago and got to a point where the wings were giving me grief.....talk about that later......it's a David Andersen plan at 1:5 scale, actually free to download off his site in the US.....at 1:5 scale it has a wingspan of 114".....quite large when you think the same Fw 190 which it originated from at 1:5 is 83"......saying it originated from the Fw 190 is probably wrong as it was designed by Kurt Tank as a completely new aircraft capable of high altitudes and probably was the fasted piston driven German fighter of WW2. Only one exists not on display but in storage at the Smithsonian Museum in the US. I already fly a Fw 190-D9 and A8 at 1:5 scale so this one will complete my Fw hanger. The plan comes on 5 sheets, i bought a laser cut kit of parts from Belairkits here in the UK but not the cowl or canopy. The fuselage construction is pretty straight forward but the installation of the Sierra tailwheel assembly was a little tricky if i remember..... 1 Quote Link to comment Share on other sites More sharing options...
david tilbury Posted January 12, 2023 Author Share Posted January 12, 2023 1 Quote Link to comment Share on other sites More sharing options...
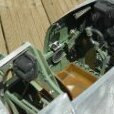
david tilbury Posted January 12, 2023 Author Share Posted January 12, 2023 Oh by the way engine upfront.....:-) 2 Quote Link to comment Share on other sites More sharing options...
Gary Clark 1 Posted January 12, 2023 Share Posted January 12, 2023 Very interesting David, looking forward to following along Quote Link to comment Share on other sites More sharing options...
david tilbury Posted January 13, 2023 Author Share Posted January 13, 2023 Thanks Gary..... Some more 1 Quote Link to comment Share on other sites More sharing options...
Ace Posted January 13, 2023 Share Posted January 13, 2023 David, fascinating subject and will be watching/lurking in the background in admiration 👍 Quote Link to comment Share on other sites More sharing options...
david tilbury Posted January 13, 2023 Author Share Posted January 13, 2023 Made the cowl pattern and laid up a glass front section, the rear veins were made by sandwich forming around a plastic bucket i found the correct diameter.....2 sheets of 1/64" ply......also there are 2 different shapes that make up the outer part which i've made open to allow cooling of the laser... 2 Quote Link to comment Share on other sites More sharing options...
david tilbury Posted January 13, 2023 Author Share Posted January 13, 2023 At the top of the cowl there is a small section with vents in .......so i printed this......i use Rhino5 for all my CAD work.... 2 Quote Link to comment Share on other sites More sharing options...
david tilbury Posted January 13, 2023 Author Share Posted January 13, 2023 The other 2 parts (rectangular shaped blocks) are flair vents which were used for identification...... the top surface of the engine cover which is very long has taken time to get right as there isn't much to go on from reference material.....but i'm happy with how it's looking next will be the gun cover behind this 2 Quote Link to comment Share on other sites More sharing options...
david tilbury Posted January 13, 2023 Author Share Posted January 13, 2023 Working on the instrument panel now in CAD.......the Ta has a slightly different panel to the Fw 190......always good to get stuck into something smaller in detail... I have a excellent book on German Aircraft Interiors which helps!..... Quote Link to comment Share on other sites More sharing options...
Nick Somerville Posted January 13, 2023 Share Posted January 13, 2023 A real bonanza of photos Dave! Lots of terrific work to admire and certainly a very interesting build and subject. It really is quite a wingspan and high aspect ratio for a warbird, so I can understand there has been a few issues keeping it all straight. Interested to know where the issue was and how you got around it. Many years ago I scratch built a 1/4 scale Bergfalke mk4 (4.3m span). Using blue foam blocks I hot wire cut the negative forms of the wings top and bottom, incorporating the required washout and blended airfoil sections. The wing was then built over the forms. Some extra work but very accurate and a much more solid base to work on compared to packing strips and rib t/e tabs. Chris Williams did a feature in Silentflight magazine on the model. Quote Link to comment Share on other sites More sharing options...
Jon H Posted January 13, 2023 Share Posted January 13, 2023 Looks great to me. I have a 1/5 Fw190a waiting its turn and i am quite looking forward to working on it when i get the time and the space. What sort of weight are you expecting for the 152? My 190 is composite and pretty porky (have seen reports online of them exceeding 30lbs!) so i am wondering if my 360v is a little marginal. My target is 25lbs, if i can hit that i will be ok as my Sea Fury is 23lbs and its fine for realistic Sea Fury like performance. I have seen a few videos of the 152 on youtube and the two i saw were hovering around 27lbs. If you can shave that down to 25 it would be ideal. Quote Link to comment Share on other sites More sharing options...
david tilbury Posted January 13, 2023 Author Share Posted January 13, 2023 Thanks Nick.....yeh talk about that wing later....:-) Hi Jon, i'm hoping around the 27lb mark.....my Sist D9 weighs about 28-29lbs with a 300v and flies great, probably my best flying model.....the Sist A8 is 30-31lbs with a 360v and that flies well.....both land like a pussy cat....no horribles etc......so at 27lbs or less the Ta will hopefully be a dream on the 300v, as it's built up i hope the weight can be reduced unlike the composite D9-A8 which you are pretty much stuck with.....although i did make new rudders/flaps/ailerons for both from wood to try and save weight something you could try... All the best Quote Link to comment Share on other sites More sharing options...
Nick Somerville Posted January 13, 2023 Share Posted January 13, 2023 The 36Ov engines sure are powerful! Those are all very respectable weights David and ideally matched to the engines from my limited experience. Had me searching for some scales to weigh up all the component parts of my 190 less receiver and batteries of which there will be four (ignition, on board engine starter and two x receiver). I am up to 29-30lbs and no paint yet or balancing additions. If my bathroom scales are half accurate I am going to be very touch and go to achieve a sub 15kg model. My hope however, is that it is still possible as with engine and cowl in place and all tail surfaces attached the model is less very close to the c of g (wings not attached). Despite the short nose the heavy engine, cowl and spinner and fairly lightly built rear seem to be in my favour, plus all of those batteries when fitted will be well up front. Quote Link to comment Share on other sites More sharing options...
kc Posted January 13, 2023 Share Posted January 13, 2023 All the David P Andersen plans are here including the 1/5 scale and also a 1/6 scale Ta152 and many other large model warbirds etc. Lots of articles there too. Quote Link to comment Share on other sites More sharing options...
david tilbury Posted January 13, 2023 Author Share Posted January 13, 2023 (edited) This will be my scheme.....'GREEN 9'....... Edited January 13, 2023 by david tilbury 3 Quote Link to comment Share on other sites More sharing options...
Jon H Posted January 13, 2023 Share Posted January 13, 2023 Thanks for the info Dave. The 190 i have is the 5th scale sist A series and i was hoping to keep the weight to 25. But, there is more to power requirement than just weight and span as my 23/4lbs and 80 inch sea fury uses all the power the 360 has, but my 23/4lb 88 inch DB hurricane is 'overpowered' using a 240v and it wafts along at half throttle while being over propped. Aerodynamic efficiency is a thing and the YT models seem to be very draggy in my experience. The DB Hurricane seems as slippery as a racing snake and certainly one of our 200 inlines would fly it even at 24lbs. But its good to know the sist model is slick enough to retain the energy and a 360 will do the work. Although i am slightly sad that i no longer have an excuse to bug the boss for my 75 or 90cc radial! Quote Link to comment Share on other sites More sharing options...
david tilbury Posted January 13, 2023 Author Share Posted January 13, 2023 The problem i had with the wing was the center section has a double skin of 1/8" balsa.....the formers for some reason didn't allow for this to happen.....so it got complicated but i think i have cracked it now.....the top sheeting now needs to be added....also the plan shows a complicated wing seat with about 3 different angles.....simplified this with one shape...also re-designed the flaps and flap bays......had some new ribs laser cut at Inwoods.....these need adding to the underside of the top wing sheet which is 2.5mm light ply...again a change by me to make the whole thing stronger...by the way the wing will finally be in 3 parts......with wing tubes which have been glued in 1 Quote Link to comment Share on other sites More sharing options...
david tilbury Posted January 13, 2023 Author Share Posted January 13, 2023 Hi Jon, You have the Sist....ok......there's no way you can get it under 30lbs i'm afraid.....you need to ditch the glass elevators/rudder and build wood ones this saves weight...foam wheel at the rear.... use the Ali hub wheels from Sierra and there gear which is fine as nothing else fits well......i have about 1.5lbs of lead up front with the laser 360....not a easy one to make light......the D9 is better and lighter and also fly's better as it's like a pattern ship.....with the long nose and longer fuz. saying that whatever the guy did with the wing section as it's not true scale it flys VERY well.....there's a video of mine flying on youtube....i'll find it cheers Quote Link to comment Share on other sites More sharing options...
david tilbury Posted January 13, 2023 Author Share Posted January 13, 2023 7 Quote Link to comment Share on other sites More sharing options...
Jon H Posted January 13, 2023 Share Posted January 13, 2023 I was looking at the control surfaces and pondering wooden ones as they must be lighter. i was going to investigate that when the time came to get stuck into the project. Now, ill grab my popcorn and watch the video. Quote Link to comment Share on other sites More sharing options...
Nick Somerville Posted January 13, 2023 Share Posted January 13, 2023 5 hours ago, Jon - Laser Engines said: . Although i am slightly sad that i no longer have an excuse to bug the boss for my 75 or 90cc radial! 😖😱😩 Quote Link to comment Share on other sites More sharing options...
david tilbury Posted January 14, 2023 Author Share Posted January 14, 2023 So progress......Laser 300 bolted in place (inverted) ...had to give clearance for the carbs which stick out about 2mm.....will have to do the same for the exhausts.....which have the extension tubes on Gun cover blank is now ready to add the bulge......rather than just add filler and discover it's wrong i thought of using some kids playdough and work out the bulge...take templates and then remove and make good with filler mirroring the other side......once all done then take a mold off and make from glass so it will much lighter... The end of the top surface still needs some work but it's looking much better... Cheers 3 Quote Link to comment Share on other sites More sharing options...
david tilbury Posted January 15, 2023 Author Share Posted January 15, 2023 So removed the playdough and glued on the soft shaped model lab board blocks and added filler some more work to do tomorrow as i ran out of car filler.... So started looking at the exhausts/cowl etc......the exhausts after a long conversation with fellow scale and club member John Carpenter are basically going where i first thought they would go on the underside.....a scale set of metal exhausts stubs would be great but the cost of metal printing at the moment is too high, maybe the future.... The baffle will work well in the cowl.....the gap between the spinner and cowl is about the same as my D9 which has the 300v in as well and has never overheated...so i'm not worried about this the rear gap is much larger... Still need to make a set of cowl standoffs... 1 Quote Link to comment Share on other sites More sharing options...
david tilbury Posted January 16, 2023 Author Share Posted January 16, 2023 Completed the laser installation today, made the clearance for the exhaust extensions from laser engines, cut out some epoxy board and recessed the fuz so to drop in.....slotted the holes to give a good clearance Once glassed these will be made good. Also brought some more filler and added to the gun cover pattern.....the shape is coming on nicely.. 1 Quote Link to comment Share on other sites More sharing options...

Recommended Posts
Join the conversation
You can post now and register later. If you have an account, sign in now to post with your account.
Note: Your post will require moderator approval before it will be visible.