All Activity
- Past hour
-
flaps created ,i used nick ziroli's flap designes with 2 panels for the center section
-
 It is. Credit to Dan and Dave, the organisers, whose time, energy and enthusiasm have taken the project forward.
 -
Don't count your chickens just yet. I still have the hinges to go yet .... Confidence is high though. This should have been attempted before noe but I was not really happy tackling it before now. Today I developed a sloppy so wot cavalier attitude about it and just got stuck in. .... in for a penny ....... Once all the strengthening and hinges are complete I may be able to tackle the cosmetics to at least pass the 3 metre rule. .... although I'm not to fussed about that as once in the air .... its all more or less out of sight. Toto
-

Spring is here again - who's been flying?
Adrian Smith 1 replied to GrumpyGnome's topic in Flying Field Reports and Chat
A brilliant way to encourage fresh blood into our hobby (or sport if you prefer), David 👍 -
Weston UK Capiche 50cc Revisited
Adrian Smith 1 replied to Adrian Smith 1's topic in Build Blogs and Kit Reviews
I have had to bow to the inevitable today and decided to do a modification to allow easier inserting and removal of the power packs. The easiest option is to remove the cross piece that holds the throttle and ignition servos for I/C variations. On close inspection is doesn't look like a structural support for the fuselage so I am going to give it a whirl. Not a long job. I was originally concerned about heaving the lipos in and out and compromising battery connections before this mod. That should do it with a bit of luck. If needs be I can always put in a new cross piece further back which won't interrupt access. -
That will be the strongest part of the plane!
- Today
-
Just thinking .... the hinges will have to be midweek at the earliest as I am off to Sellafield tomorrow not returning until Tuesday evening at the earliest. .... never mind .... no rush at it won't be in immediate use or any time soon that I can see so no drama's. Good to get it back into a serviceable position though. Cheers Toto
-
Im looking for an original Avicraft Moronic if any one has one they are looking to sell... Must be in good flyable condition
-
My Wot4 flies fine on a 4AH 4S LiPo. At least it did before I crashed it a week or 3 ago - I hope my repaired version will,too 🙂 I hope my Fokker DVIII will, too with a Turnigy G46 670 rpm/v motor and a 13x6.5" prop
-
Hi Grump, No worries ..... diluted epoxy was used. The micropore will do the job. The repair will always stand out to a certain extent even once painted. The main thing is strength and fitness for purpose I suppose. I have completed the application of the epoxy and will let it fully cure ... I'll give it at least 24 hours before tackling the hinges. As you can see, a good soaking ... As I mentioned, it will hopefully take a light sanding and a bit coverage with white paint once finished. It's not quite as messy as the camera makes it look. Next....the hinges ..... tomorrow for that .... so far so good I think ... for someone that was crapping it to have a go. Not the most cosmetically sound job but I think it will have the required strength. Cheers Toto
-

Some projects that have hit the back burner of late.
GrumpyGnome replied to toto's topic in Beginners
But..... it's going to be usable. Don't forget to check the balance of the model after you've finished. -
Some projects that have hit the back burner of late.
GrumpyGnome replied to toto's topic in Beginners
My micropore tape, from Boots is very thin - much thinner than yours, conforms to changes in surface etc. well, and doesn't need pricking because it's porous...... -

Galaxy/Pegasus Hurricane
Martin Harris - Moderator replied to GrumpyGnome's topic in All Things Model Flying
Thanks for the kind words Paul. I’m planning on a further reduction of rates (I took the position of preferring a slight excess rather than insufficient) and the tight turns aren’t a normal feature of my Hurricane flying! Although I cut out a lot of the taxying in the video, it was totally uneventful even with a stiff downwind component. I’m tending to come round to Jon’s ideas on warbird handling with the CofG significantly rearward of the plan position. I wimped out of further testing yesterday due to a nasty wind direction for our site…once bitten… -
Some projects that have hit the back burner of late.
GrumpyGnome replied to toto's topic in Beginners
Sorry toto, just noticed that GG is wood glue. Use the epoxy. -
OK..... I've went with micropore ..... wrapped around the piece with the fracture centred beneath it ..... And ..... And ...... You get the picture. My next step was to make a series of puncture marks all over the surface area of where the micropore covered using a sharp scalpel. ..... not digging holes .... just puncturing the micropore and just into the foam. The idea being to let the diluted epoxy ( which is what I am going to go with ) penetrate the micropore into the foam to help key the materials together. The diluted epoxy ( diluted with IPA ... Isopropyl alcohol ) will run into the puncture marks through to the foam for a better grip. We will see what the end finish is like and if necessary, the surface may be good enough to take a light sanding. The epoxy will be brushed on then left to set. This will just leave the two pieces to be mated with the hinges. More later. Away to mix the epoxy. Toto
-
Next up is looking at strengthening the surface cracks. I have found the micropore to be a bit on the thick side although not ruling it out. I hade thought of some kind of bandage or gause impregnated with CA or watered down epoxy using IPA to thin it out. The bandage ( typical first aid box variety ) is really just a sort of thin netting to take the adhesive ( whichever variety ) and bridge the surfaces giving a hard finish a bit like cataloy. ..... Not sure. If I applied the bandage ( whatever ) I would put little pin pricks through the bandage into the foam to give channels for the watered down expoxy somewhere to flow and grip the foam ..... ideas on a psotcard .... another 5 or 10 minute intermission. toto
-
What a time for the laptop and the camera to have a fight. OK here is what I have done .... rightly or wrongly. Using .... Apologies for the slanty photos. I'm using my pad for the first time and have not quite mastered it in termsof changing photo orientation. Still .... I'm sure you get the picture. Back soon Toto
-
Can anyone identify what this model is please?
-
No need to drill into the foam, just push your gluey sticks into it and it will be a nice firm fit.
-
Some projects that have hit the back burner of late.
GrumpyGnome replied to toto's topic in Beginners
In my experience, GG clear and epoxy are on a par - no mixing with GG of course. @toto that looks about right, either of the larger ones - the middle sized one will allow for greater drilling inaccuracies 🙂 P.S. the piece in question is an elevator, not a wing. 9 P6 -
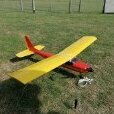
Something like this on 4 cells would be fine.
-
So, I have drilled two initial pilot holes really just as it will be easier to penetrate the plastic with a thinner drill for the first time. I will have to redrill them with a thicker drill to match the chosen wood section diameter. I could maybe get away with a third hole. I'll think about that. maybe one at more of a diagonal attitude. To give an idea how far the drill has penetrated .... and the other. I will need to go an see what other drills I have as I want the wooden sections to be a comfort fit once the glue or epoxy has been applied. ( still undecided ) I am still leaning towards the epoxy since I dont have the gorilla brown glue. more as it happens. toto.
-
OK ......... In the shed ....... here is what I have in my armoury for today .... so far. First up ..... the all important dremmel .... a selection of various types of potential stiffeners from cocktail sticks .... upwards .... some glues ... but no Gorilla brown .... some epoxy if favoured ..... some micropore ...... and to give you an idea of the sectional sises of the wooden sticks ..... and the areas that I intend to utilise the micropore for .... and the other side .... I would also like to fill in the slots where the wing hinges previously were ..... and ..... I'd fill these in as using the fresh areas of foam in between, may weaken the entire edge of the foam. so my intention is to cut the fresh slots for the new hinges and fill in between as I go. I'll have to think what I will use to do that. maybe just neat epoxy itself as when it hardens, it will be as good as anything. I will be spending about 10 minutes before starting to think out my plan of action but think I will start with drilling a couple of holes through the plastic former along the wings length to insert the wooden strengthening sticks. So ...... if you want to chip in telling me why this approach is wrong ..... better make it fast. now ..... for a coffee and a ponder. cheers toto