Ron Gray Posted May 25, 2020 Share Posted May 25, 2020 Thanks for your input to Bob, much appreciated as you guys have already gone through the process. I'm still waiting for eta glue to set on mine before I decide if sticking to the cowl is the way to go! I did also think about 3D printing that section instead of balsa but it's quite a complex shape so probably a tad advanced for my basic 3D design skills! Quote Link to comment Share on other sites More sharing options...
Ron Gray Posted May 25, 2020 Share Posted May 25, 2020 Have gone ahead with the balsa stuck to cowl approach, needs final sanding and then glassing. Quote Link to comment Share on other sites More sharing options...
Tim Flyer Posted May 26, 2020 Share Posted May 26, 2020 Hi chaps sorry I made a mistake above . On my build what I should have said is that I stuck the blocks onto the fuselage (not the wing) . I remember it being a bit of faff. Like Ron I also had to add Additional blocks to the inner leading wing edges as I had also forgotten to extend the leading edge Or sanded too much away Edited By Tim Flyer on 26/05/2020 09:45:35 Edited By Tim Flyer on 26/05/2020 09:46:06 Quote Link to comment Share on other sites More sharing options...
Tim Flyer Posted May 26, 2020 Share Posted May 26, 2020 Very neat work Ron . Adding the blocks to the cowl looks good too . This is one of the real “head scratching” bits on this build as the block profiles are quite complex. Edited By Tim Flyer on 26/05/2020 09:50:59 Quote Link to comment Share on other sites More sharing options...
Nigel R Posted May 26, 2020 Share Posted May 26, 2020 That fairing looks like an 'interesting' shaping job, was it a sandpaper-round-the-finger job, or something more serious? Quote Link to comment Share on other sites More sharing options...
Ron Gray Posted May 26, 2020 Share Posted May 26, 2020 Balsa blocks were stuck to the cowl using Gorilla Glue with the wing in place (masking tape to prevent sticking to the wrong parts!) then sculpted using permagrit block then final curves using sandpaper around various sized bits of dowel and final sanding with very fine sandpaper on finger tips (can feel the edges). Quote Link to comment Share on other sites More sharing options...
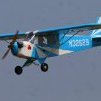
Ron Gray Posted May 27, 2020 Share Posted May 27, 2020 The tailplane was checked for level using my Smart Angle and it only needed a couple of passes with the sandpaper to get it spot on. The rudder was next and that completed all of the major parts assembly. More balsa infill pieces, this time to the fin / fuse junction as well as more to the wing. I also sprayed some primer onto the cowl moulding to get a better idea on the finish And the obligatory trial fit. And finally, the first piece of laminating film goes onto the wing. My roll of film is only 300mm wide so there has to be a join which will be feathered so hopefully won't be that obvious. Edited By Ron Gray on 27/05/2020 22:27:23 Quote Link to comment Share on other sites More sharing options...
Peter Jenkins Posted May 28, 2020 Share Posted May 28, 2020 Ron, that wing/cowling fairing has come out looking top drawer. Well done. It's always the little bits that take so much time! Quote Link to comment Share on other sites More sharing options...
SR 71 Posted May 28, 2020 Share Posted May 28, 2020 Hi Ron where did you buy the Smart angle from, just looked on their web site but it dose not say Tony Quote Link to comment Share on other sites More sharing options...
Ron Gray Posted May 28, 2020 Share Posted May 28, 2020 @Peter - very pleased with the way it turned out! @Tony - I got mine from Wordcraft, [email protected]. I use it with 3D printed parts for measuring, amongst other things, wing incidences. Quote Link to comment Share on other sites More sharing options...
Ron Gray Posted May 28, 2020 Share Posted May 28, 2020 First job today was to finish the wing covering off, covering always seems to take me ages! But then I did do other things like fit the wheel wells and then onto some 'scale' detail, the silver you can see in the next photo is aluminium tape representing the two service panels in the wing. I also sprayed some red primer onto the wing tips to see how obvious the film join is (not too bad as it turns out). Mustn't forget the root LE air intakes. I have been pondering over the tailwheel. I certainly wasn't going to add too much weight by making it retractable but I do like steerable tailwheels, so that was the plan. But like all good plans they can be changed and at the last moment I did just that and made it into a semi casting one; semi in that the wheel can rotate through about 15 degrees. Not tried one before but thought that it may give a bit of ground handling unlike a fixed one. I cut through the balsa undersheeting and let in the ply base. And this was sanded in situ before fitting the tailwheel assembly. I used a piece of nylon tube as a bearing for the wheel. Assembled and glued in place. And some final balsa sculpting to finish off the underside of the fuse. Whilst looking at photos of the full size I realised that there is a fillet between the fin and tailplane so I've stuck in some triangle strip which will be sanded to a concave profile tomorrow. So, with a bit of luck I will cover the fuse tomorrow and then some more detailing (not too much as this is only a sport scale model). But the paint phase is rapidly approaching so I better hurry up and decide on the colour scheme. I can probably get on with priming it using Halford or similar rattle cans as I can get some delivered to me (I'm still in lockdown mode). Quote Link to comment Share on other sites More sharing options...
Ron Gray Posted May 31, 2020 Share Posted May 31, 2020 Some progress! The fuse got covered in laminating film, the most difficult bits being the concave curves on the wing fillets. I decided that the under belly radiator / air intake as shown on the plans and the moulded mouth piece provided were a little on the large side so over to the 3D printer. The advantage of doing it this way was that I could incorporate the wing fixing bolts which otherwise would have got in the way. Then covered with aluminium tape (will be primed and painted). Following on from the aluminium tape applied to the wings to simulate the access panels, I did the same thing for the fuse, before starting the priming works. 'scuse the crocs in some of these photos! A close look at the fuse service panel. I then spent many, many minutes masking the canopy and then priming it. Other jobs completed, no photos, the wing has been primed and rubbed down. The fuse has had the aluminium tape treatment to the forward section (the full size had metal panels forward of the cockpit) and new gun blisters were 3D printed as I felt that the ones supplied were a little on the large side. The problem I now have is that the finish is too good! Now that I have rubbed down the primer the surface is silky smooth so I've got to think of a way to 'distress' it a bit, to make it look like it has been in many battles. The primer has also helped me locate areas where the laminating film was not fully shrunk / ironed down. Whilst I really do like using the laminating film, being clear and very glossy it is sometimes difficult to see wrinkles, but the primer makes them stick out! Fortunately there were very few and were easily got rid of with the sealing iron. During a break in proceedings I took this shot of our wild flower meadow which we planted in place of some of our lawn last year. Edited By Ron Gray on 31/05/2020 20:36:37 Quote Link to comment Share on other sites More sharing options...
Ron Gray Posted May 31, 2020 Share Posted May 31, 2020 I've been asked about why I'm using the aluminium tape. Well the main reason is that when I weather the finish in some areas, like the hub blisters, the underbelly radiator and the canopy I will rub through to the base and I want it to look a bit like metal. The other reason is that it is easier to make impressions in it to look like fixings, as can be seen on a couple of the photos above of the fuselage service panel. Of course the whole thing may end up looking like a dog's dinner, we shall see! Quote Link to comment Share on other sites More sharing options...
john stones 1 - Moderator Posted May 31, 2020 Share Posted May 31, 2020 Coming on nicely Ron, like your plot given over to wildflower meadow, Council seeds a lot near me, nice change from the bedding plants. Quote Link to comment Share on other sites More sharing options...
Ron Gray Posted May 31, 2020 Share Posted May 31, 2020 Thanks John. Topcoat paints should be here by the middle of the week so hopefully have it all painted by the end of the week. Wildflower meadow is great as I can use the paths through it as an fpv course for my quads! Quote Link to comment Share on other sites More sharing options...
Adrian Smith 1 Posted June 1, 2020 Share Posted June 1, 2020 Lovely handiwork, Ron. When do you get time to fly doing all this work? Quote Link to comment Share on other sites More sharing options...
Ron Gray Posted June 1, 2020 Share Posted June 1, 2020 Thanks Adrian, that's the beauty of the lockdown, I'm not going out at the moment! Anyway, here are some more photos showing the aluminium foil to teh front of teh fuse plus the obligatory semi assembled photo shoot. Just had a delivery of my paint (incredibly quick delivery) so should be putting some topcoat on later on today!!!! But I must do some more surface distressing, even the aluminium foil areas need some more! Edited By Ron Gray on 01/06/2020 11:20:34 Quote Link to comment Share on other sites More sharing options...
Nigel R Posted June 1, 2020 Share Posted June 1, 2020 Looking very smart. Love the wing bolt / radiator fairing widget. How did you handle the film on the wing fillet? I've been put off doing fillets because of the concave curve and not seeing an obvious way to do it with heat shrinks, but you've clearly found a way... Quote Link to comment Share on other sites More sharing options...
Ron Gray Posted June 1, 2020 Share Posted June 1, 2020 I use different size / diameter bits of copper/alloy tube/rod. I then cut a strip of film to cover the fillet, tack it in place with the covering iron onto the fuse then heat the tube with a hot air gun and use that to apply the heat to the film in the concave shape. I also use a very small nozzle on a small heat gun I got from Hobby King to heat the film then use a cloth to smooth into place. Quote Link to comment Share on other sites More sharing options...
john stones 1 - Moderator Posted June 1, 2020 Share Posted June 1, 2020 Love the shape of It, the tail ends magic. Quote Link to comment Share on other sites More sharing options...
Peter Jenkins Posted June 1, 2020 Share Posted June 1, 2020 Excellent work Ron! Full marks. Quote Link to comment Share on other sites More sharing options...
Ron Gray Posted June 1, 2020 Share Posted June 1, 2020 Thanks Peter, now onto fixing control surfaces and top coat paint! One thing I'm not sure of but can hazard a guess. I assume that the paint was applied with a brush back in WW2 so the junction between different camouflage colours would have been a fairly sharp line. I must admit that I don't like that so was wondering about a more 'blended' join using a soft mask rather than a hard one. Quote Link to comment Share on other sites More sharing options...
Ron Gray Posted June 1, 2020 Share Posted June 1, 2020 Just been playing around and designing a 3D printed dash, on the printer at the moment. Quote Link to comment Share on other sites More sharing options...
Bob Cotsford Posted June 2, 2020 Share Posted June 2, 2020 Ron, looking at images and historic film on Youtube I'd say that they came out of the factories with an unmasked sprayed paint scheme with the only sharp line being the separation between the blue underside and grey/grey upper surfaces on the rear fuselage. Light/dark area separation looks very soft, an unmasked touch-up gun could well give an accurate representation it's that indistinct on some aircraft! What happened with field repaints though is anyone's guess. Quote Link to comment Share on other sites More sharing options...
Ron Gray Posted June 2, 2020 Share Posted June 2, 2020 I think that you are right Bob. The photos that I’ve seen tend to be black and white ones of the grey / grey ones and as you say, the separation is quite blurry. The colour scheme I’m doing is based on some reports I’ve read about dark brown / light brown schemes mainly from squadrons in the South do I will use a soft mask / unmasked spray apart from where it meets the underside blue. Quote Link to comment Share on other sites More sharing options...

Recommended Posts
Join the conversation
You can post now and register later. If you have an account, sign in now to post with your account.
Note: Your post will require moderator approval before it will be visible.