david tilbury Posted May 4, 2023 Author Share Posted May 4, 2023 (edited) Started spraying today, using my trusty old IWATA airbrush at 1 bar, this helps when the mask is over uneven surfaces, trying to spray perpendicular to the mask, also you only need to extend the mask about 30mm all around as there isn't any over spray... More to follow Edited May 4, 2023 by david tilbury Quote Link to comment Share on other sites More sharing options...
david tilbury Posted May 4, 2023 Author Share Posted May 4, 2023 (edited) Static prop blades near complete.......just the back face to add the yellow tip.... Edited May 4, 2023 by david tilbury 1 Quote Link to comment Share on other sites More sharing options...
Nick Somerville Posted May 4, 2023 Share Posted May 4, 2023 Wow, such tiny stencils. Looks perfect! Quote Link to comment Share on other sites More sharing options...
david tilbury Posted May 5, 2023 Author Share Posted May 5, 2023 (edited) Thanks Nick.....roundels complete, had to mix some blue as the Humbrol wasn't quite like the photos.....don't ask what %.....not sure.... Pitot finished, used water based paints for this, as being electric.....doesn't matter... Need to draw out the top chamo soon.... Cheers Edited May 5, 2023 by david tilbury 4 Quote Link to comment Share on other sites More sharing options...
david tilbury Posted May 9, 2023 Author Share Posted May 9, 2023 (edited) Nearly finished the static prop today, made an error with the position of the locking screws so filled and made new ones, also added the flush rivets and made some new 'LOCKED and UNLOCKED' stencils......so painted these in yellow like the full size.....the locking screws are gloss on the full size so now these are dry i'll glue in the holes..... Edited May 9, 2023 by david tilbury 1 Quote Link to comment Share on other sites More sharing options...
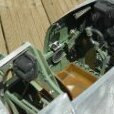
david tilbury Posted May 22, 2023 Author Share Posted May 22, 2023 (edited) Been on holiday so not much happening but made a start on the final cockpit installation before final canopy fix......once this is done i can do some minor things before making a C of G check......the paint won't add much..... Sprayed the wheel wells with interior green as well having found out this is what's on the full size......finished the seat belt stay behind the seat former....and glued the rear canopy with clear canopy glue....door tomorrow..... Also wasn't happy with the spinner where the center section met the base, somehow in the printing it's opened up slightly on the diameter so had to add 1mm all around the base diameter with ply.....seems to have worked ok.. Edited May 22, 2023 by david tilbury 5 Quote Link to comment Share on other sites More sharing options...
david tilbury Posted May 24, 2023 Author Share Posted May 24, 2023 Canopy glued.......had a session this afternoon filling the old upper mid fuel tank filler and vents, RM927 doesn't have them, so now replaced with the new one, also a large round inspection hatch added, hatch on side of front cowl hidden switch location 2 Quote Link to comment Share on other sites More sharing options...
david tilbury Posted May 26, 2023 Author Share Posted May 26, 2023 (edited) Edited May 26, 2023 by david tilbury 11 Quote Link to comment Share on other sites More sharing options...
Chris Freeman 3 Posted May 26, 2023 Share Posted May 26, 2023 Stunning! very nice. Quote Link to comment Share on other sites More sharing options...
GrumpyGnome Posted May 28, 2023 Share Posted May 28, 2023 Is the hole behind the cockpit for a camera - i.e. a reconnaissance Spitfire? I thought they were de-armed..... but happy to be educated better. Quote Link to comment Share on other sites More sharing options...
paul devereux Posted May 28, 2023 Share Posted May 28, 2023 53 minutes ago, GrumpyGnome said: Is the hole behind the cockpit for a camera - i.e. a reconnaissance Spitfire? I thought they were de-armed..... but happy to be educated better. Puzzles me too. Doesn't seem a logical place or angle for a camera. Quote Link to comment Share on other sites More sharing options...
Ron Gray Posted May 28, 2023 Share Posted May 28, 2023 Bank and shoot! Quote Link to comment Share on other sites More sharing options...
david tilbury Posted May 29, 2023 Author Share Posted May 29, 2023 (edited) Thanks Chris...:-) Yes, you are correct, the small window behind the cockpit is for a camera, same the other side, no underside cameras, plus it has guns.....Mk XIVe FR...now in France..... Edited May 29, 2023 by david tilbury Quote Link to comment Share on other sites More sharing options...
david tilbury Posted May 29, 2023 Author Share Posted May 29, 2023 (edited) Edited May 29, 2023 by david tilbury Quote Link to comment Share on other sites More sharing options...
GrumpyGnome Posted May 29, 2023 Share Posted May 29, 2023 Interesting variant... Quote Link to comment Share on other sites More sharing options...
david tilbury Posted June 6, 2023 Author Share Posted June 6, 2023 (edited) So been a while since last posting....holidays etc.....plus the weather for the past 3 weeks or so has been windy.....too windy to be painting outside so decided to sponge most of the top chamo and today in the workshop just sprayed the break lines between the dark green and ocean grey.......once dry i'll make a start on the yellow leading wing edges and roundels...... The panel detail is looking ok as well painted.....which i'm pleased about... Edited June 6, 2023 by david tilbury 6 Quote Link to comment Share on other sites More sharing options...
david tilbury Posted June 6, 2023 Author Share Posted June 6, 2023 (edited) To simulate the rough walkway which is only on one side of RM927 i used a decorative paint found in any of the major DIY stores here in the UK.....again sponged on, i spray some in a dish then sponge it onto the surface of the wing......this gives an uneven finish which i saw on a Mk XI Sunday at Duxford......i hate seeing sand paper glued on a wing....plus using the decor paint it goes over the hatches and small panels like the full size.....anyway that's my 50 cents worth... The walkway will end up being black like the full size Edited June 6, 2023 by david tilbury Quote Link to comment Share on other sites More sharing options...
david tilbury Posted June 7, 2023 Author Share Posted June 7, 2023 Working from the rear forward.....sprayed the nomenclature on the rudder and underside of the elevators and tailwheel doors.....added the blue and red to the fin... 4 Quote Link to comment Share on other sites More sharing options...
david tilbury Posted June 8, 2023 Author Share Posted June 8, 2023 (edited) Sponge painting ok not rocket science but quite effective......not a technique i would use all the time but under certain conditions you get constant results Ideally i would love to spray paint everything, i guess the same as everyone else but with the bad weather here at the moment in the UK....wind and more wind not great for spraying! i've had no choice as i want to finish the model.... using a paint brush as you know can leave horrible brush marks, sponging doesn't, you get a solid colour depending on the paint you use, no over spray, etc. To apply the paint cut a small piece of sponge, the type of sponge is quite important, you need one with a close surface not like a natural sponge, apply the paint to the sponge with a brush and start dabbing the surface you want to cover. I have painted the surface first on larger areas, say 2" square with a brush and then dabbed while the paint is wet, it's surprising how much surface you can cover with little paint, at a guess i've used 7 tins of humbrol paint to paint the model which when you take away the weight of the tin and add just the paint it's not a lot. Edited June 8, 2023 by david tilbury 4 Quote Link to comment Share on other sites More sharing options...
Jon H Posted June 9, 2023 Share Posted June 9, 2023 dont you end up with a textured finish using the sponge? i have used them in the past for grubbying up models and for weathering and i always got a textured finish. It didnt bother me as i would flat it with wet n dry, but still Quote Link to comment Share on other sites More sharing options...
Paul De Tourtoulon Posted June 9, 2023 Share Posted June 9, 2023 Or just a coat of mat varnish will make it disappear with the brush marks. Quote Link to comment Share on other sites More sharing options...
dave parnham Posted June 9, 2023 Share Posted June 9, 2023 Thanks to Dave Tilbury for the Tip ive tried this yesterday on a cambrian Me109 Wing. It does work on the solartex i used very well but i convinced myself the colour wasnt quite right. So today i brought two small spray cans that cost me £15 !! in a slightly better colour. Thing is i cannot tell the difference between the two paint jobs except the spray was much quicker. Quote Link to comment Share on other sites More sharing options...
david tilbury Posted June 10, 2023 Author Share Posted June 10, 2023 Hi Jon, Would never use a sponge for weathering but that's just me.....nope no texture depends on the sponge used i guess. We all have our ways when it comes to painting, not saying mine is the best by a long shot but i get the result i want......the below was sponged yesterday.....if you want i can take a real close up of the surface Hi Paul, never been happy using a brush for painting, i do remember Brian Taylor did when i asked him years ago, saying that i did on my Fokker Dvii with the streaked pattern as the full size was painted the same with a 8" brush. Hi Dave, Yes spraying is quicker but with the wing lately just couldn't do it outside......so this was my only option, i did buy a proper paint mask which i used so in the future this maybe the road i take. 2 Quote Link to comment Share on other sites More sharing options...
david tilbury Posted June 17, 2023 Author Share Posted June 17, 2023 (edited) So, final stages now....all the painting is finished....yippee.......need to add some satin Humbrol varnish.......but big question...weathering, i tried some tests the other day and wasn't happy with the result.....the full size is a fully restored example.....no bullet holes here...but....it has a patina look.....probably not the correct word but the paint doesn't look new.....i need to do more testing....i think once the surface is sealed with the satin it may take a light wash..... Rudder needs gluing, retracts testing and finishing....motor tests and the all important CofG.....with my new Vanessa rig. Edited June 17, 2023 by david tilbury 4 Quote Link to comment Share on other sites More sharing options...
Adrian Smith 1 Posted June 17, 2023 Share Posted June 17, 2023 (edited) All I can say is wow!! Just brilliant 👏 Edited June 17, 2023 by Adrian Smith 1 1 Quote Link to comment Share on other sites More sharing options...

Recommended Posts
Join the conversation
You can post now and register later. If you have an account, sign in now to post with your account.
Note: Your post will require moderator approval before it will be visible.