Leaderboard


Popular Content
Showing content with the highest reputation on 26/04/24 in all areas
-
Mother in law was reading the Omen and said it was the most frightening book she had ever read. In fact she never finished it. She took it to a local lake and threw it in. I went straight to a book shop and bought another copy, ran in under the tap and left it on her bedside table. Think I’m going to hell for that one.8 points
-
Nipped out to maiden the 2m RES Mirai I've just finished. I've decided to have a go at some of the FxRes comps' this year, particularly as Kent Interclub is running it's own league for the first time. Some trimming needed but it went well in damp and windless conditions. I got the AUW down to 540g, whether that's enough we'll see.5 points
-
Unfortunately my wife opened the letter with Richard’s Tempest order form in. She said, ‘ Don’t you think you have enough planes in your garage Piers?’ (I think it was a rhetorical question 🤣) Next time Richard mark the envelope ‘HMRC’, she won’t open that! Anyway, cheques in the post, as they say.2 points
-
Or at all. Every sliding canopy i have ever seen has done one thing, and one thing only. Fall off. They look cool, but every one i have ever seen has made a bid for freedom in short order!1 point
-
Following on from my previous thread about the Li-ion chargebox that I use for fast-charging my LiPos at the patch, I thought it may be useful to do a long term 4C charge rate test on the LiPos that I'm using: cheap-as-chips Turnigy Heavy Duty 6S 3300mAh 60C that were about £38 each when I bought them in 2020. As I tend to have lots of flights each time I go flying, and often fly alone or with only one or two others, my recently introduced charging-at-the-field regime relies on charging at an elevated C rate for a fun day's flying rather than a day hanging about waiting for batteries to charge. A lot of people have told me that this will result in reduced battery life but none of them can say how many cycles I should be getting, nor by how much this will be reduced when charging at high C rates (and I will ask these questions). It seems that nobody's actually tried it to find out, outside of RC buggy bashing where it's absolutely the norm, and much of the info I get quoted at me is from 15-20 years ago when things were definitely different. I want current, empirical evidence! So I went and got me some. I fly aerobatics, so at times I'm using a decent wodge of throttle. In F3A circles it seems that 100 cycles is considered about normal and 200 cycles is good. I had a pair of 3300mAh 6S packs that had about 200 cycles already on them at a 1C charge rate, so decided to sacrifice them in the name of science and immediately formulated a totally unscientific test: that from now on they shall be charged at 12 amps until they die. It's a minute sample size. There's no control. It's anecdotal. It's a really rubbish test but it is a real world evidence gathering exercise, done by Joe Punter having a rummage and sharing what comes up for whatever it may be worth. As my aerobatics aren't as power intensive as they are in F3A I figured that I should aim for double the number of cycles, so the aim of this shoddy, so-called "test" was to put another 200 cycles on each battery, only this time charging at 12A not 3.3A. (Mods - feel free to change the thread title to "Charging LiPos at 3.6363636363636363C" but I don't think it's quite as snappy) The rules: LiPos are only charged to 4.17v (aka "90%" but please use voltages!) and discharged to 3.80v (aka "50%"), which gives me a 7m30s flight +/- 0.05v, with roughly 1750mAh going back in. They are charged immediately before flying and then flown back down to 3.80v, so the whole charge/discharge cycle is about 20 minutes. On Johnny Nomates flying days they are put on to charge as soon as they come out of the plane while I go and fly what's just come off the charger - so no "cooling down" period - then rinse and repeat until brain-fade or nightfall sets in. The idea with the chargebox was that I could fly almost non-stop almost all day on any plane in my vast all-electric hangar while only owning two (sets of) LiPos for that plane. If only I'd thought of it before buying several LiPos for each plane I own... Anyway, going forward, it's definitely the way I'm doing it from now and I'll just have to try and insert a memory block about the dozens and dozens and dozens of LiPos that I never needed to buy over the years. If you're new to electric flight: put together a chargebox and buy one high-C LiPo per plane you own (but only if it takes different batteries to the rest of your hangar!) - it's the best advice I can possibly give you and will save you hundreds of £s - maybe thousands if you ever seriously move on to 10S or 12S - and keep you flying when everyone else is going home because "I've used up my battery". What's that saying... "The answers to all of your questions are written at the bottom of a 100 gallon drum of fuel." (there is no electric version of that quote, so it shall remain forever I.C.) I digress. I started the test in August and so far (11th April '24) they've done: 440 flights in a 6S 60" EF Slick - last year's pulled-the-short-straw autumn/winter hack & the most bonkers plane I've ever flown. Currently modelling the "several oz of mud" scheme. 10 flights in a 12S 74" EF Laser (10x2 packs) 50 flights in a 12S 74" EF Edge (50x2 packs) = 560 cycles ÷ 2 batts = 280 cycles each @ 12A, plus what they started with back in the days of 1C charging, so these two batteries will each be at 500 cycles by the end of this month and there's simply loads of life left in them yet. If this is the reduced battery life that people are telling me about then I'm fine with it - it's 1½p per (6S) flying minute, including charging up the Li-ions, and that's coming down all the time until they finally expire. They're not showing any signs of stress at all yet, though I never bother trying to measure capacity because it's going to take a long time for me to notice any reduction, given that I only use the 50% in the middle anyway. Internal Resistance is 1.1 to 1.2mΩ per cell (@19°C @24v pack voltage), which is what they settled down to after around 20 cycles and have remained at ever since. So, unless I've fortuitously bought the Willy Wonka Golden Ticket LiPos that are full of magic beans, I'm beginning to come to the conclusion that charging at high C rates is doing very little, if any, harm at all, and that battery damage is far more likely to come from charging all the way to 4.2v, poor throttle management, using the wrong C rating for your flying style, or "It says there's 14% left, so that's okay" which almost certainly means that you've actually just ruined your battery (I said use voltages!). I'm not having a go - I've been all of these people, which is why I've bought so many LiPos. You pays your money... I have another test going on, with four Zippy 6S 4500mAh 40C batteries, that's parked at the moment on 40 x 15A cycles each (not flying those planes just now) that is showing identical results, though I'm not drawing any firm conclusions until getting 200 extra cycles on them, which if they manage it will take them over 600 cycles. Tests are ongoing and I'll report back with more interesting info/tedious waffle. A future test will be to try this with a new battery - is it the 200 cycles at 1C that's somehow making it resilient to a higher C charge later on (chemically unlikely, I'd say), or can it sustain this kind of "abuse" from new? In the meantime, I'm trying to find out - ideally in layman's terms (no equations!) - whether the asymmetric process of reversible intercalation is at a fixed or variable ratio. In other words, does a high C rating for discharge automatically equal a proportionately high C rating for charging too? Surface area of the lattice seems to be key, which explains why high C batteries are bigger and heavier, but I'm not sure if the processes are exactly the same, just reversed, for insertion and extraction to/from the lattice because I'm rubbish at chemistry. Any electrochemical engineers out there?1 point
-
I struggle to get 50+ cycles out of my 2200maH lipos which are charged at 1C and have a very easy life.1 point
-
I cut any balsa strip I need from sheet using a table top band saw. Far more versatile than the circular blade saws and IMO just as accurate if kept well fettled and decent blade/band. My current one came fro Axminster tools probably 10 years ago, time fly's, I use it for all sorts of wood and it goes through birch ply up yo 10mm thick like a hot knife thtough butter. It also has a tilting table, very handy for cutting triangle strip. Blades easily available on ebay Might be worth a look . Axminster used to sell Proxxon tools , possible still do but are expensive and have a very limited capacity wheras the band saw will handle stuff up to 50mm +. Apart from being used constantly for modelling jobs it often gets used for home DIY.1 point
-
Thanks cheque's in the post1 point
-
Yes, a tilting table is valuable. Thats the problem with the cheaper models, lack of a tilt. I have a cheaper one how I know. I have had full size models in the past so have some experience in use. Bas1 point
-
Many thanks to the lad's. Cheque in post to cover their Haribo cravings!!1 point
-
My two 6S 3300mAh LiPos reached 500 cycles each today: 200 charges at 3.3A + 300 charges at 12A This means 6S flying = 1½p/min, 12S flying = 3p/min, which breaks down as: LiPo replacement @ 500 cycles (70%), Li-ion replacement @ 4 years (20%), 75kWh electricity p/a to recharge the Li-ions (10%) - only I haven't had to replace any LiPos or Li-ions yet, but that's how the budget looks as of today I'd have to fly a 6S plane for 3h20m before it cost more than the £3 of petrol to get to the field and back, so it's all academic now - if I could just stop buying planes Anyway, it's not about the money, it's about charging at 4C, which they seem to be consistently shrugging off as a non-event1 point
-
Nigel.Don't use the Uhu as a contact adhesive unless you can garrantee getting the position right first time, For a job like that I usually coat the ply, put it in position, making sure it can't move and leave it overnight.1 point
-
I think my favored method would be to use carbon strip, say 1mm wide and 3 or 4mm deep, glued into the foam, most likely using foam safe cyno but definitely use carbon to add strength.1 point
-
We 'enjoyed' our first thermal comp (F5J-ish) today. The wind was on our declared limit (14mph) when we started, but by the time we had completed 4 rounds it was gusting 33mph! And yes, there were thermals to be had, whistling down wind past us. No models were damaged so after some celebratory coffee and cake we went home happy 😁 Tom1 point
-
I have had a Proxxon for about 5 years, the most useful feature for me is the ability to tilt the cutting blade. This makes cutting strip balsa with beveled edges for planking very easy and fast. Suddenly planking becomes a pleasure 🙂1 point
-
I use it regularly for balsa and ply, all thicknesses.1 point
-
Now all back together. Hole? What hole. A new "heavy" nose cone printed in double wall PLA rather than a single wall in LW-PLA. It also has 5g of lead in it so 13g rather than2. The CofG is now still further forward. It looks crazy but it flew impossibly tail heavy at the left hand mark (25% mean chord). Still flew tail heavy at the middle mark (18%). The right hand mark is at about 12%. I just have to accept that the long relatively bulky forward fuselage compared to the tiny wing creates a substantial nose up pitch at the normal angle of attack for such a light weight low powered plane. The final modification will be to cut down the full span ailerons as the roll sensitivity is much too great. Even the gyro can't control it at the moment.1 point
-
Also when updating the firmware the printer needs all its E steps, probe off sets etc resetting1 point
-
Try using the custom build page and make sure you have all the correct printer info entered. Also have you disconnected the z stop microswitch and from within the firmware builder selected to use the bltouch in its place. There is a lot of settings available from within the custom build page that are not available from the free download link, for a few dollars donation I find its worth it. Also check you have connected the bltouch correctly. I have the CR touch which is connected differently. It's usually something missed in either connecting up or firmware that causes issues.1 point
-
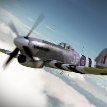
Its all about creating a model that looks far more detailed than it really is . That suits these two entry level kits because they are supposed to be quick build, no fuss models , but that doesn't mean they have to look ordinary . Im still waiting for exhaust stacks before I call it a day . Also got to give the rudder an impression of fabric covering .1 point
-
In the last picture above , you can see that a lot has happened since picture one . So lets explain how to follow . (In fact if you visit the FW190 thread , there is quite a lot about weathering effects ). The lines were drawn as you saw . Then the little rivets added . The model would still look too toy like and clean . So what we need to do is make each panel jump out . On the full sized aircraft each panel would sit slightly differently and collect dirt and wind differently . The up shot of that is, that dirt stain would appear downwind of a panel line . So what I do is put a piece of masking tape along the panel line on the "upwind" side and then smudge some charcoal from the tape backwards towards the trailing edge . Sometime a circular motion with your finger works best , going onto the tape to pick up the black dust and then round onto the lower panel. When you pull the tape off , the panel will appear as an individual piece . If the panel line crosses a black stripe or other dark area, you can use white chalk in the same way . The other thing you will notice is the silver . It is just one of those "shaker pens " with a little ball bearing in . The silver sort of runs out like little blobs when you press on a surface . What I do is dot a little paint on , then quickly smudge it for and aft of the model . It simulates the way the plane would wear if people slid over the wings . The edges are also very effective . You just blob the edge , smear it along the edge very fast then drag the paint with your finger toward the middle of the wing . You can imagine pilots and ground crew constantly chucking parachutes with buckles and other scratchy kit onto the wing skin .1 point
-
Have a look at this video.....1 point