Leaderboard


Popular Content
Showing content with the highest reputation on 02/02/22 in all areas
-
Yup, that is MUCH faster than my Windbag! It might be because the Windbag has much wider horizontal strakes (where the wings on any right minded design would be) which enable it to 'lay on the air' and give some semblance of lift, enabling it to fly slower? What I find with the Windbag is that the rocking motion only really occurs when you try and control the model in any way - leave it to its own devices and it settles down after a few seconds. One theory is that the underside of the octagonal fuz is a bit like a very small wingspan with a huge amount of polyhedral and the rocking is in actual fact extreme Dutch roll...... I'll leave it to the aerodynamicists amongst us to argue the pros and cons of that one! As for tailerons - DO NOT TRY TAILERONS!!!! Some others have tried them, and the bloody things were uncontrollable, with any amount of 'aileron' input causing massive instant rolling, inversion, dives, explosions and the total collapse of Western civilisation as we know it. Best stick to simple R/E control, which will at least mean you can kid yourself you have input into where the thing goes. They are mad as a box of frogs, never a relaxing flier, but conversely never fail to make people stop and look! https://www.rcgroups.com/forums/showthread.php?2863243-Windbag-by-Colin-Read-NOT-for-TBD2-but-for-CAP2017!4 points
-
Having calculated I had just enough Carmine Red to cover the wings I find I'm fractionally short so whilst I wait on HobbyKing it's back to the fuselage. After a further two coats of Oracolor I moved on to the fiddly bits, first I fabricated the leather cockpit coaming using some leftover log burner rope gasket covered in masking tape: Along with some spruce finished with Danish oil and a piece of foam to simulate the head rest I have a reasonably atmospheric cockpit: Rudder servo installed and Rx mounted alongside: Tailwheel and closed loop detail: Motor mounted and secured with thread lock, I've retained the side and down thrust, I can always change it if I feel the need. ESC floating free in the battery bay: Registration lettering added: And with the wheels finally on that's the fuselage pretty much complete, apart from the windscreen which I haven't yet figured out how I'm going to secure it:3 points
-
Hi Manish ! It's a 128mm schubeler fan and it will be powered by 12 or 14 cells. It will produce up to 11 kg of thrust. With a more powerfull motor it can go to 13kg of thrust but then the amperage goes up to 200amps !3 points
-
Hello everyone Great idea for a Mass Build. I enjoyed building Pete Miller's Ballerina, and Lindsay Todd's Skywriter and Renaissance as part of previous Mass Builds. All still flying. Already had a plan for "Dawn Flyer" to build so why not dedicate the build to this years Mass Build. Will be a first electric build for me. Anyone got a spare set of Flair Vintage wheels they have no use for and would like to sell? Cheers LPP2 points
-
Just posted a “for sale” advert. It’s so much easier than the old site. Loading pictures was a simple click and choose which to post. You've done great work again Andy and everyone ! ?2 points
-
Small update. So I have acquired a Turnigy 100cc motor but still have to get a suitable speed controller - looking for a 200A one at present which should be ample. I’ve hollowed out the exhaust stacks and made a light balsa former for the center line tank. The former is only there so I can sand flat, I’ll add epoxy and micro balloons to make a strong former and take it back to about 1/4” thickness. Once both shells have been done like this Ill add further strengthening and give it a light sand before adding the lip. I’ll add some details in the coming weeks and this will be stored to one side along with the other pre made parts.2 points
-
Spot on, Steve, you just have to go with what you can get and make a start. I am lucky in that the Smoke Trail plan lists all the materials required and I have built up a fair bit of surplus stock over the years. Little of it is the required "medium soft" grade but I'm going with it because (i) the local (45 mins drive!) model shop doesn't have any better, (ii) there are no shows for a few months where I could choose the wood and (iii) I can't guarantee a fresh order from SLEC or BC would be any better. By the way, I would suggest you order an extra sheet of each size to account for waste and invest in a balsa stripper to cut your own strip from sheet - much cheaper.2 points
-
I have been trimming plastic parts (lots of) and made a start on the sheet tail surfaces. Thought I would share an improvement to a parts making technique that I use. 1. I copied the parts from their A4 drawings to preserve the originals, I usually stick these to the wood with Pritt stick but it doesn't always let go cleanly on removal and leaves sticky residue so I had a brainwave to cover the wood in masking tape first (as that usually does give up nicely as long as it hasn't been left on for months/years/decades! 2. Paper stuck down and cuts made. 3. Peeling off cleanly. 4. Et voila! It was at this point that I noticed two mistakes, the wood is the wrong thickness, should be 6 mm not 4.5 (but the elevator is 4.5) and I ignored the very clear grain direction guidance on the paper!2 points
-
Picked my build out, the Mini Super from outerzone site, there will be a few tweaks made when I start. Waiting for the plan being printed for now. https://outerzone.co.uk/plan_details.asp?ID=51071 point
-
Wing is covered now. As Richard Wills once said; you can't see what's under it once it's covered. It looks like any other model wing now...1 point
-
Come on, John, try and keep up ? More prep work today using Patricia (Chris de Burgh reference) to make the spars and leading edge sections from sheet stock. I also cut out tailplane and wing rib blanks and made a couple of jigs to help make accurate spar slots and cut out the rib shapes themselves. The first one is just a piece of 1/16" ply with appropriately-sized slots glued to a length of 1/4" square hardwood which acts as a depth stop. The rib blank is placed behind the plywood and a razor saw used to cut a perpendicular slot: The blank is then turned over and set on the 2nd jig which locates the rib template, ensuring it doesn't move while the rib is cut out: Overkill? Perhaps, but I now have all the ribs ready for assembling the flying surfaces: The observant amongst you may have noticed from the rib shape that I have changed the spar design from that shown on the plan, which calls for a single 1/8" square spruce spar on the upper surface only. I couldn't understand the logic behind this so I had a look through a few free-flight designs on Outerzone for some inspiration. Some models had a similar design with just a single spar (either top or bottom), others had 2 spars (but no shear webs) and others had multi-spar arrangements (usually 2 lower and 1 upper). I decided that pretty much anything goes so chose a full depth 1/8" balsa spar with ribs slotted in from the top. More tomorrow...1 point
-
Could it be a Flair Fledgling ? It had a tapered wing with swept back leading edge.1 point
-
Rich, the fuselage seems to be lite ply, looks a darkish colour, maybe gaboon? Or perhaps just age coloured. John, although the photo makes the chord look constant it is actually tapered. Centre section chord is 9 5/8", tips are 7 3/4 and more tapered at the l/e than t/e making it look almost swept back.1 point
-
Been down this road before, will be a little confusion at first, and maybe a bug or two to sort, who knows ? Patience is a virtue, ?1 point
-
Sussed it, read the user guide, you log in via Portal. worra pudding. P.S just seen Andys post. ?1 point
-
https://classifieds.bmfa.org/user-guide1 point
-
PM me your email address and I will send you the original drawings1 point
-
Don't remember problems with my tank position and just use an extension on the vent when filling to stop the overflow running down the cowl, but gillyg1's might be inverted.1 point
-
You even get a free magazines ! How much is rcme these days ?1 point
-
I fired up the 200 using the dumpy exhausts and an 18x8 classic master prop. While not the most accurate recording device ever made, the noise app on my phone recorded 84db at about 1 foot away.1 point
-
Thanks folks I bought an original immaculate Watty 4 with 2 transmitters and receivers of tinternet lesson learned1 point
-
The list I came up with was very simple. Sheet 1/16 x5 3/16 x2 Strip 3/16 square x18 1/8x3/16 x3 Very easy in the end it just seemed difficult which was putting me off ordering strip wood myself (I always bought the additional wood pack from Sarik) which in turn was putting me off going anywhere else. A note of caution for anyone building for the first time. I am into double figures on my builds and Sarik always 'give' me too much wood, for example I have nine sheets of 1/16, so I have a stockpile and a pile of scrap that I can delve into if I make a mistake and order too little. If you are short then ordering more will cost £12 delivery, not the end of the world. Also it's not difficult to cut strip from sheet especially easy for short lengths. Don't be like me and build up imaginary obstacles when in reality it's easy and fun.1 point
-
Involving kids would be a good idea, thru clubs or schools perhaps. Also a cheap easy to make rubber powered model, schools have sports halls and playing fields these days ? For us bigger kids, and since it's a centenary, perhaps a model for every year since the bmfa/smae was formed ? I discovered a sheet plan for a "gasser" in the loft, and will be making an " aspin" converted to 2 channel control surfaces, with either diesel or electric power...hope to be made ready for summer...that's the plan anyway, subject to god's approval.1 point
-
Your not potty Denis, most aircraft have a stabilizer provides downward pressure to keep the aircraft in balance. Lifting tail's tend to be found on early aircraft like my Bleriot and free flight models. The problem with a lifting tail while it does help keep the aircraft in the air it has a narrow speed range. Take a normal model wing on its own, just a wing and launch it from your hands it will either rear up over backwards or dive to the ground as it will be critical how the wing meets the air flowing over it, no tail no balance. Therefore Slope445 your set up sounds correct. A reflex section wing will fly with no tail as will a steeply swept back type like a paper dart. Modern airliners have their stabilizer set at very near neutral at cruising power, this is to save drag and fuel and rely on the computer controls to keep the aircraft in balance when passing through disturbed air. I am no expert but that is how I understand it.1 point
-
It's also worth bearing in mind that a "B" is often a prerequisite for display pilots, so taking appropriate avoiding action on a runway incursion, is probably a good skill to acquire.1 point
-
LPP There is some advice to extend the nose and be aware of tail weight. CofG being the issue and ending up with a heavy model that flies fast, not a problem for you I assume.1 point
-
To meet that deadline I would have to resort to a sheet of A4 folded into a chuckie paper dart. ?1 point
-
My 2p's worth coming up. 1st give the airframe a good sanding to get rid of the old tissue that looks to be sort of attached. Bin the rudder, make a new one the correct size and with a stick frame type construction to reduce weight. Remove and bin the rudder pushrod and use closed loop - again lighter weight. Replace wooden elevator pushrod with carbon fibre (weight reduction again), and as you stated replace tail wheel mechanism with something thinner, more modern & lighter. Use a foam wheel for the tail wheel - again light weight. Remember with a model like this, even a few grams / ounces at the rear will require many of the equivalent at the front to counter balance. Remove if possible the engine bearers in the nacels as they are now unnecessary. Sheet the nacels with 1/16" balsa - no need for more. I totally agree with the removal of the bell crank / pushrod system for the ailerons. For servos, I would look at something like HS81's IF you can keep it light enough. Keep the servos forward, both the fuselage ones and the wing ones - as.close to the spar as you can would be good. Lighter weight means it can fly slower which will need less power so lighter batteries. It also means that if you were to crash the lower energy carried into the crash will cause less damage. Strangely, I believe I am the modeller referenced to earlier by KC as he has described both my models. I never knew. The machines referred to are free flight type stick / frame construction with shaping pieces outside the frame then sheeted. Both designed (by Ivan Pettigrew) at the time when electric flight was buggy brushed motors and heavy lower power / short duration NiCads. Good luck with this project, I shall be watching with interest.1 point
-
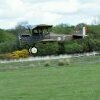
I just shows how much drag you get from unnecessary items such as wings... ?1 point
-
Barnstormer ?1 point
-
You're right unfortunately, Grumpy! Even in the original entry. However the descriptive instructions are pretty clear. I've haven't tried it out yet- but after I buy my supply of talcum powder,(!), I'll let you know how it went with me!1 point
-
Cracker little model. MK1 and MK21 point
-
I've had a root around in the balsa box and think I've got all the materials I need to get started on the build. Interesting that the list didn't mention trailing edge stock but I guess that the hard men of free flight eschew such frippery and carve their own (as Whittaker might say) ?. Being a lesser mortal, I found some 1" x 1/4" TE stock which I can strip down to the sizes needed for the wing and tailplane. Not having beech bearer in the required size of 1/4" x 5/16", I set up my bandsaw to rip some 1/2" beech down for two 4" lengths. The cut edge is a little rough but can be cleaned up a bit with sandpaper and the rough sides hidden from prying eyes. Next job was to cut up some of the plan copies to make patterns for marking out the more complex shapes such as the wing and tailplane ribs. The rib patterns were stuck to some scraps of thin ply ready for rib production. I also christened the model with some of my own blood when I caught the sharp end of a scalpel while digging around in the tool box! Hmm, now what did I say about not spending too much time on this ?1 point
-
Like it. Attached is a .pdf scan of the original magazine build article for those interested. 2130531333_JUNKERSJu88Specialplanfeaturej.pdf1 point
-
Hi Paul, the drawbar is a long bolt that goes from the top down the centre of the quill and holds the chuck or collets firmly in place, I have a small mill and sometimes if it is a small job like cutting a groove in some wood for an undercarriage fixing I put the cutter in the chuck, for cutting metal I use the collets to hold the cutter. I also flew on Newcastle town moor many years ago.1 point
-
I've spent a little bit of time today gathering together some of the things needed for this model while trying hard not to get drawn into it full-time as I have other things that really need to be done first. Others could, I'm sure, knock together this simple model in a week of evenings but for me doing a bit here and there will eventually see it finished - there's no rush! Below is a view of the plan as it appeared, spread over 2 double pages, in the December 2019 Aeromodeller magazine. I've made a few photocopies to cut up where necessary and use as templates for cutting the various components. Incidentally, it's also available for download from the outerzone.co.uk Handily, the plan also shows a list of the materials required to build the basic airframe, most of which I already have in stock, collected over many years of hoarding. The other important item is a suitable engine, in my case a CS "Boddo" Mills 0.5cc. It has never been used and hopefully won't suffer the same fate as Engine Doctor's similar engine. I also have a DC Dart in reserve, just in case, but it will obviously require a separate tank. That's all so far. I'm off to have a rummage in the balsa box to see what, if anything, I need to order.1 point
-
The Martians have landed! (As opposed to crashing inverted or bouncing of a fence post). The Spaceship has now flown successfully. While I had some of the covering off while repairing it I took the opportunity to extend the battery tray to allow for greater adjustment of the C of G without adding extra weight. I also reduced the rudder movement even further and added a slight touch of right to counteract the torque. The elevator movement was increased a bit and I mixed in the flap function with the elevator so that I now have a ‘take off’ setting with lots of ‘up’ that can easily be returned to neutral using a rotary slider on the side of my old Hitec Optic radio. I’ve found that the stub fin on top is a convenient handle for an underarm launch. Using the ‘take off’ setting and launching it up at 45 degrees with full power results in a stable climb out. If the launch setting is reduced to neutral the climb stops completely and the model shows a surprising turn of speed at full throttle, considering its limited power. After the first successful flight I added -25% expo to try and calm the rudder a bit more, not something I normally use. It still needs to be treated with respect, but it’s much better than it was. Now it’s been trimmed out it’s not difficult to fly, but it doesn’t behave like a conventional aircraft. It can fly quite slowly in a nose high attitude, when it will gently rock from side to side but remains under full control. It doesn’t seem to be possible to stall it. The glide doesn’t really exist in the conventional sense. I found that starting the landing approach reasonably high and reducing the power to about 30% results in a steep decent but with enough power for a decent flare, and chopping the throttle just before touch down results in a smooth arrival. The most challenging part about flying it is orientation. As there is no wing it’s quite difficult to see how much bank is applied, and I certainly wouldn’t want to fly it very far away or in poor visibility. If anyone else is afflicted in the same way and fancies building one, here are the settings I used: Motor BL-2208/14 with a 20A ESC. Using a 7 x 4 prop and an 850mAh 3s battery gives about 85W, which is more than adequate. Weight without battery is 10.5oz. At the moment I’m flying it with the C of G at 34%. The rudder has 7 degree movement each way. The tailplane has -3 degrees incidence relative to the datum. I’d increase that to -5 degrees if I build another. Elevator has 20 degrees movement each way. The flap mix gives an additional 10 degrees up for take-off, with the mid (cruise) position set at 5 degrees.1 point
-
I got that part, i just wasnt sure which aspect you were asking about. As i mentioned in my reply to Ace i am waiting on the backplates. We only made 2 first time round in case tweaks were needed once the crankcases were manufactured, and sure enough... But, we are getting there. Just need to sort backplates, exhausts, mounts, and get the liners back...3 weeks? maybe?1 point
-
Scaremongering worthy of the tabloids. Glow fuel is methanol and oil at its core. Both are used for all sorts of things and can be sourced as raw ingredients if it really comes down to it. Petrol and diesel, please. I doubt i will see the end of petrol and diesel in my lifetime unless they get hydrogen sorted out. Even so, hydrogen is only 'green' if they use renewable energy to zap water into atoms. Currently they do some witchcraft with methane if i recall correctly and its not green at all. All these promises to ban i/c cars by next week are empty political promises made to make themselves look good and get another go come election day. The technology and infrastructure will take decades to mature/install so i think we are safe for a while yet. Most of the current shortages being experienced are demand/supply/logistics related. We certainly have not run out of oil yet.1 point