Leaderboard


Popular Content
Showing content with the highest reputation on 04/02/23 in all areas
-
So in summary what would I recommend. Top requirements 0.5mm or bigger nozzle not a fixed cup, must be able to use bottles PTFE seals would be desirable External/Internal mix and Single/Double action doesn’t really matter, though it is pretty hard to buy anything that is not internal/double these days and after a bit of practice they are the most versatile. Button/Trigger action - really down to your personal choice. Recommendations Budget - something like the Badger 350 - external/single airbrush. Airbrush - something like the Sparmax/Premi-Air DH-125 - internal/double, side-feed, top-button, takes bottles and cups - very versatile, could be used for finer detail, or small stuff (like Airfix models) Spray Gun - something like the Sparmax/Premi-Air GP-850 - internal/double, top-feed, trigger, different spray patterns, takes big bottles - more suited to big jobs, less so far smaller work If you are really desperate to save money then look on eBay as there are Chinese clones of most designs. But bear in mind that Quality Control is iffy and you often can’t get spare parts. Compressor - less critical, cheap clones are fine. Ideally look for one with a tank and moisture trap. The tank stores air and buffer to stop pulsing of air. When air is compressed any moisture in the air condenses, the moisture trap stops that water from getting into your sprayed paint. Do you need to buy a compressor - does anyone at the club have one that they can lend - for the most part they sit unused, I know mine does so if someone from my club wanted to borrow mine I’d be happy to oblige.4 points
-
BTW Internal mix - air and paint are mixed inside the airbrush before being shot out the nozzle. External mix - air is shot out of the airbrush and sucks up paint as it exits the nozzle Internal mix usually results in a better air/paint mix but are also more work to clean the airbrush because there is paint inside. Single action - you press down for paint and air - there is sometimes a control to allow you to set how much paint/air, effectively the spray width. Double action - press down for air, pull back for paint. The ‘pull back’ is variable so you can control how much paint (how wide the spray pattern) by how much you pull back. Single action is simpler to use, double action takes time to get used to. Single action is good for putting solid uniform colour down, double action gives you much more control (once you have got the hang of it) so you can be much more artistic. Two main designs the traditional airbrush that you hold a bit like a pencil, the trigger is usually on the top, and if double action has two separate independent actions - press down for air and pull back for paint. the trigger design. More like a spray gun like you would see car painters use, but you can also get airbrushes like this. Here the double action is with one movement, pulling the trigger - the first part of the pull turns on the air and then the rest of the pull turns on the paint, varying by how much you pull. Paint cups - airbrushes often have a small fixed paint cups - these are suitable for plastic model making and artworks but not for big areas like RC aircraft as you would be constantly interrupting your work to refill the cup. For RC planes you need to look for an airbrush or spray gun that takes bottles. Suction versus gravity - this applies to internal mix, all external mix are suction - some have the cup or bottle on top, paint is drawn into the brush by gravity, usually thought to give a better paint flow but some don’t like that the cup/bottle obscures the view of your work and some don’t like the top-heavy balance. Others have the bottle/cup below and the paint is sucked up into the brush - the supply of paint is not so good, but the balance and view of the work is better especially with bigger bottles. You can also get side feed which is a compromise between gravity and suction as you can position the bottle above or below - these are a bit rarer. Spray gun versus airbrush - it definition does blur in the middle. At one end you have pencil like, internal mix, double action with small fixed paint cup, for small detail work - most definitely an airbrush. At the other end you have the trigger gun with big bottle like you see car bodywork repairers use, for large areas - most definitely a spray gun. But it blurs in the middle where you get tools that look and work like spray guns but work more like an airbrush for smaller areas. Spray pattern - and airbrush spays a circular pattern. Decent spray guns let you choose between a circular or flat (or sometimes oval) spray pattern. The circular pattern is good where you are moving the paint round in all directions, the flat is best when you are putting paint down uniformly on big areas. Even for RC aircraft which are relatively big, I’d say the circular pattern is still best - the flat pattern really comes in when you are doing really big areas - like full size cars. Nozzle size - this determines how fine and how wide your spray circle is. You can get down as small as 0.1mm but you need extremely fine paint for that, and it is for very small work. For plastic model making a good size is 0.3mm but for RC model painting I’d recommend a 0.5mm or bigger because you have a lot of area. Nozzle size also dictates what paint you can spray - with small nozzles the paint has to have a very fine pigment and needs to be thinned down a lot, otherwise the nozzle will keep getting blocked. But paints like primers and metallics tend to have much bigger pigments so will block smaller nozzles - use a 0.5mm or bigger even for small plastic models. Seals - it is best to look for an airbrush that uses PTFE seals - these resist all sorts of solvents - some, especially the cheap eBay clones uses rubber seals and these can perish or deform on contact with certain solvents, like cellulose thinners or white spirit.4 points
-
Plan coming to RCM&E soon...2 points
-
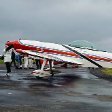
Finally got to maiden it today. Used a 9 x 4 prop on 3S which pulled 31A. It's a bit heavy so lumbered into the sky from a kind club members launch. I was wary that it would be a bit wild, but it wasn't at all and was slower and softer on the controls than I expected. It slowed up well with a very soft safe stall which was reassuring. I'll try next time with a 9 x 6, (that pulls 44A on the ground and I only fitted a 40A ESC so need to be careful of full throttle use (I can always go to 4S). I'll also add more aileron throw and less expo. Pretty pleased really, it was stable and looked great in the sky. Glad I added the rudder, it just felt like I had fuller control options.2 points
-
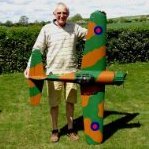
Ready for maiden: Some scale details are lacking, and I needed 60 gr lead under the tail to get the CG right, but we should be able to fly. Lucas2 points
-
Thanks to all the tips from this forum, I spent another enjoyable evening applying some weathering. Panel lines and rivets using a fine black marker, highlighted using a white gel pen, then sprayed some dark grey weathering behind and to one side of each line with just some held card masking. A touch of dry brush silver on leading edges etc to illustrate some worn paint to finish. The best bit was peeling off the windscreen masking to reveal the result - dead chuffed tbh. Just the radio install to complete now2 points
-
But if you weigh epoxy, or indeed any two part chemical, something cup shaped makes it much easier and far less likely to drip into the scales. I understand that +/- 10% proportions will adhere but beyond that the strength is significantly compromised and I query whether it is reliable to achieve these parameters by eye. BTC1 point
-
Paul I use my airbrush quite happily on funfighter size models. Needs more passes but little or no overspray, I keep the pressure around 20psi or lower. Never really look at dial but keep it low. The guns need about double the pressure. More concerned about how much airborne spray occurs as I have asthma and emphysema. Even with a mask (Force8), it still depends on what equipment/media you use. S1 point
-
Oh waily, wailly. Exciting, soft tries, one world class try. A work in progress. Respect Scotland. Mutter, mutter.1 point
-
Just my thoughts. The Iwata Neo CN is what I use but this can be greater or less than £100 depending on where you go. You can easily get a full range of spares as well. You can get relatively cheap compressors but you have to remember the cost of hoses and adaptors. It is a fair investment but there are a few complete sets about. I personally have gone for the airbrush rather than a gun (I have a couple of guns for laying on primer) A gun can lay a lot of paint on big areas but the airbrush can do the same, just takes longer. The paint is a key matter to consider. I use acrylics by Vallejo Model Air. But others are others out there. It’s largely a matter of choice but it might be worth getting Ian Peacocks Airbrush book, several copies on eBay to give a broad understanding- yes it’s very dated but a quick cheap way of getting some knowledge.1 point
-
Very impressed by the quality of the covering. What technique do you use to cut out the compound curve trims?1 point
-
I've never used wire or clips on fuel tube/pipe connectors since I had some nice looking small wire springclips included with an ARTF model years ago. Seemed a good idea at the time so I used them and didn't think anything more of them..............until I had occasion to inspect the tank installation quite some afterwards and found that the clips were steadily cutting their way into the glow tubing. Can't see there being a prob with tygon. Just a light roughing of the surface of brass/ali tube and glow tubing stays fast with the bond getting stronger with time. Have 15mm of tube pushed on and it'll never slip off. I always radius the outside edge of the pipe so it doesn't cut into the soft silicon - especially important with the thin clunk tubing inside the tank where I use a fairly short length connected to another length of metal tube and then on to the clunk weight. Prevents the tube from curling back on itself in a hard landing and giving you an unexpected dead stick on the next flight. Happened to me once years ago - never again.1 point
-
Yea, swigging dark heavy, in the Diggers down the road, so you don’t get thirsty later, “what we singing Dai, Cliff Richard doing his kiddies singing Christian rhyme”. ”you been up that mountain too long boyo, closed yer last brain cell down, get them in boyo.”1 point
-
The most interesting thing for me will be to see how much louder than usual the Welsh fans will be singing "Delilah". I felt the knife in my hand and ...... suddenly there was a wing rib.......1 point
-
Result! Nice one.1 point
-
Good news Greg. Fingers crossed for some decent weather.....1 point
-
Glad you're sorted, Greg, but I'd love to know what the problem was just to satisfy my curiosity.1 point
-
For larger areas (like RC aircraft), ideally you’d want a spray gun. Other than that an airbrush with a nozzle size no smaller than 0.5mm. The cheap Chinese clones are okay, but quality control is iffy, luck of the draw, you can get excellent ones but you can get poor ones. Another thing to watch out for is what the seals and o-rings are made of - important if you want to spray cellulose or enamels. Some of the cheap Chinese clones use seals that can dissolve in certain solvents. Personally, I’d recommend a proper brand but it will be over your budget. A good budget brand is Sparmax (also called Premi-Air). A suitable airbrush would be the DH-125 and a suitable spray gun would be GP-850. But they are around your budget so you would need extra for the compressor. These are both double-action, internal mix, which you don’t really need - you could manage with single action, even external mix which would be a lot cheaper, such as a Badger 350. Cheers, Nigel1 point
-
Kc All of those eligible to vote in general elections do not always choose to exercise their rights. I believe around 70% vote in general elections and somewhere from 40%-50% in local elections. However, in order to vote you should spend time to understand the issues being debated. Many choose not to spend the time required to do so for all sorts of reasons. I believe the BMFA Council, or it may hsve been the executive voted in by members, reviewed the Articles of Association with a view to changing the definition of BMFA Member from Clubs to individuals. With legal input they decided to stay with the status quo. In my experience, most Club members have little knowledge of how the BMFA is run and care even less. When I was an Area Chairman I went out to a small number of Clubs to talk about the BMFA - at the time, I had spent 5 years on Council, 4 years as Area Chairman and 2 years on the Achievement Scheme Review Committee so I felt I was able to present a pretty good picture of the organisation. Most members had little idea that the day to day operation is down to 3 people: the CEO; the Development Officer; and the Club Support Officer. They were supported by around 7-8 support, financial and administrative staff. All other functions are by volunteers in the same way as Clubs rely on volunteers to run them. My punchline used to be, if you think the BMFA doesn't do enough for you, look in the mirror. This would almost invariably be answered with: I don't have the time; I can't be bothered; someone else should do it. I have found that in life, there are those that do and those that complain. You choose which one to be.1 point
-
If that is the case it is a failing at club level. Each club is entitled to send a delegate to their Area meetings (mostly held on Zoom these days so no real excuse not to ensure they are represented) where they get to represent the views of the club members which can then be carried forward to the BMFA board via the areas council. The system is there but it does of course require the clubs and their members to engage with it.1 point
-
Obviously you have never heard of fake news. The thing that frightens me is the imminent arrival of deep fake videos that can make anything look real. It's ban enough now to try and sort the wheat from the chaff.1 point
-
Well it flies! Took it to the field this afternoon, and had two good flights. CG and control throws felt pretty good, and hand launch into the gusty wind was much easier than I expected. Now to finish the canopy and add some markings!1 point
-
Superb!1 point
-
Good to hear of a happy ending. Now get stuck into the simulator and come some decent weather you’ll be ready to fly. GDB1 point
-
As I said if you need to do any serious painting small or large this will do it all as double the action as in my lien will do everything.1 point
-
Well that depends. Do you want it done quickly or thoroughly? Cant have both. I dont think the human cost is lost on anyone here. Its a given and does not need discussion. The thing being discussed is why, just as was discussed on the other thread regarding the accident in the US between the P63 and B17 without any issues. Disasters in general are fascinating things to study. Understanding why a thing happened is important, especially to those who may change rules or whatever to prevent them happening again. Also consider we make movies about them and watch for entertainment. Something which is arguably more ghoulish than our conversation here. I can virtually guarantee kids will be playing a Battlefield Ukraine computer game in years to come in the same way i play a WWII combat flight sim for my amusement and entertainment today while observing a minutes silence on Nov 11...Humans are a strange bunch. Rather contradictory.1 point
-
Maiden today! -6 degees, no wind and sunshine. And (of course) no other pilots on the strip. I needed a lot of up trim to get her to fly straigth. Adding another 25gr to the tail helped with inverted flight. After some fiddling with expo (back to 0%) the plane behaved well. It took another battery to feel at home, but now we are friends. Thanks Peter for yet another good design! Snow tomorrow, and a lot of wind in the weekend. Time to work on some more scale details.1 point
-
The cockpit is very nice after the protective films are removed from the PET sheet! Glueing the hinges is done: and this time I did remember to mark where the slots for the hinges are while covering, so it was not difficult to find them back! Soon the flappy bits will start flapping... Cheers, Lucas1 point
-
Hello all , Wth the gear door lay-up fully cured , i disc-grinded the doors out of the frame but left the main gear door in one piece .(it has to be cut in 3 pieces later) With the gear strut in retracted position , i presented the door to the door-opening. Satsified with the fit i marked the position of the mounting holes and filed these area's with a blob of thickened epoxy. Imediatly presented the door to the opening again and left it to cure. To prevent the epoxy sticking to the mounting supports , i protected them with a piece of plastic , easy to remove. After curing i lifted the door and drilled the mounting holes in the door. Now it was time to cut the door in 3 parts like the original.This was done with a very small disc grinder (proxxon)to prevent losing to much material. After some fitting i was happy with the result ! I made a video but it was too large to upload , sorry , i'll shoot another tomorrow. Sorry for the wrong screws in the fotos , these will be replaced with sunken ones later... It might take a while to finish the other wing as there's a lot of fitting !! Thanks for watching !1 point
-
Hi all ! I made the grear doors as planned and after curing i lifted them off the moulds , no problem. It could be the new parts are'nt fully cured but they feel to weak for the job. I'm now sorry i didn't add airex between the layers cloth. If they don't get harder , i'll make another set with airex , but that means i have to use vacuum and 2 wing moulds don't fit in my bags ! That means another 2 days ! While i left the parts to cure , i used the time to finish the nose gear door control. Another item i can remove from the long "to do list"1 point
-
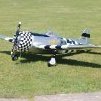
Wow, I have to say that spraying this model has been a hugely enjoyable learning process and is already inspiring me to build another scale model. Things I learned / put into practice ; 1. Still no success with my dual action airbrush - can't even get air out of it never mind paint 2. My single action is ok but does keep stopping / blocking - bit of patience and retrying and it kinda works 3. I used Vallejo model air acrylics that required no thinning and they worked great 4. I was pleasantly surprised that there's no solvent smell, so I got away with spraying in a corner of the kitchen 5. Drying with a hair dryer between multiple thin coats allowed a very quick paint build up 6. Spraying some clear acrylic over masking tape before painting prevented bleed through I saw this rough masking tip somewhere (Flitetest ?) to help get the loose camo edge ey Viole First colour Grey Violet Light Green Added Built up more colour, then added the decals (bought from Cambrian with the kit), and it just sprung to life 🙂 Weight so far 958 g - So paint has added 18g - not too bad Now onto some panel lines and weathering1 point
-
Where would you like winter to start - the thread could certainly be split off... The more appropriate thread, given the recent weather, is: Anyway while I'm here, our usual Thursday bunch all flew today - after the rain stopped conditions were great for flying if a little grey. Maidened my new little Arrows Hawk...smooth as a larger model and excellent performance...how good are they?!! You'll note the careful and conservative exploration of the flight envelope - sorry but it just felt so right! Hawk.mp41 point
-
Mine the Cambria version for IC but if yours flies half as well as mine you will be very happy with it! I was doubtful about the look of the "Dora" FW190D but its performance soon had me won over! Enjoy!1 point
-
I flew mine last week it is very fast !! and sits really nicely when flying straight and level I made a skid to rest on as I was worried about the durability of the fins. The comments re the elevator throttle mix is very useful as when throttle is closed there is a significant pitch change.1 point
-
Hi - got one for Christmas. I agree about the pilot so here.s my solution, although my granddaughter was a bit upset when she found the remains in the bin!1 point
-
reading today that the blades display team is getting disbanded.. ken anderson...ne...1...display dept.0 points


.thumb.JPG.051c5bb1d446ab8af8a2c911cbae321b.JPG)