Leaderboard


Popular Content
Showing content with the highest reputation on 25/03/24 in all areas
-
The very limited flying over the winter means I need to get in some practise with EDFs as I hope to get the rather "extreme" Douglas X-3 flying. The better my flying skills are the less likely it will might not get any more damaged that it already has been. I decided to fly some of my EDFs that have spent most of last year "hanging on the wall", quite literally. First was the 50mm EDF DH "Swiss" Venom although on this occasion it was flown without the tip tanks. 44" span, it is a Depron job and light at 520g but with a 1300mAh 4s and a clean airframe it is no slouch. Those twin booms are delicate so a belly landing needs concentration and accuracy. Next calm day it was the exact opposite. The Depron Douglas Skray . 36" span and a similar weight to the Venom but with over twice the wing area. A gentle slow flyer but like all delta the drag rises rapidly in any sort of manoeuvre. Flown bank and yank nose drop in a turn is pronounced. Pull too many g and it almost stops flying! Next was the Hawker Hunter F6. 50 mm EDF 33" span and made entirely from 5mm XPS sheet (no balsa or carbon!). At 385g a bit heavier than the Venom although not quite as fast but flies very nicely. Decorated as a Black Arrow of 111 squadron who managed to loop 22 of them together in formation. Today late on (17:20) the weather improved considerably so it was the turn of the P1052 better known as the prototype swept wing Sea Hawk, Still a "portly" Sea Hawk fuselage with a modest power 55mm EDF. Like the Hunter made entirely from 5mm XPS sheet This was my second Hawker, the first was a Sea Hawk. I made a better job of the complex bifurcated inlet and exhaust duct so it had more thrust from just a 1500mAh 3s. Two were built. One still exists at IWM Cosford. The other was modified with a bit more thrust but broke up trying to go supersonic in a dive. The test pilot did not survive. Hopefully at the next calm day I will be able to try the Douglas X-3, again and be a bit better prepared to not break it.5 points
-
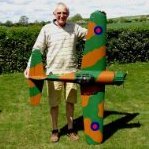
I have, for a while, been looking out for a glider for those lovely summer days that will be coming along soon.......maybe. Nothing I fancied has come along, then I remembered, the first model I built from a plan was a glider, Rex 1a. I had literally hundreds of flights with it. The club I belonged to then in the mid 1970's was the Thanet Model Flying Club in Kent where thermal soaring was quite a big thing, after the Rex I went to a Radiosailplanes Wildfleken, I had two of those, then for the 100s comps a Scirroco all good flyers and lots of fun. All these were hand launched with a tow line, but at age 72 I am not going to do that any more or ask my fellow club mates who in many cases are older than me! So I wondered how hard it would be to fit a motor and lipo into the Rex, I think I have all the right bits in stock so lets get on with it. I no longer have the original plan but handily it is to be found on Outerzone along with original article from Radio Modeller, copy of which is just below This was fifty years ago so I really do not remember much of the build, but it must have been simple as it was my first fully completed plan build after a false start with a Big Wig, so this should be a quick build provided I can squeeze in the motor and battery, so I will start with the fuselage as that is where all the main changes will be. Overlaying the motor that I intend to use an Overlander T3548/05 ( purely because it is in stock) and a folding prop a Graupner 13/7 (ditto) I can see that I can keep the side elevation almost as per the plan by moving the front bulkhead forward a little and at the same time arranging a little down thrust ( as I have seen that in other plans that I have looked at. I have increase the width of the bulkhead just a tad to give me a bit more room. This is the original unaltered drawing, the download from outerzone is not that good but will suffice, I will do away with the wirework for the tow hook, and face the underside of the fuselage with 1/16th ply. Motor and prop will fit about here Plan amended to suit Front bulkhead enlarged just a little for a bit more working room, the plan says balsa but for obvious reasons I have substituted 1/4 ply for this one to mount the motor on The rest of the fuselage is per the plan and a very simple box so quickly knocked up. Here is the fuselage more or less complete, with a canopy made of some scrap balsa, which is shown here with some stopper and primer on as I could not get a good finish on the bare wood with just sandpaper so filled the sanding grooves with stopper and high build primer and then sanded down with wet and dry, it will be covered with some black film So now I know the electric conversion is going to work and not look too bad I will get on with tha tail and wings.3 points
-
Hi I have recently returned to this hobby after many years away, and I look forward to getting new ideas and approaches to building and flying model aircraft again3 points
-
Yes Bas , If you paste some PVA on Brown paper or even wood , it will go dry to touch in about 30mins . However if you place the glue side down on another surface and iron the dry side , the heat will turn the glue tacking and then rapidly cool and adhere for good . So , in a way , you have created your own solarfilm . You cant do that with wallpaper paste as far as I know . Apart from brown paper covering the other use for this feature is when adding plywood doublers to fuselage sides . You coat one side of the doublers with PVA . Wait till dry to touch . Align the doubler over the balsa fuselage (glue downward) then iron the doubler down . In this technique the advantages are clear . No clamping or weight required . The two items don't slide around . Unlike contact adhesive , you can adjust position right until heat is applied . Try it on some thin scrap wood .3 points
-
Load of hot air................ 👀2 points
-
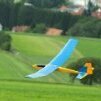
Test flown this afternoon, built from a Derek Woodward plan as an i.c model (not by me), bought from APOB and converted to 3s electric. Chilton DW1, i plan on building a larger one using foamboard and depron at some point.2 points
-
So I’ve finally gotten around to starting the build…. Tony Nijhuis Bristol Beaufighter. I’ve used the part kit and additional wood pack from Belair, ribs/formers etc all nicely cut and go together well!1 point
-
Thanks Keith, worth a try! While I wait for the fine lapping grease and some fresh cast iron for the piston thought I would do some boring bits. The needle itself has been made as my friend suggested, in the chuck and with a grind stone in the dremmel (and it at maximum rpm) shaped the needle point quite well. Turned a needle collar and soft soldered the needle and collar together with little fuss. All screws up and down with some nice resistance which I hope will resist the fine vibration of this turbine like engine... Next came the top of the cooling head and decided to add some more fins as the rest of the sleeve, more heart-stopping parting off tool work, what a din! Soaked the steel cylinder in citric acid solution, 20% crystals and had a good coat of bubbles on the cylinder after 10 mins. all rinsed and it looks much better, but still needs some swiss file work. Oddly, now ground to a halt, little else to do until the iron and grease turn up. Can this adventure (to me) actually be drawing to a close? Plan was to have it ready to run (really?) by my birthday, end of this month. Will i make it? Doubt it! 73T 911 Coup1 point
-
You have to be extremely careful with AliExpress that what you are actually ordering is what you are looking at in the picture. Very often the main page for an item will contain lots of small pictures, with vastly different prices for completely different items. At first glance it might look like you are setting up to buy a model at £3.19, but what you have actually selected is a replacement wheel. As for how cheap things are, sometimes they will have a very low price, but heavily weight the shipping charge, which can be as much or even more than the cost of the item. Bear in mind you'll have to factor in the VAT if applicable and add that to the cost - the final cost shown is what you will pay. Pleasantly surprised to receive my latest order from them this morning 6 days after placing the order, when the predicted delivery date was 9th April.1 point
-
The company and its original Airlander was based in one of the airship sheds at Cardington (Bedfordshire) until a few years ago. That is about two miles from our club's flying field, but we never had any issues. It could often be see flying in the area. Following some issues, the use of the Cardington shed was no longer available and the Airlander was then moored outside. One night it broke loose from its mooring and was shredded by hearby hedges and laid in pieces on the ground. I have heard no more of it until now. It's interesting that the idea seems to have been resurrected. Most of the airfield at Cardington is now being covered by housing, though the sheds are used (for film work) and are listed so will stay. A couple of pictures. Brian.1 point
-
1 point
-
South Yorkshire has a history of lighter than air aircraft. The R100 was built in Howden a few miles east of Doncaster on the north bank of the Humber. It was much more successful than the R101, perhaps because it was designed by Barnes-Wallis and part-time novelist Neville Shute Norway. btw I know Howden is in East Yorkshire but it's still geographically in the southern part of the county 🙂 It sounds an interesting project. I hope that it's both successful and doesn't affect the model club.1 point
-
Thanks John. I've had a read and it looks reassuring but the planned site is obviously nearby for the meeting to be set up in the first place. Fingers crossed and hopefully the flying site and the AirLander site will be able to co-exist well into the future. On a positive note, I suppose this and the Airport re-opening are both good things for Doncaster and Doncastrians.1 point
-
I was just having a light hearted jibe . Its a quad flying in an orchard so not really interesting or different . If you put vids out then what do you expect and its not as good as Top Gun Maverick ....is it ? I am not good at vids but occasionally put pics of work I have done . If someone doesnt like them fine but I like to know.1 point
-
Google FS-B1700 battery, there are lots available, mostly from China. They seem to be 1600 mAh, but that shouldn’t be a problem. GDB1 point
-
I looked up the transmitter on the hobbyking website and the battery looks like a repurposed compact digital camera battery. It may be possible to find a replacement by sending dimensions and pictures to a camera battery supplier. Whether the tx is worth buying depends upon the price but it would have to be very cheap to be of interest.1 point
-
What helps me is that if the throttle is on a switch for a particular model, it is the same red kill switch I use for all powered models. So in my mind it is linked to power on or off anyway. After reading some of the comments I will change it to a different switch for redundancy. Good suggestions here, great forum this is.1 point
-
First I apologize for publishing in Spanish. Then thank everyone for your interest and quick responses. This forum is very helpful for less advanced builders and this thread about the Stampe is very interesting since each of you contributes your grain of sand and your peculiarities to this model and we are all getting ideas. I would also like to modify the upper wing in three parts and the lower wing in two to have access to the interior of the fuselage. I am studying how to do it....Thank you all very much for your help and understanding, greetings.1 point
-
I'm pretty sure nail varnish remover is acetone, which works to soften Cyano, too.1 point
-
If you are talking about heat shrink covering, such as Solarfilm or Profilm don't be tempted to just pull it off without using any heat, that's how you end up leaving the colour stuck to the wood, which is then a pain to remove properly. You'll get most of it off smoothly , especially if it's Profilm or one of the better products, Solarfilm can leave a sticky mess and shards of the colour layer stuck to the wood. To get those off, you can use parcel tape, ironed onto the remaining shards of film layer and pulled off at a variety of angles, which can then y-just leave you with the most stubborn bits to pick off with the tip of a knife blade or by sanding. I don't recommend the use of cellulose thinners, especially if you are planning to recover in a different colour, as it will just drive the colour into the wood and you'll never get it out. There's lots of useful information in previous threads, such as here.1 point
-
Had about 10 short trimming flights this afternoon. It’s the first time I’ve been out since early January!! The flaps worked very well at 90*, and needed only 3-4mm of down elevator to compensate. The plane will need some weight on the port wing but that will be done this week as it’s due to pour down all this week....again1 point
-
And today I stood up under my own power and can now transfer between bed and chair without the hoist on a natty trolley-like contraption they call the re-turn https://www.directhealthcaregroup.com/app/uploads/return_product_brochure_uk_12pages_1505_low-10.pdf1 point
-
To view data, use Google Earth Download & open Google Earth. Remove the SD card and insert into an SD reader on your PC. In Google Earth, use - File – Import – {select the file from the memory card reader Dataxx.csv}. Ensure “Delimited” and “Comma” are ticked then press “Finish”. It will ask , “Do you want to apply a style template to the features you ingested?” Create a new template and you will get:- In “Color” 1) Set “color from field”. 2) Select “speed” as the field. 3) Set the start colour to blue and the end colour to red. 4) Change the number of “buckets” to a high number say 50 (this is the number of shades between blue and red!). Note - you cant have more buckets than you have number of different speeds in your data! 5) Press “height” tab. In “Height” 1) Select “Set height from field” 2) Select “Height” as the field. 3) Select “Continuous” 4) Slide the slider so the maximum height to be displayed is approximately the same as the maximum in the data for realistic height display on the map (you can make it bigger if you want to exaggerate the altitude display?). 5) Select feet (the gps records hight in feet on the SD card). 6) Press OK. 7) Save the setup file as a name e.g. “height and speed.kst” More to follow!!!1 point
-
https://www.gov.uk/government/news/the-age-of-the-flying-taxi-draws-closer-with-the-future-of-flight-action-plan They cant even get the EV infrastructure right, who dreams up this stuff!1 point
-
If you're using Imperial (UK) measurements a quart is 1.1365 litres.1 point
-
Hi All...from the land down under..heres my Lanc from the plan..enjoy regards Artie1 point
-
Just back from a beautiful days’ flying but had a lucky escape....I will explain. I fellow flying mate asked me to have a go with his Extra. During the preflight I was pulling on the elevator hinges checking that they were secure. His Tx was around my neck on my neck strap. As I was bending down the Tx just gently, no , brushed against the elevator.............THE BACK OF THE TX FELL RIGHT OUT WITH THE BATTERY. There were no screws holding in the back at all. He had bought the Futaba 7c second hand......please beware!!0 points
-
1 in 10000 odds aren't very good when it comes to the plethora of RC activities. I was spotting for a friend one day at our club. He was using a JR 3810 radio which has the battery compartment hatch secured by a plastic catch. The battery used is a "button" type that has terminals like you get on small 9v batteries. The connection is just maintained by a slight bending of the terminals inside the battery bay when the battery is inserted. When the TX is held horizontally the battery compartment hatch forms a trap door and the battery hangs precariously above it, held in place by friction. So, he was flying along calmly, when all of a sudden there was a nasty "click", the battery hatch pops open and the battery drops out on to the ground at our feet. The model went into failsafe, which had been set up as a gentle circular turn and I made a grab for the battery. My friend held out the transmitter and I inserted the battery back in the bay and held it in place while he made a very hurried landing. He now secures the hatch with electrical tape! Edited By KiwiKid on 05/08/2018 03:59:130 points