john stones 1 - Moderator Posted February 20, 2023 Share Posted February 20, 2023 That's a bit good Saint. 👍 1 Quote Link to comment Share on other sites More sharing options...
Ace Posted February 21, 2023 Share Posted February 21, 2023 Stunning, 👏 1 Quote Link to comment Share on other sites More sharing options...
Andy Meade Posted February 21, 2023 Share Posted February 21, 2023 16% static margin is quite a ways forward isn't it? I usually have mine somewhere between 8 and 10%! As for wind speed, anything over 25mph on the SW bowl will be good for a maiden on the Orme at that loading I'd say. 1 Quote Link to comment Share on other sites More sharing options...
Saint 1 Posted February 21, 2023 Share Posted February 21, 2023 2 hours ago, Andy Meade said: 16% static margin is quite a ways forward isn't it? I usually have mine somewhere between 8 and 10%! As for wind speed, anything over 25mph on the SW bowl will be good for a maiden on the Orme at that loading I'd say. Thanks for your thoughts Andy. Yes the margin does seem a little on the high side but that is what seems to work on my std Super Corsair and was the recommended CG position on the Correx build plan. I am still a relative novice in the flying department but did a dive test with it last year with Phil Cooke looking on and it gently pulled out from the dive so didn't look too bad to us. I would have gladly let Phil fly it to see what he thought first hand but I fly mode 1 for my sins. I also note that Flightline produce a powered 1/8 scale Corsair model of near identical dimensions to mine. That has an AUW of 3.76 Kg (half a Kilo more than mine) and a recommended CG point 100mm from L.E. slightly further forward of mine at 103mm. So that is what I've based my decision on for it's maiden, I may think otherwise afterwards of course 😁 I'll be sure to hold off for a good 25mph South Westerly then thanks 👍 1 Quote Link to comment Share on other sites More sharing options...
Peter Miller Posted February 21, 2023 Share Posted February 21, 2023 If anyone is interested I designed and built a Correx high wing aerobatic model a very long time ago. It w as called Blue Movie and was published by Radio Controlled Model World. It was still flying in other peoples hand years later and there is one in Canada that could still be flying. Sarik still list the plan. A little story goes with it. The auditors were in the offices and the summoned the editor of the day to their office and demanded to know why he had bought a blue movie. They didn't believe him until he brought them a copy of the magazine!! The name? Well it was very crude and very ugly but the performance was incredible 1 Quote Link to comment Share on other sites More sharing options...
Saint 1 Posted April 2, 2023 Share Posted April 2, 2023 Well, paranoia has finally got the better of me and the thought of my Corsair's maiden resulting in an uncontrolled downward plunge into the briny has made me remove the additional 150g of nose ballast 🥴 This has now moved the CG point back from 103mm to 115mm, equating to what's still a fairly nose heavy 13% static margin. Sadly I won't be at the Lleyn MAC event to try it but we're booked in for the first Orme event in May so I'll hopefully get to fly it there 🙂 Quote Link to comment Share on other sites More sharing options...
Saint 1 Posted June 28, 2023 Share Posted June 28, 2023 A little update on my Super Corsair... A few weeks back I decided to experiment with moving the CG point back on my standard Corsair from it's current 16% static margin to a more reasonable 10% and after a bit of trimming found it still flew absolutely fine. Based on that I have now also set my Super Corsair at 10% margin too by moving the receiver battery rearwards. (The CG point is now 123mm rear of the root LE instead of the 103mm I originally had with a 16% margin). On Monday the Super Corsair had its maiden...of sorts, it probably lasted a couple of minutes all told before the lift suddenly dropped off and I found myself landing out way down in the valley. On the plus side, in the somewhat brief flight time it did seem to fly well, on the down side it clipped a wing tip on landing and twisted the wing in its mounting a little so I have had a few repairs to do since. My wing was located within the fuselage between the fuselage formers and so had square abutment faces meaning when the wing tried to twist it cracked the fuselage side slightly. I should have known better really but have now created a chamfered ramp at the TE to hopefully minimise any damage should I have a similar occurrence in the future. The ramp's at 45 degrees, maybe 60 degrees would have been even better but it's an improvement on what it was anyway. The mini-maiden also highlighted a potential issue with my two elevator servos so it was worthwhile if only for that and I have now swapped them out for some tried and tested ones. So now the Super Corsair is fully ready for its proper maiden and I'm feeling more confident too for this coming weekend at the Orme where the winds are looking quite favourable I reckon 3 Quote Link to comment Share on other sites More sharing options...
Saint 1 Posted July 14, 2023 Share Posted July 14, 2023 Success! I finally managed a proper maiden flight at the PSSA event on the Orme! Although we were flying on the main slope the wind speed was a bit on the high side for me and not square to the slope making launching and landing a little tricky for all but the most experienced pilots. Having flown my smaller Corsair early on Saturday I waited for a quiet spell to try the big one and with thanks to Harry Twist for the launch she took to the air around lunchtime. She flew well with the 10% static margin and was noticeably more stable in the air than my smaller Corsair no doubt helped by being twice the weight. I didn't try any heroics with it, just some banked turns and the occasional role after which I was just glad to get her safely back down. Unfortunately the wind strength continued to increase over the rest of the weekend and I didn't want to risk another flight in such challenging conditions so that will have to wait for another time. Sadly, with it being lunchtime I don't think anyone captured a photo of the maiden either but if anyone did by chance then I'd very much like to see it please. Phil 🙂 2 Quote Link to comment Share on other sites More sharing options...
Saint 1 Posted January 29 Share Posted January 29 Building my Correx planes to look more scale takes on a new dimension. I thought I’d share a few photos and info on another Correx build I have been working on over the Winter, but this one's a little different for me. As you may know already I have built quite a number of Correx PSS aircraft over the past four or so years and over that time have gradually attempted to transform them from the normal vinyl covered 'fun' plane to something a little more scale in appearance and worthy of gracing the skies alongside more traditionally built planes at our PSSA events. This time I decided to turn my attention to the Aermacchi MB-326 Impala. There is something about planes with tip tanks that just seems to make them look so good in the air. The plans for this particular model have been about for years and are freely available to download, along with many others, from RCgroups.com https://www.rcgroups.com/forums/showthread.php?1445391-Correx-PSS-L39HawkF-18FoxxU-2ImpalaA-10SpitfireF4USeaFuryP-51VulcanFW190-free-plans! The construction method has been covered many times before so I won’t go into detail on that. My build is already complete and now ready for a primer coat. The build was mostly to plan other than my usual approach of using 2.4mm ‘Correx’ for the wings rather than 2mm plus a few adjustments along the way to fuselage former sizes and positions to aid assembly. In my more recent builds I have taken to closing off any exposed flutes to improve the look, either with thin ply, balsa or filler and that is what I have done again here. I have also produced the ailerons with a folded piece of Correx rather than just a single 3mm thickness: this not only reduces the amount of exposed flutes but also makes for a smoother blend between the wing and aileron surfaces. The nose is made from a ply cruciform with balsa infill. When I first commenced this build knew I would want to improve on the tip tanks; to plan they are simply made from a few thicknesses of Correx glued together. Plus there were no air intakes either – something else I wanted to add. These were invariably going to be produced in balsa BUT then, mid-way through December I was offered a second-hand 3d printer – something I had been thinking about for some time..... My builds are never going to be the same again! Much of my past career revolved around Cad modelling so before long I found myself downloading some free Cad software and although it was a different package to that I’d been accustomed to I soon got back into the swing of things again….and then there was no stopping me! The tip tanks are HUGE – 400mm long! But after a fair few iterations I had something that fitted neatly over the ends of my Correx wings. For retention I included holes to accommodate both 6mm and 8mm magnets, in case the 6mm ones aren't strong enough. My first attempts were printed flat on the bed and had way too much infill and consequently weighed well over 100g each. After much help and advice from Tim Mackey (Thanks Tim!) I ended up printing the tanks vertically with thinner walls and a much reduced level of infill. This not only produced a far better surface finish but also reduced the weight by more than half, down to a little over 50g each. This was using PLA+ print filament. A test performed by Tim suggests this weight could be further reduced by another half again if lightweight LWPLA were to be used. For now though I’m happy with what I have. With the tanks sorted my next challenge were the air intakes. I opted to make each one in two pieces; a lower piece which I bonded to the underside of the wing with the upper piece held in place by yet more magnets. My thinking here is that the upper pieces will easily detach, should the wing bolts ever shear and cause the wing to twist out of the fuselage, rather than directly impacting the fuselage sides. These weighed a little over 60g for the pair which didn’t seem too bad. A part-pilot and seat added another 20g The particular Impala I’m modelling had cannons so I decided to have a go at modelling and printing some of those too. Trying to create the correct shape to mate to the underside of a folded Correx fuselage proved quite challenging but I eventually had something that fitted reasonably well and weighed in at around 35g for the set. I made a pair of wing strakes which weighed in at under 5g and also made a little instrument binnacle to suit a photo of the instruments I found. This weighed just 6.5g Another feature of the plane I’m modelling is what I presume is some kind of aerial – a hoop-like structure on the tail fin. Recreating this would invariably result in something exceedingly prone to damage in transit so I wanted to make something which was detachable. I ended up modelling some tiny grommet-like pieces that will be glued together sandwiching the tail fin and with suitably sized holes to accommodate some black wire sleeving (with the wire stripped out from inside). A trial piece suggests it should work. Adding all these detail parts (and filler) of course comes with a weight penalty, something in the region of 250g for this build, taking a more normal build up from around 1400g to where I am now at 1650g (fully balanced to the plan CG point and including 50g of nose weight but without paint). Hopefully it’ll all be worth it though! Here are a few more photos of the whole plane as it is currently. Thin ply and filler used to cover any exposed flutes around the exhaust (Not the best place to be adding weight admittedly). Filler applied at the joint between the turtle deck and fuselage Thin ply edging of exposed flutes and 6mm x 2mm magnets to retain the tip tanks...hopefully! Predominantly balsa edging strips around all tail surface edges. Also visible are 2.5mm carbon stiffening rods inserted through the flutes. Those within the fin penetrate down through the fuselage formers for extra rigidity. Hopefully it'll soon warm up and I'll be able to make a start on getting it primered and ready for the finished colours Phil 6 Quote Link to comment Share on other sites More sharing options...
Peter Miller Posted January 29 Share Posted January 29 After my one very basic design for a Correx model many, many years ago. Your model is totally amazing. I would not have believed Correx could be used to produce such an accurate and realistic model. WELL DONE 1 Quote Link to comment Share on other sites More sharing options...
PDB Posted January 29 Share Posted January 29 @Saint 1 What a fantastic looking model, what adhesive are you using as I have struggled to get a good bond with my correx experiments? 1 Quote Link to comment Share on other sites More sharing options...
Saint 1 Posted January 29 Share Posted January 29 40 minutes ago, PDB said: @Saint 1 What a fantastic looking model, what adhesive are you using as I have struggled to get a good bond with my correx experiments? Thanks PDB. That's a very good question. Correx is tricky to get a decent bond to as you say. On surfaces that aren't seen I first key the bond area with sandpaper, then clean all surfaces with nail varnish remover. In my experience wherever possible hot melt glue gives the best bond, followed by EvoStik. When using EvoStik to glue on my balsa edging strips though it has sometimes had some kind of chemical reaction within the flutes and caused the skins to bubble up slightly. As an alternative I have now found that clear Gorilla glue also works reasonably well when bonding to the flute edges. It's not as good as EvoStik when bonding directly on the surface of the Correx though, as I found when gluing my printed wing strakes. I first bonded these with Gorilla glue but then managed to dislodge one so have now reverted to EvoStik again! I have had similar problems with filler. It's ok to use when filling joint gaps where it has good edges to get a grip on but it never adheres as a thin slither over surfaces very well and would invariably flake off after a heavy landing. 1 Quote Link to comment Share on other sites More sharing options...
Saint 1 Posted March 15 Share Posted March 15 I've finally managed to finish off my Impala, the weather hasn't been very conducive to spraying so there has been the need for much use of the fan heater and hot air gun to help things along, my impatience doesn't help of course! I chose to replicate the colours of a recently restored Italian Air Force MB-326K Impala - registration I-MBCK. I had never attempted spraying camouflage with faded edges before so this was a bit of a new adventure for me. Fortunately, Harry Twist pointed me towards using soft edge masking foam which helped no end and although the masking process took quite a while I'm very pleased with the results. I once again used the Lifecolor Mimetic range of paints from Airbrushes.com. The rest of the detailing is a mixture of vinyl and waterslides and in some places waterslide on top of vinyl. The whole model then had a couple of coats of clear satin sealer to finish off. It turns out that paint and vinyl are heavy, adding another 140g to the finished weight so I probably now have the heaviest Correx Impala ever built at 1790g! That aside, with all the added 3d printed parts and detail I reckon from 6 feet away anyone would now be hard pushed to recognise its humble Correx origins. I'm now really looking forward to getting her maidened... when there's a stiff breeze blowing! 9 Quote Link to comment Share on other sites More sharing options...
extra slim Posted March 15 Share Posted March 15 Beautiful.. simply stunning. 1 Quote Link to comment Share on other sites More sharing options...
PDB Posted March 15 Share Posted March 15 2 hours ago, Saint 1 said: I've finally managed to finish off my Impala, the weather hasn't been very conducive to spraying so there has been the need for much use of the fan heater and hot air gun to help things along, my impatience doesn't help of course! I chose to replicate the colours of a recently restored Italian Air Force MB-326K Impala - registration I-MBCK. I had never attempted spraying camouflage with faded edges before so this was a bit of a new adventure for me. Fortunately, Harry Twist pointed me towards using soft edge masking foam which helped no end and although the masking process took quite a while I'm very pleased with the results. I once again used the Lifecolor Mimetic range of paints from Airbrushes.com. The rest of the detailing is a mixture of vinyl and waterslides and in some places waterslide on top of vinyl. The whole model then had a couple of coats of clear satin sealer to finish off. It turns out that paint and vinyl are heavy, adding another 140g to the finished weight so I probably now have the heaviest Correx Impala ever built at 1790g! That aside, with all the added 3d printed parts and detail I reckon from 6 feet away anyone would now be hard pushed to recognise its humble Correx origins. I'm now really looking forward to getting her maidened... when there's a stiff breeze blowing! Wow, that is fantastic, great job and wish I had your skills. 1 Quote Link to comment Share on other sites More sharing options...
stu knowles Posted March 16 Share Posted March 16 That looks fantastic! I too had a dabble with Corrox year ago. Made a horrible looking but very robust trainer. It flew fine but I couldn't live with the appearance and wrote off Correx as a building material. Next stop will be the beginning of this thread to learn how you have done it. Any thoughts on putting the STL files of somewhere like Thingiverse? The Tip Tanks look very handy 😉 1 Quote Link to comment Share on other sites More sharing options...
Saint 1 Posted March 16 Share Posted March 16 Thanks for the kind comments all. Stu: I've sent you a pm. Quote Link to comment Share on other sites More sharing options...
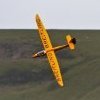
Saint 1 Posted April 18 Share Posted April 18 Just realised I had not added any in-flight photos of my Super Corsair. The first was taken by Phil Cooke at the Orme last October And these next two were taken by Dave Gilder, again at the Orme, last weekend She is a delight to fly and one of my favourites. 1 Quote Link to comment Share on other sites More sharing options...
Saint 1 Posted April 18 Share Posted April 18 I maidened my Impala at the Orme last weekend too! Despite her hefty 1.8kg AUW she flew brilliantly from the off with virtually no trimming. With how windy it was I did have some reservations that the air intakes or tip tanks might have blown off in flight but they were unfounded. Both intakes did detach on landing though but that was the idea. I'll be looking forward to flying her again soon. Last minute checks - Photo courtesy of Dave Gilder:- And away! - Photo courtesy of Phil Cooke. 1 Quote Link to comment Share on other sites More sharing options...

Recommended Posts
Join the conversation
You can post now and register later. If you have an account, sign in now to post with your account.
Note: Your post will require moderator approval before it will be visible.