Leaderboard


Popular Content
Showing content with the highest reputation on 18/02/21 in all areas
-
Amazing footage from the mid 1970's.....3 points
-
And here is the video of it second run. I did the first one this morning with the cowl on but I had a problem with my remote glow so it only ran on 1 pot, mind you it still pulled 5K on just 1! After the rain stopped I took it out again with the cowl removed so that I could put 2 separate drivers on the plugs. Things to note, I need to adjust the slow running as it's still not quite right, but top end is giving me 8.2K on an APC 18x8. Ignore me kicking the wing but hang on to the end when I tweak the top end and just listen to that sound!!!!!3 points
-
All the capping done I decided to sort the aileron hinging. As you will have noticed I have altered the ailerons from square fronted, mylar hinging ailerons (yuck), to proper friese ailerons. The leading edge of the ailerons was bulked up with scrap balsa, and rounded off. The hinge position worked out. its a long way back from the aileron leading edge at around 18mm. I bored some holes and threaded piano wire to check everything aligned, and it did so I then cut brass tube to act as hinges to piano wire rods. If you have built a few Brian Taylor models you will know this technique. A slight deviation is caused by the upsweep of the wingtips. This means the usual wing tip holding a brass tube bearing could not be used, so instead I had to make an interim hinge point from glass board with a small brass bushing. This meant I could thread everything up and adjust the interim hinge against the adjacent rib until the fit was good, then some thin CA and we were done. Really happy with the hinges absolutely free and no slop. The other benefit is if you slide a long piano wire in from the root then the aileron is removable. Cheers Danny2 points
-
A day in the workshop yesterday airbrushing the insignia etc. Decided to pop Pengie on both sides of the cowl.2 points
-
A dressmakers tape might be useful for following curves and wrapping around fuselages for drawing lines, it can be tacked in place with masking tape and carefully followed as a straight edge.2 points
-
Hi, Apologies for the delay in posting, but I was experiencing difficulty with the new "App" in part by using an old "App" to view it....So if anyone is left to follow this thread I'll do a quick update. I can't see the number of views so either let me know how to or post a emoji so I know its worth continuing? Couple of plastic spoon air scoops for the motors and ESC's Grumpy sizing up his office2 points
-
As my RF-4 build is coming to an end I have started thinking what next. I have downloaded the plan and article from outerzone, @Peter Millerdesigned and recommended it so it must be good. It looks a good candidate for a first plan build. First I will go to the printers and get a couple of plans printed, why else would one go to the printers ? Just a minute I have The Ohmen waiting to start and by the time I can get to the printers we will be flying again. It's good to have plenty to do.1 point
-
Still waiting on veneer chaps . So sorry , but nothing we can do but wait for it to turn up . Undercarriages are made so we are fully committed (not for the first time in my life , and yes I do have very long sleeves )1 point
-
Chris, Thanks, I've bookmarked it so I don't have to go through that each time. Andy.1 point
-
This is my setup which consists of an ali frame and a box which connects to the vacuum cleaner. I made the frame to fit in the grill slider ways in the cooker. The box is a simple plenum with holes drilled for suction and some draft strip to seal the frame. I clamp a piece of 1mm PETG sheet to the frame. Heat it under the grill till it starts to sag then with the vac cleaner running I quickly take the frame and push it down over the plug located on the box until the frame seals on the draft strip and the vacuum pulls it tight. I have made two perfect canopies for classic aerobats this way. A.1 point
-
Should I be worried about this model being a bit of a lemon?1 point
-
They bowl-ed me over1 point
-
Not me guys, we have Jon to thank for this British engineering beauty, I just stuck it in a plane! Can't wait for lockdown to end!1 point
-
Go for it. You'll have it ready by the time flying starts again.1 point
-
Good evening. I have looked on Sarik in the past and they don't seem to do what used to be called universal canopies with different sizes, but i will give Trent a call tomorrow, A3 sheets are quite cheap so i will have a word with them. I do want to mould my own to find out if i can. More satisfaction. I will let you know how i get on? Thanks Geoff1 point
-
Just to totally underwhelm you, here's the pic I took, it does look like I also used countersunk machine screws, but I cannot prove it LOL When you build the fuselage perhaps you could add some ply in the right places to take the inevitable screw fixings Danny, I had to cut the covering when I did mine. D.D.1 point
-
A slight distraction today from cutting into wood. Having removed the undercarriage I was a bit embarrassed by the corrosion that had built up, so not wanting to keep looking at the sorry state while continuing with the airframe, I though I ought to make the oleos clean and serviceable. A before and after picture of a cleaned up oleo, fresh grease applied inside the sliders. The oleos were supplied by Tony Goodger when he was running Unitracts. They are simply two legs separated by a square plate. The screws were tapped into the legs 6BA however there is very little metal for the bottom screws and they had pulled out. I bodged a repair by fitting self-tapping screws, hardly an elegant engineering solution so I decided to do the job properly - thanks Boris for giving us all the time in the world. Raiding my do-not-throw-these-away stash I found 4BA taps and suitable screws, though the screws needed filing down until they would go in tight but not bind on the springs beneath. One leg down and one to go. Plenty of metal at the top for a tapped hole, but very little on the oleo tube, hopefully 4BA will last longer than 6BA The centre hole in the oleo plate had made a convenient place to mount a home made silencer. On the inners the Laser exhausts came just on the front curve of the wheel fairings which would have meant an enormous hole in a visible place, so the solution was to use bendy extensions and route the exhaust to the bottom rear of the fairings. This has worked well so will be retained on the refurbished model.1 point
-
A few iterations later. Fit sand fit sand ...... That's near enough for me. Now I can fit the flairs ( the fancy bits to blend the fuselage into the wing). Another good day here in North Lincolnshire. ?1 point
-
I would check the RB10 with some simple tests to prove it's RX and power redundancy features, then use that. Two RXs, two battery packs, a few servos connected and a servo test setup on your TX... just unplug stuff one by one and check the servos keep moving. Give it a few hours of operation at home driving (say) 8 servos simultaneously; if it can handle that and still pass the redundancy tests I say it is good to go. PS - Does your model petrol or glow? Remember the X series RXs are not rated for spark ignition, there have been problems with them in the past despite Frsky denying that initially. There are now petrol specific models in their lineup though such as the RX8R pro.1 point
-
Hi Mods - very minor quibble.... had you noticed the "latest posts" button shows "Showing topics posted in for the last 365 days" [sic] as a subtitle under the "Latest Posts" heading? It's the same whether it's the button added site-wise, or the view we were encouraged to add ourselves in the early days. Thanks for making the default text blacker ... it's definitely better. The new RGB values are (18,20,22) rather than (53,60,65) - so still not totally black, it could probably go all the way to (0,0,0)! Is there any way of resizing images once added to a post? I've not found one yet, if so. I've seen a lot of images posted that take up a whole page on my large screen when displayed. Thanks again, it's really getting there. Simon Feather1 point
-
Why try to mend something if it isn’t broke. just saying?1 point
-
I am aware that I haven't actually shown the engine in all its glory but I can now do that. Installed1 point
-
I have pics of that part of the assembly Danny, At work now but when I get home I will post. The wing retainers work for a while but get looser and looser, I made some inconspicuous screw in plates in the top of the wing and fus in the end. Getting them off requires cursing. Looking good tho Matey . ? D.D.1 point
-
Thanks FF, Getting there I am going to have to do better than this. I just need to work out what and were to trim.1 point
-
Hi Jon - my preference would be to put the servos in the wing - plenty of good spec mini/micro servos available that would do an excellent job for you. Cheers Mike1 point
-
here's my latest creation...an airfix MK.IA,made to look like the thank you NHS spitfire that did the flypasts of the hospitals last year.. ken anderson...ne..1..NHS dept.1 point
-
I've been unable to upload a zip file of the collection as it is over the forum maximum file size. In the meantime I have created a thumbnail page where you can view and download individual images. I've hit a small snag with my FTP connection and can't upload the zip file just yet but once I get that sorted out I'll add a link so you can download the whole lot in one go. I've temporarily added smaller zip files with the images grouped by view type. http://www.iom.org/?page_id=12671 point
-
I reckon we would all like to see a new aerobatic plan in RCME! The Karma perhaps?........... From my point of view a 53 inch span model would be ideal and it would be very nice to see an electric version. .1 point
-
Great work Danny. I don't have any experience of that retention mechanism, but it looks like a good solution. It should work, but it will be interesting to see how it functions in real life. It does look a bit tight in there though!1 point
-
You've bought some nice brushes there David, many people go for the cheap option which is fine if you're prepared to do some work on them but yours will be ready out of the box and are well made Japanese products. Once you start delving into the black art of airbrushing on YouTube you'll be on it for hours marvelling at the skill of some of the masters and in fairness, beginners too. It cannot be said often enough .....practice, practice, practice and experiment. Good luck and enjoy.1 point
-
I reckon the high oil content is largely a hangup from the days of bronze bushed engines running meehanite pistons in steel liners. Nothing like a skin of burnt castor for sealing a slack piston!?1 point
-
I haven't flown very many times for the last couple of years. I've got used to taking a couple of replaceable old hacks with me when I go, until I get the feel for it again. The only trouble is, that's all I've flown because I've not got the feel for it back. I dare say that it'll be the old hacks again when we are free to return. Probably these two. Wot4 classic with Saito 82. Hyperion Sniper XII1 point
-
Chris, I was really just wondering why others could not find it so had a go myself.1 point
-
Short answer, yes.1 point
-
The undercarriage has now been removed and the bad covering stripped off fortunately it came away without causing further damage. I must have used Balsaloc or similar on some parts as the Solartex had a tenacious grip, especially around the windows, on other parts it came away easily. An inspection of the tail showed that there's no visual damage though I may cause some trying to remove the covering. The hinges are Robart type (glued in) so I'll leave the tail section as is and worry about how to paint that area later. The flaps were driven by trusty Futaba S148 servos, one per wing stub. I remember needing to reverse one of the servos so had to disassemble it and swap over the motor and feedback pot wiring - this is a good example of the use of programmable servos which will make setting up so much easier. The 1/16 sheeting has started to lift but will have to come off anyway to replace the wing joiners, these were brass tubes using piano wire as the joiner. The stresses on a biplane wing attachment are not as high as a cantilever wing so were adequate for the purpose.........provided all landings were perfect! They will be replaced with thicker aluminium rods running in phenolic tubes The elevator and rudder servos were mounted high in the fuselage, immediately behind the cockpit, this gave a direct run to the surfaces. I don't think I'll alter anything here, just change the servos for something modern. A bit of useful work will be to dispense with a hatch-latch when recovering and use neodym magnets. I'd not heard of them until a few years ago but are now my preferred method of retaining hatches.1 point
-
Chris, the words 'enough power to clear the faulty item' - what does that actually mean?1 point
-
I have been a bit of colour for a couple of days which could be the jab on Saturday, symptoms tie in with the 1:10 side effects on the data sheet. Not ill and not worth reporting but good news because it is a sure sign that I am producing antibodies. I have had many jabs in my life and this to me is nothing worth talking about. Bring on the second jab and as @john stones 1 Moderator says let me out. ?1 point
-
If I'm in England at the time and if I haven't set fire to the rest of my Laser powered models, I will be there! ?1 point
-
I have never been a big fan of retracts in simple sports models and saw no need to consider them on the Chilli series - even the 67" span 60 size version featured a fixed u/c. Wing sections were also becoming slimmer around that time and this was another good reason to "keep it simple". The Chilli Karma shown in the photos featured a carbon fibre undercarriage mounted on the fuselage and this was a very practical, lightweight alterative to the piano wire version mounted in the wing and, for my taste, much preferred to retracts - further refinement included a separate servo for each aileron. The OS .46 is using a C-Vec device in place of the standard silencer and this worked quite well in terms of boosting power but the Bolly pipe was wonderful and quiet too!. I have included a pic of the "stretched" Chilli Wind showing the YS .45 RE/Bolly pipe installation and also the arrangement that was featured in the magazine article for those who are interested in the oily side of life.1 point
-
Lovely work Eric ? But then again I wouldn't expect anything less. Cheers Danny1 point
-
Hit a snag - my zip file is over the maximum size, I'll sort something else out tomorrow. Here's a teaser:1 point
-
Here's my rather nice Freewing Spitfire Mk IX. Not much in the way of building, but I did give it the proper invasion stripes under the wing ( the kit supplies them for the fus but not the wings. ) and a little bit of weathering. Overall a very nice kit, but the trailing edges of the wings had "bowed" a little in storage. Happily the flap servos put enough pressure in the up position to straighten them out. ( Mostly) without unduly stressing the servos. Oh and the rather lovely looking stencil sheet is practically useless: the rub down transfers really don't want to leave the backing sheet. A good size at 48 ish inches ( 1.2m) As yet unflown ( It was a Christmas gift ) Finished as Pierre Closterman's aircraft.1 point
-
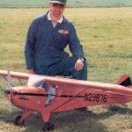
Last model built, a Parnall Elf based on the Shuttleworth example, built from my plans, 68 inch span, Laser 70. Test flown last year in between lockdowns. Photos courtesy of Brian Collins.1 point
-
Went out again late afternoon1 point
-
Sinbad on YouTube First, short flight, there were a few others but the battery ran out on the RunCam!1 point
-
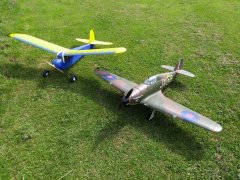
Latest build Anglewings Sinbad.1 point
-
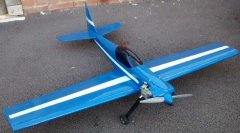
Another lockdown build, this time a Peter Miller Peggy Sue 2 built for electric and finished in the same colour scheme as my Sig Rascal 110. Quite a bit of 3D printing was involved in this one, including the cowl.1 point
-
Hi Guys Regarding undercarriages, there is always a plan B, or is it C...D... Here Jeff0 points