Leaderboard


Popular Content
Showing content with the highest reputation on 15/03/21 in all areas
-
Finally nearly there. Just engine run and general adjustments to do. Quite pleased with colour scheme. Originally it was to be yellow/silver but the red looked nice so went with that. New Engine is an OS55. Last flew with an OS70 4 stroke many years ago.4 points
-
decided to test fly it before painting and detailing it, so with a 22x10 2 blade test prop the engine was fired up and it was taxied out, so much thrust from the engine. It took off in about 3 meters at 25% throttle setting and just flew like a big slow trainer, only easier At 25% flap it floated in for landing at walking pace. So now all stripped down ready to paint. VID-20210312-WA0013.mp4 VID-20210312-WA0012.mp43 points
-
test flight VID-20210312-WA0031.mp4 VID-20210312-WA0030.mp43 points
-
more building. Flew beautifully on the test flight.3 points
-
I found these on YouTube. There’s more and I think very funny. I recommend wearing some headphones as the sound is very entertaining2 points
-
ok thanks David and young Chris....i'm using an old black and white tv up here in ne...1. land ken anderson...ne...1....back woods dept.2 points
-
If you go into the version screen menu long press into Radio setup 4 short presses on Page, there is the 'EEprom Backup' and Factory reset! Thanks for all the help. It's nice to know help is here when needed2 points
-
G'day, I'm Richard Will's friend who lives in Italy. I did my own build of a Pilot Spitfire back in the 80's and powered it with a (brushed neodim) Keller 40/8 motor and 2 x 7 cell nicad packs. I modded it with a proper flat center section & mechanical retracts with scale pintle angles. Also gave it a full cockpit interior with a sliding canopy. It only flew once and in a sprightly fashion (probably a scale mach 3) before my brand new Sanwa excellence tranny intervened. Even though the end result was rather poor, the model was thoroughly enjoyable to build and even modify. If I was lucky enough to find one, I'd buy it straight away! IMHO, it was a beautiful model extremely well presented for the day.2 points
-
Cor, I'm going to buy shares in a clamp company! Second side added and drying off. All good so far.....2 points
-
Composite aluminium/piano wire undercarriage made and fitted to its mountings. As this was the first stage of actual fuselage construction and I had my glues to hand, it would have been rude to stop there so I added the basic structure to the rear. Next will be to add the keel piece visible on top of the pile of wood destined to form the curvaceous nose - no fancy moulded plastic cowls in the good ol’ days!2 points
-
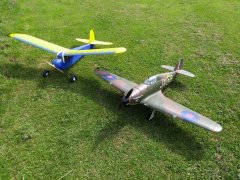
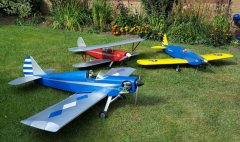
Some of my toys, past and present....1 point
-
-
Plenty Lightness been added there Ron.1 point
-
Took my Ahi out for a bit of local (10mins from home) slope-soaring this afternoon. Seems that I haven't lost the knack... which isn't saying much really, as it wasn't very good to start with !!1 point
-
Well, this is as far as I can get until the silencer arrives. At least it is starting to look like an aeroplane. I might cover the wings and get them ready for painting.1 point
-
That looks to be a very nice kit Gary and you're making a lovely job of it. Is the wood as good as it looks in the photos? It only seems like a few days since you started the build but you've made great progress - I should have looked back sooner! I'd second the idea of a cf rod linkage - looks like a nice straight run and should give a lovely slop free result. I always feel there's a possibility of the screw weakening the plastic pushrod if you tighten it enough to ensure there's no slippage.1 point
-
By the way one thing I haven’t mentioned earlier but I’m sure most modellers already have their own methods are my DIY elastic band joiners. The elastic bands are useful for sheeting and even holding the sheets while you mark a pencil cutting line . I use bits of bent wire cut offs to join the ends of elastics so they can be easy released ( its good to wear glasses when releasing for eye safety!)1 point
-
Oooh nice bench fly Gary, with you on the push rod, don't like those.1 point
-
More fuselage work and a weighing session. The forward fuselage shaped easily, just needs final sanding after gluing the mouldings on, I need to check if cellulose dope affects the plastic. Weighing all the parts came to 895 grammes, that included a second motor, mount and prop that I have to order. Battery is 135 g, receiver and two ESCs around 60 g, covering and finishing 75 g ish. Nose weight unknown, it might be better to use a larger, heavier battery. There is a small amount of engine pylon fairing wood not included and a lot of the plastic still needs to be trimmed. The tail assembly feels chunky/heavy at 77 g but hasn't been sanded yet. Total weight guess is 1,165 g so hopefully it will end up under 1,200 g. That compares to Aero-naut's weight of 1,500 g (I assume without undercarriage) and tallies with the battery weight difference of circa 300 g. That works out to a wing loading of 16 oz/sq ft which is the same as my Phase 6. 1. Using the centre section fairing to mark the contour line. 2 and 3. Same at the nose cone. 4. A template is provided in case you don't trust your eyes! 5. Making some hamster bedding. 6. I've missed some photos of trimming the canopy and fitting a former to it, still thinking about making it a hatch. The rear lower fuselage sheeting needed to be added so I fitted the elevator snake, servo bearers and servo, not sure if I will stick with this arrangement, might upgrade to a carbon inner rod and proper clevises. 7. The wind had died enough to get a photo outside, it's getting there. 8. Weighing bits and pieces, the tail assembly weighs 77 g at the moment, the fins feel particularly heavy but they haven't been sanded yet. 9. Weighing the wing with everything except the servos and covering, the tip blocks are very heavy, hard wood but the majority of them is carved away to make Horner tips. 290 g. 10. Fuselage and one motor, 370 g.1 point
-
I’m steadily getting on with sheeting the fuselage. I added the ply front top sheeting after putting in the elevator and rudder servos and securing the elevator snake. The pull-pull rudder wire will go in later ... probably after covering. The ply front top sheet needs to make a rebate for the cowl . I actually centred it on both the formers to also allow a small rebate for the rear sheeting to join. I’m using as large as possible sheets to keep the weight down and try to minimise jointing . It’s going to be slightly fiddly butting the sheeting near the rear wing fairing former as there isn’t much support there so I may add a few fillets. I haven’t made the cockpit sheet cutout to size yet so that’s just a rough cutout to allow clamping.1 point
-
Received a full set of replacement fuselage side parts from Sarik, packed in a cardboard box this time so undamaged. Fuselage construction underway.1 point
-
Easy peasy, I 've been rying to cut and paste!1 point
-
Also if you click on the + to the left of Quote any post in the topic or any topic on any forum then a pop up will appear.1 point
-
Ken, if you look at the list of members on line at any time (via "browse") there's always a very healthy number of folk looking in. A good number of those are shown as "guests". i.e. they are not logged in. It could well be that some or even most of those are previous members just browsing. If/when they have something to contribute, I'm sure they will log in. If they're having trouble doing that, they only have to use "contact us" below. Is there anyone in particular that you have a concern about?1 point
-
Raid the Mrs peg bag!1 point
-
I usually buy a humbrol tin of the colour that I want, paint a 3cm square swatch on a bit of white card, then take it to B&Q and get them to scan it and mix a tester pot (should be enough for 2 or 3 models).1 point
-
I use automotive paint to paint my models most of the time. I usually use Cellulose paint for cheapness and for ease of mixing and handling, plus most of my painted models are either PSS gliders or electric. I do use 2k clear as a fuelproofer for glow models when needed though. I use a supplier based in the West Midlands called Jawel Paints. I found ordering through their website easy and their service quick, plus their paint does what it says on the tin. To take your example of Ford Frozen white, I googled "Ford Frozen White paint code" and got the result "7VTA" in seconds. There is a text box to type this code on on the Jawel site. Their carriage costs are reasonable too (my last order was a 5L tin of thinners and two 1/4 litres of paint). I live in NE England, so have no prior knowledge or connection to the company. I would imagine any car paint supplier could manage the same service though?1 point
-
No I didn't know I could. I assumed as my models and settings were in Companion then that was the only way. I did not know that either. ?? I read posts to see if I can help but in the process I almost always learn something new. You are welcome, always pleased to help.1 point
-
Thanks John, just need to find homes for them now, the surpass and OS 46s are (sort of) spoken for, the surpass to be swapped in to my current twin and the 46s for a future twin project, the rest, who knows, just been having fun getting them tidied up. Didn't got involved with getting the sandcast parts cleaned up, so some show a little oxidisation in places, probably a bit late to think about that now the new bearings are in, they're clean enough for me though, bit of boil / scrub got the muck off and cutting compound cleaned up the smooth stuff like cylinder heads. Can't hold a candle to the engine work of some of the guys posting here, but its kept me happy in the winter evenings and its great to hear them bark again.1 point
-
Not just you Colin. I used to do maintenance and restoration work on Austers, and had to frequently check the pivot bolts on the undercarriage. They are quite small diameter and the port side (pilot's side) ones would often be bent like a banana, sometimes making them almost impossible to remove.1 point
-
I usually reinforce the front of the fuselage when it is lacking in strength or is made of only fibreglass. Often there is a lack of carbon reinforcement so as to avoid signal interference unlike under the wings whereas this is just where you need the strength to protect from heavy landings. I try to use Kevlar because strength is added but no signal interference. It is however difficult to cut and trim. I managed to find some thin Kevlar which is also difficult to source. I made a paper template then cut out the cloth. Again, important to protect the fuselage with masking tap. You can see the carbon ribbon which does help but is not as strong as the full carbon version which is also available by special order from TJIRC. Also rub the inside of the fuselage with Isopropyl Alcohol to remove any manufacturer residue.1 point
-
If I remember rightly, Ceconite has been around for a while as a full-size covering material? In this case I’ve got more than enough Solartex to do the Fury and I want to get it finished now. I bought some nylon for this project, but I’ll use that for something else now. One of the problems that lead me to park the Chipmunk was warping of the ailerons using silk, tissue and dope, among other self-induced mishaps! One day I’ll take a deep breath and have another go with it. There’s a lovely un-run OS62FV in that, mustn’t waste it.1 point
-
Not quite old airframes, but it's what has been keeping me busy for the dark of winter... Two 40 Surpasses, fresh bearings all round, valve gap set and they run like butter. Clearly too easy... Two 46 SF-P, put together from four (!) motors of varying tidiness, plus bearings and o rings swapped. Both run lovely. Pipe (novarossi 50350) on the first one is being bench run to get the length set for target prop, 11x8. Two 61 SF-P, again from a collection of four second hand units. First has run, the second has just had a bearing swap but should go just as well as the first does. Last two early irvine 46s. The first has been in the family since new and once had an embarrassing encounter with terra firma but a dead mk1 40 donated a front end which sorted most problems. Runs like a (very noisy) watch. The second is a mish mash of spares from the popular auction site. Yet to run. Got another 46SF-P to assemble from the leftovers, maybe another 61, neither will be tidy but both should run. Long live glow!1 point
-
Just out of curiosity do my posts look different if viewing on a pc/laptop ??? All these posts have been done on a phone so they appear ok to me.1 point
-
Ah, missed that bit! If you update regularly, have a photographic memory or keep notes then updating isn't overly complex. Unfortunately I have a mind like a sieve so have often managed to overwrite my models folder with older versions or similar basic errors. The SD card update is probably the area causing more grey hairs than anything else with OpenTX, so unless going between major releases (eg 2.1 to 2.2 or 2.2 to 2.3) it's easiest to just change the version file (unless the release notes indicate otherwise).1 point
-
How odd! I've just tried downloading various X9 SD card images from the OpenTX site and non of them contain any BMPs in the Image folder! Horus SD cards still contain them, but not Taranis models. I'll try pasting my Image folder from my Taranis SD card folder, I still have 2.2 installed so lets see how that works ? Images.zip1 point
-
Mike, I used heavyweight Modelspan but because of my colour scheme choice I covered from the spar to TE first then spar to LE using a single coat of thinned dope for each section. Subsequent coats of dope applied to both areas in one go. If I'd been using a single colour, I'd have applied the damp tissue as before but brushed the thinned dope along the LE,TE, tip, root edges then the spar & allowed that to partially dry before a brushing a first coat over the rest.1 point
-
I reckon the modern world stomped on many a good kit maker, buy it cheap, delivered for nowt is a hard competitor to beat. How many used to go the Nats with a wad to buy your hearts desire ? Those days are gone, pretty packaging never killed them, modellers did. Some want their pound of flesh for 50p and woe betide the seller, if it's a day late arriving.1 point
-
13" Peanut Scale DH80A Puss Moth, Jim Mollison's "The Heart's Content" (1932 solo Atlantic from east to west). My first own design, flying weight 11g (8.5g airframe plus 1.5g rubber plus 1g lead in nose). First outdoor trim flights 42 secs, aspire towards 60 secs indoors (which under the rules means 50 secs plus 10 secs ROG bonus).1 point
-
This has been lockdown build. I can't remember ever completing a model in around eight weeks. I have quite enjoyed a 'sports model' build, being freed from the tyranny of a scale build with simple hinges, no retracts or wing fillets1 point
-
Flamingo 3.5 metre Scale Glider from the Chris Williams Sarik Plan and short kit which includes the canopy. This appeared as a Free Plan in RCM&E. Chris has been very helpful answering my queries throughout the build. Also of use, however, are a selection of photos he supplies free of charge, and the article which appeared in the magazine. I have a scanned in copy in case anyone wants it. This is a true scratch build balsa bash. It uses eliptical formers which are overlaid with .8mm ply for the fuselage, which was something I had never attempted before and employed a lot of kettle steam. Looking forward to maidening next week hopefully.1 point
-
I got around to clearing up the fire damage yesterday and "reducing to process" as I believe they say in the RAF. Ex Brylcream Boys will be able to correct me. A few pictures of the effects of the Great St Valentine's Day Fire for the entertainment of those who like horror movies! Not much left of the Spektrum AR410 receiver or the Hitec HS81 throttle servo. As for the two HS 311s which actuated the rudder and elevator, the switch, and the rx battery, there's no trace at all! The engine seems to have sustained only minor cosmetic damage.0 points


.thumb.jpg.6e9ca6f431386c6c58ab30794f332751.jpg)