Leaderboard


Popular Content
Showing content with the highest reputation on 03/04/21 in all areas
-
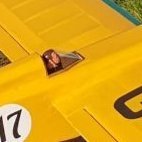
I fitted the undercarriage to the wing and got the cowl back on, and the pilot in. Then down the garden for some pictures. D.D. The home made wheels, look OK I think. Bit of an interior.6 points
-
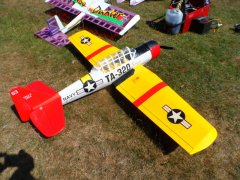
Took my PT-19 and Veron Hawker Tomtit for a turn in the spring sunshine..4 points
-
Hi All, Anyone interested in a Galaxy Models Musketeer Build blog. I will probably start one in a week or so. Tony H3 points
-
The undercarriage is nearly finished. In the photo you can see the key differences between the Spanish plane and RAF versions, in the undercarriage, engine cowling detail and radiator. There is also some interesting louvre detail I will have to contrive. It’s impossible to do the sprung wheel detail without having one, but otherwise the undercarriage is reasonably accurate. The Dubro wheels are accurate in diameter and tyre section, but have light spoke outlines moulded in. I’m making conical discs from 1/64” ply to cover these. I did think about making some lighter wheels, using the tyres off the Dubros, but decided against it. The weight is in front of the c of g and they are robust. Coming along nicely.3 points
-
Been out, 10 of us and Shep, sat talking all day, and watched Buzzards and Dog play. Bliss.2 points
-
A Homage to the original model. D.F. I still have to paint the engine blocks and the cowl, they are gluing as we speak D.D.2 points
-
I'm chuffed to report that another renovated Spatman took to the air today, after a retirement of around 20 years or so - I'd nearly chucked it out and am so glad that I didn't. Although I thought that I was prepared for the amazing manoeuvrability, it still took me by surprise. Possibly a little tail heavy, as I'd swapped the original bunch of AA NiCD batteies for some AAA NiMh , and a blustery wind with turbulence from nearby trees didn't help - but after a short flight I got it down in one piece and will be looking forward to the next time out, having tweaked it a bit. Roy, I will get a better photo to you asap, cheers...2 points
-
I've checked the source code changes on Github. The only change between 1.3.2.67 and 1.3.2.68 is a one line addition to sort the above problem, so it should be safe to use. Mike2 points
-
Maiden to do on this, I will fit the canopy once it is all mechanically trimmed.2 points
-
I'd change back if you are going to fly with it if I were you @Outrunner. There are plenty of warnings about not using the test firmware in anger where you downloaded it from. Maybe feed back your findings to help the team decide that the tweak has worked. I suspect that @Mike Blandford will be keeping an eye on this thread and may do that anyway. You now at least know that "0" is the right setting for your tranny, and that "should be" what the latest stable build uses, with no fine tuning applied.2 points
-
I've flashed the Radiomaster 4 in 1 with the latest firmware, as it's a test build do I need to change it back again or wait for an approval of this build? Now with Hitec Optima selected it behaves in a more expected fashion, I lose connection at about +64 and about -64 so if my understanding is correct it should be set on 0 It needs range testing yet but I will report back later. Phil2 points
-
Just to add a bit to my previous post after I realised I'd missed out answering one of Basil's queries, refering to power plants. We would generally have slightly more trainees who want to fly electric, I can't be sure of the exact reason why this is but some cite cleanliness which is fair enough. If the correct trainer is chosen then duration for either i.c. or electric is similar. For instance a Seagull E-Pioneer with a fair sized Lipo flies easily for 10 mins even when it's windy ditto for the Multiplex Mentor. Most of the foamies on 3s 2200's get 5 mins which is no problem but needs plenty of packs. For i.c. duration never seems to be an issue and 10 minute flights are the norm. One point of slight interest is that quite a few of the electric trainees migrate over to i.c for some reason, possibly due to the fill and go again convenience, rather than having lots of packs/ waiting for packs to charge?2 points
-
I’m amazed and really pleased that so many are willing to try this inexpensive covering material. Spreading the word to keep costs down!2 points
-
One thing I would add here is that experience and skill don't always make for a good teacher. I was in a club where the 'expert' appointed himself as the club teacher, but was generally to be found impatiently taking the tx off the student every few minutes or showing off with 'demonstrations'. The essence of training is to teach people to fly just well enough to be safe and able to fly and land in one piece reasonably consistently. Most of the real learning comes after you take off the reins.2 points
-
...and within moments a solution appears to have been found - gotta love the MPM project ?. (Ground) test away guys!2 points
-
Thanks David -it's been a long held dream to have a decent workshop, having spent a long time working away from home, coming home for the weekends and with the models usually occupying one room, but with not a lot of room to work. The outbuilding conversion took quite a lot of planning, but I've borrowed lots of ideas from magazine and other modeller's workshops and sheds. I wanted to have a couple of 360 degree access benches, as well as my trusty main bench which was made from a draughting machine. It was about 80% finished when the first lockdown started and the second fix electrics and finishing couldn't be completed for months. I decided that I needed a lot of storage for models and kits outside of the workshop, then had the idea of putting a mezzanine floor in the barn to house the kit mountain. The finishing touches were adding wall rack for holding my fleet of funfighter sized models ready to grab and go. I did put some pictures in my gallery in the old forum, but those photos are all mixed in now. Here's a piccy of the model storage racks -I've added another bay since then and plan to add a couple more in the near future.2 points
-
Couldn't leave it alone , so I assembled the engine. Leads and exhaust to make. Balsa cement was the glue of choice here. D.D.1 point
-
I you want some, just let me know, I can easily print some more off and different sizes too!1 point
-
Flying pretty slowly - Looking at videos posted of the model in flight it just floats along but the brakes are not opened fully, they only go to approximately 50 degrees.1 point
-
After a long wait, I got to Maiden my Loaded Dice 30EP today in chilly but beautiful conditions. Ran 4 batteries through getting close to 10 mins each time. Had to add a bit of down trim but otherwise good. Really pleased with how it performed. Pulls vertically nicely, lovely axial rolls and big loops. Still early days for me to refine my aerobatics but I'm sure this will be a great plane to practice with. Had to clear a low hedge on the landing runs and it floated straight on past the strip, so took a few attempts to bring her in. Landing gear seems nice and strong and ground handling is good, with easy taxying / steering. Dead chuffed with the colour scheme, looks great in the air and the darker red bottom wing contrasts well with the white / yellow uppers. Looking forward to learning what it can do1 point
-
Thanks John. Looking for the next one now. LOL D.D.1 point
-
Really cool and vintage.. Well done.1 point
-
Simply elegant DD1 point
-
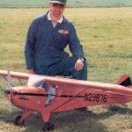
Well I moved the Chippie on and he finished it (Chaz Boddy, club mate). Made a better job of finishing it than I would have. ? Tiggie in background Laser 150 powered.1 point
-
It certainly looks as if it will be, with that wing.1 point
-
Thanks Colin. The all up weight is 1.7kg, and 4 Max Calculate the thrust to be 1800g, so should a nice flyer too. 13 x 6 prop 3s 3700 lipo 40A ESC D.D.1 point
-
That is very, very nice.1 point
-
Well, that was very very successful. Chid_flyer and I arrived at the field to this Nobody else there, wind stiff but steady. Had a couple of flights with FT Legacy (basically a Telemaster). That is usually ok in a wind, and it managed reasonably well. We certainly felt on our toes the whole time. Child_flyer was wary about us taking the Stik up, but that was what we were there for. Such a difference ?. The model just goes where you want it to and pretty much ignored the wind. I got very little time with it as C_f was having too much fun. Thank you for the encouragement.1 point
-
I'm not planning on flying with my Optima receivers yet as I'm still (slowly) evaluating Radiomaster and only using it in a parkfly model and boats. I'm still using my Hitec Aurora for my main transmitter as it's too good to retire. I will switch back to the latest release though. Phil1 point
-
Thanks Jeff. I know it’s been around for a while and I got the impression that modellers were put off using it due to the quantities you need to buy. This way nobody gets ripped off for getting it in quantities more suited to us!1 point
-
Credit to you, Ron, for making it available to us in hobby quantities. Jeff1 point
-
I use these for servos Screws1 point
-
That's a great storage facility and a very nice collection of warbirds too!1 point
-
It has revolutionised my model making Guys, I have to say. D.D1 point
-
Waste and soil pipe in various diameters is useful for storage and it's cheap, that's how I keep my wire and rods, triangle and trailing edge stock and the odd few lengths of strip I do have, I also use the cardboard tubes left over from wrapping paper and postage tubes.1 point
-
Thanks guys, I will give it a try tomorrow and report back. Phil1 point
-
Nothing as fancy as other here. Old model box's flat under the bed. Balsa keep well anyway.1 point
-
I got things connected up and all the bits glued on. I got the ESC in place, the Rx in, and the elevator and rudder servos in. D.D. Tail sorted. ESC. Rx1 point
-
Wing centre section coming together. Some cap strips on the spars to add and shape to the airfoil section and then ready to be sheeted. Flap and aileron servo positions shown on plan not being used as I prefer to have servos directly behind the surfaces. They can be fitted once the wing is inverted and prior to bottom sheeting. I haven’t used pneumatic gear before so need to investigate how and where to route the plumbing to the retracts, door operating actuators and the sequencer. I shall most likely use one of these and mount it in the centre of the wing so I only have one pneumatic connection to make when assembling the model.1 point
-
Yes it is called the Big Guff. It was designed by a pair of twin brothers Walter and William Good in 1938.They built the transmitter and receiver for it too. There is a YouTube video of an interview with the Good brothers here with some footage of the original flights: https://www.youtube.com/watch?v=jduj1wkGFT0 They'd previously built a smaller model called "The Guff" as a proof of concept. My build blog is here: https://www.rcgroups.com/forums/showthread.php?3115832-The-Big-Guff-This-is-mine. It starts in August 2018 but I didn't start to build it it until April 2019. The blog strays over many different subjects until the maiden flight. I bought the short kit from Laser Design Services in Texas. http://store.laser-design-services.com/index.php?main_page=product_info&products_id=400. It's run by an ex-patriate Englishman from Portsmouth. The kit was ok but the planview of the fuselage was distorted leading to several setbacks. Post 54 of my build blog has all of the details. Apparently better plans are availablle, please see Post 320 for details.1 point
-
I've looked at the source code of the MPM for the Hitec protocol, and it appears to be handling the tuning in a different way. I've asked on the Multiprotocol thread on RCGroups about this. Mike1 point
-
That's an impressive facility you have there Leccy.1 point
-
I'm not sure quite what you were expecting Bas - Model Monster had composed and posted a very full run down of his club's training regime to which probably mirrors most larger clubs' general processes and to which few people would need to add much within a couple of hours of your OP. I feel that there is far more to learning to fly than simple stick time. Joining in with the activities at the club and just watching others doing things right - and probably more importantly identifying where they go wrong is key to giving you a good grounding in what to aim for and how to achieve it. Those that don't make progress are often the ones turning up on the best days and expecting people to run around after them. Make yourself useful, ask sensible questions and join in with the banter and you'll find everyone even more willing to help you. Make sure you have your equipment ready and as well prepared as possible and don't sit around moping because nobody has come up to you to encourage you to fly - I'm (nearly) always happy to do a session if someone simply indicates that they would like to fly and are ready to go. It does get rather frustrating to have to rebuild someone's model for them on a good flying day - club instructors want to enjoy their flying too so spending an hour sorting out a model on a good day won't be terribly popular - although you'd be surprised how many people would be willing to help anyway. Please bear in mind that club instructors are giving their time - usually very willingly - voluntarily and may want to indulge in their hobby at times. If this doesn't suit someone, they should go to one of the commercial schools.1 point
-
For me, the key thing is turning up with appropriate equipment. My heart sinks when I see somebody show up with one of those little pusher 'toys' with its own tx and built in 'stabilisers'. They (both plane and modeller) rarely last. My latest pupil turned up at an Open Day (in 2019!) with a Spitfire that he'd been assured a beginner could fly. I barely managed to get it down in one piece - bag of spanners. He went away and got an ST Discovery, Futaba gear and half a dozen flight packs. I told him to turn up as often as he could, ensure his plane was always ready for flight then pester me to take him up. He was solo within 6 weeks, flying mainly weekends.1 point
-
Ken. I get exactly the same result as you with the Hitec Optima receiver, if I move one click away from zero then I lose connection and a RSSI signal lost warning but as yet I've not tried an Optima in flight. I have though tried a Hitec Red Minima Ikonnik receiver, range tested and worked fine in flight although it was a very small park flyer type model. I need to flight test a Hitec Optima receiver in flight but I'm in hurry as I got the Radiomaster as a backup in case my Hitec Aurora dies on me. I'm using the Radiomaster in smaller park fly and boats for the present. Phil1 point
-
Hi Colin, there is a lot of hacking around to do around the cockpit to make the DB one work, I also wanted to hack those chunky ply formers away, but it is the heart of the design. I think you may be better off drawing your own. The rear upper glazing wont work either. If like me you would have to use friese ailerons than they take a bit of work too. So my suggestion if you want it to be a good approximation, draw your own or take a look at the Jerry Bates 108" 1/4 scale plan? Cheers Danny1 point
-
I made mine from MDF, glued and screwed. Partition shelves one one side with one vertical for sheet on the other using post-it notes between the different thicknesses.1 point
-
Not needed if the cheap thin ply base has the stiffer grain orientation front to back. Balsa is so light in any case.1 point
-
All stored in a 3ft box made from some thin ply from b&q. When leccyflyer has finished with the round tuit i am going to make a matching 4 ft box.1 point
-
What an interesting question and weirdly I was chatting to another club’s chairman about this yesterday. There are lots of ways of skinning a cat and not necessarily simple but we have found this works best and a high percentage of our trainees do actually learn to fly, stay with the hobby and become regulars with all of the obvious advantages. Prospective members that haven’t got a model, visit the club have a go on one of the club’s trainers, on the buddy, so they can have “taster” lesson. If they then want to join and a space is available then they are given advice on what equipment to get etc and start training. Our club’s training/ solo flying programme has evolved over time, along the BMFA’s guidelines and now takes place on defined days, primarily on Saturday’s from 9.00am – approx 2.00pm and also during BST 5.00pm until dusk on Wednesday’s. We use a dedicated Whatsapp group to keep trainees informed (or call them). During this time they naturally and gradually get to understand the club rules, BMFA/ RCC stuff etc and the questions part of the Fixed Wing A test. Our examiners don’t get involved with any testing until a trainer advises them that a trainee is ready. There are a few routes to being allowed to fly solo (outside of the training environment). 1, If the prospective member has their own model and a FW A or above then a proving flight of basic competency is all that is required (must inc relevant calling and an understanding of our flying rules) – Take off, fly a few circuits within the flying boundaries and then a landing on the strip and they are good to go. 2, As above, but if found a bit wanting/ rusty then they have to attend the training sessions until they can reliably do this. If they can fly solo but just need a bit of supervised practice then a few sessions is usually all it takes. If they are really dodgy, they have to go on the buddy until they are at the FW A standard (see below for buddy arrangements). 3, We also have several members mentoring mates/ family and they are both encouraged to also attend the training sessions although no problem if they want to make their own arrangements to meet at other times. 4, After joining, absolute novices must attend the training sessions, regularly and with serviceable equipment. We insist on them having their own buddy system of 2 Tx’s, their own either i.c. or electric trainer (ideally a 60”+ wingspan, we like the Seagull E-Pioneer or Arising Star, but anything high wing and “trainery” is ok) and all of their own field equipment etc. We provide lots of guidance on equipment and quite often existing members have suitable 2nd hand stuff for sale (usually from our previous trainees). The 1st couple of sessions we put a fair amount of effort into getting the model and radios fully set up, fail-safe, range checks etc and go through all of the pre-flight checks with the trainee. This pays dividends down the line as we have quite a few members that help with training and they don’t mind doing the flying but most don’t want to get involved in the initial setting up or 1st flights (too much responsibility?). As soon as the model is ready they start flying and this involves getting the hang of calling, circuits within the boundaries at a fairly constant height and making sure they know how to carry out pre/ post flight checks of the model and controls etc. Once they can do that, we move onto rectangular circuits. Then rectangular circuits with descents to approx head height and slow flying down the strip with rudder steering and straight climb outs. This gets repeated, a lot, until they are fairly consistent. We also start taxing/ lining up for take-off practice during this period. Landings are next (usually not a problem by this stage, as they are used to flying low and slow, just throttling back and hang onto the elevator and they are down – phew!). After this straight onto take-offs which are usually a non-event by then. A few more sessions of “whole flights” and they come off the buddy and the trainers gradually move away from them until the trainee is properly flying solo – yay. After that back on the buddy for trimming, figure of eights, climbing to altitude and dead stick demo’s. They then go back to solo and carry on practicing these on their own but within the supervised training environment/ sessions. Once they are consistent they do their test and are then let loose. We also do some “Beyond the A” training for basic aerobatics.1 point


.thumb.jpg.632415da66ae2d3b91c91514c153e5df.jpg)