Leaderboard


Popular Content
Showing content with the highest reputation on 09/08/22 in all areas
-
Don't you just cringe when seeing spelling mistakes. . . .5 points
-
Despite the high pressure forecast and the less favoured WNW wind direction we've had another great 2 days flying with the right models on the Great Orme at Llandudno. Big thanks to all who travelled and took part - a report and more photos from this event will be added to our PSSA site soon!4 points
-
Here's my Eyelash. Not exactly new, I built it in 1975(!) from a MAN article and plan, (which I still have) and flew it extensively then over the next few years in Bermuda. Powered by a Cox TD.049, it was fast, with no throttle on the TD! A miniature Pattern plane, it was a very small version of the .60 powered Eyeball, 0-0-0set up, exciting to fly. I remember a 50 turn power on spin from a height that I could just see it (it's very small- good eyesight required!) Anyway, we returned home, the Eyelash went into the loft, in lieu of other models, and I only brought it out a year ago, after a 20+ years period when I was too busy working to fly. I now had entered the new mystic world of electric motors and lipos! So, on advice, the TD was hauled out, and replaced with a (Banggood) cheap and cheerful 2212 2200kv electric motor on a 1300mah 3s battery and a 6x4 prop. Wingspan 38 1/4" Area 215sq in Weight 24oz. Ace rigid foam wings, with fibreglass tape top and bottom. Solarfilm finish Well it flies as I remember it, with the added luxury of a throttle! It's fast! On flying it again, it still requires quick reflexes- and good eyesight, but it behaves perfectly, like the small pattern model that it is.3 points
-
Flown a while back now (earlier this season) with the wing tanks fitted - they dropped of nicely before landing - finishes the model of nicely IMO well worth the effort! 🙂2 points
-
Here are a few photos of some of the formation flying from the weekend The Jet Provosts of Harry Twist and Steve Kemp. And the Alpha-jets of Phil Stone, Harry Twist and Phil Cooke2 points
-
I had a feeling this wasn’t a first time offence!!! Same part just a different location.2 points
-
All very well but how much testing have you done? How do these hold up over various temperature and fuel conditions? What about high compression situations? Not being funny but I don't think you have fully understood this very complex requirement2 points
-
Eagle eyed will have noticed on the previous post that the rudder was missing it’s balance tab. Error addressed and the hollowed addition covered to pretend I had never omitted it.2 points
-
Never, I get the wife to do that!2 points
-
I would be wary of relying on RTH in the context of a relatively lightweight thermal glider. Sure, it will point the nose in the direction it came from, but if you are in a big thermal (where the best exit is normally at 90 degrees to the prevailing wind) or the direction home is into a headwind (which it normally is when thermalling thermalling as you will have followed lift downwind) then RTH is unlikely to help much. One of the main skills of thermal soaring is judging how far downwind you can safely go before you need to return to find the next thermal; over multiple flights you will learn that (with the odd land-out!), but RTH is not really going toh help you with that. PS - If you are really worried about your eyes you are better off just going for a larger machine of 3m+ (with a 3 piece wing) that you can see better.2 points
-
Got to the field this morning - yippee! Got a couple in on the Valiant, the PT17, the Hawk..... and 30 mins working up a sweat with the little Alt DLG. Then our farmer/landlord arrived and said that although he's harvested the crop field to the West, he's not yet baled the straw so asked us to minimise flying over it - tinder dry again, and another large wildfire within a couple of miles yesterday evening. They reckon the combine caused a spark on a stone - scary! No more Valiant flying as the most used airspace for that size plane is over the field at the West. Hey-ho - he hopes to do baling of the straw this week. Managed to set up the engine on the Double Trouble, got some stick time on the smaller planes, an had a good old chin wag, so was a nice pleasant morning.2 points
-
Ok i admit it i love ME/BF 109`s, the simple lines and colouful schemes make it great to build and to paint, i have built a Cambrian Fun fighter and have both Royal 1/2A and Aerotech International kits in my to build stash. I am getting very interested in this latest wave of foam board models as it enables you to produce aircraft that aren`t available as kits or even plans, many just go with a 3 view as a starting point. I am partial to a number of the WW2 Japanese aircraft and would like to build a couple of their twins but don`t want to run before i walk so have chosen the 109 as a simple type scale shape to dip my toe in! Looking around at plans to use as a basis i came across Boddo`s old 109 plan on the Outerzone website and thought that would provide a good starting point, probably blown up half as big again. I am fishing around for basic advice on building with foam board as there are seemingly some great scale models being turned out by the forum members, what thickness board, Maker or Hobbycraft, hotmelt or POR? Richard Wills has done a couple of detail tutorials, anyone got anything like that they could share. Once the foam is ordered and cutting commences i will post the build up here, anyone else fancy using these plans to have a bash? Mine will be simple hand launch as per the plan to save weight and for ease of construction. https://outerzone.co.uk/plan_details.asp?ID=11752 Messerschmitt_Me109E_Combat_oz11752 (1).pdf1 point
-
One owner since new and untouched DB SE5 kit. 80" wingspan for 1.20 4 strokes, ST 2000 - 3000, Laser 1.50 and above. Pre-cut balsa and ply parts (this pre-dates the laser cut kits) and does not include wheels or decals. All wire work part formed. The contents have never been removed from the box. Located in Chesterfield, Derbyshire. £300 plus shipping.1 point
-
Slow learner! 😇1 point
-
Not sure about being a master but I had an ASP36 2 stroke way back when. It was a great little motor and went very nicely. Standard 5/15 fuel will do fine, os 8 plug, probably a 10x6 prop and its off to the races. If yours is anything like mine was the liner will be mega tight at tdc so once you get it started get some rpm and heat into it asap, dont just leave it at idle or the little end may suffer. After 2-3 minutes at a slightly rich half throttle wind it up to full chat and very quickly tune it for about 90% of its optimum tuning and then throttle back. This will be a fairly coarse adjustment taking no more than 5 seconds to set. Set the slow run to be half decent, then mess about with it up and down the rev range for another few minutes with some short bursts (5 seconds or so) at full power and then pinch off the fuel line to stop it. Let it cool off, fire it up, give it a more accurate tune, fly. For the first 3 or 4 flights use full throttle in short bursts only, keep tweaking the slow run tuning as needed...Thats about it really.1 point
-
You are right, tomorrow I will turn down a die punch on my lathe and make one from the sheet brass, you never now.1 point
-
Of course if the 48 inch means a higher carriage charge then it may not be worthwhile. Damage to longer stuff in transit might also be a consideration. If collecting in person this may not apply but the overriding factor is whether a nice piece of balsa ( bendable in the case of wing sheeting ) is available or it's better to look at the 36 inch stock. Masher - lets hope the OP has actually seen this material list!1 point
-
I think Ron and Cymaz have hit the nail on the head. When I flew this originally, the motor was pretty much right “out of the box”. Later on I decided to tinker with the settings to “improve” it, but leaving it running for too long without realising that it was overheating, lead me to set it up too rich and causing it to run evenly and cut when I throttled up for take-off. I haven’t flown it for a long time, but now that I’m flying again, probably will, because it’s a brilliant flyer. However, next time I’ll set it up with the close fitting radial cowl removed. There’s no question that the FA82 is a good motor, it has a great reputation.1 point
-
The tailplane has been glassed and glued in place and the basic fin structure built up. As the fuselage is yet to be sheeted some careful alignment checks were made and once again the little level with integral laser proved invaluable. The tail retract needed a lot of shoehorning as previously mentioned but I am happy with the geometry achieved and the runs for the rudder closed loop and tail steering closed loop have all worked out nicely with no chance of fouling. The elevator is actuated by a very stiff 6mm x 3mm carbon rod. The rudder has been constructed and covered along with stitching and pinked tapes as also have the elevators that were made some time back. The rudder linkage on the full size is hidden with the actuating horn just inside the fin shroud. With a width of only 22mm I just don’t think a closed loop set up will be rigid enough so I have fabricated a small horn giving 40mm between the connection holes that should be fairly innocuous. Next I need to consider whether a scale access hatch to the tail retract should be made. Even if I do constructed one I think extracting the retract and air cylinder would be fiendishly difficult so I am inclined to thoroughly test the unit and steering before sheeting the fin, and if 100% happy just simulate the hatch.1 point
-
Looking at all the interest and rarity of this unavailable product i decided to do a 'tuto' on making one. First one to measure, I seemed to have found one,,,🥳 Then you need Safety Goggles a lathe with it's accessories, a small rat tailed file and a vernier gauge for finishing some fine emery cloth. Some metal, here aluminium, and copper, I settled for the 6mm OD copper tube, a 6mm drill and hammer. Start by putting on your safety Goggles. The drill was inserted it the copper tube and hammered on the outside to open it up to the right size here ID of 6.3mm. then inserted into the lathe to be faced off and with the outside diameter checked, i parted it off with a fine and sharp parting tool the 6mm drill is inserted to support the tube while parting. then both surfaces cleaned up with the emery cloth, the rat tailed file to clean off the swarf from the inside then finally annealed, heated to cherry red and quenched in water. In the last image you can see that I have successfully achieved my mission. Any questions please feel free to ask. If the Moderators find this post too silly no offence will be taken if it is deleted.😇1 point
-
"collector",,,🤣1 point
-
Well if you list them on ebay you can declare them as a rare item.1 point
-
Excellent job Paul but shouldn’t the lettering be round ‘tother way, or are they for an Aussie version?1 point
-
If you are worried about the engine, as Ron says, also fly the maiden without the cowl. Adding nose weight to compensate the cowl weight.1 point
-
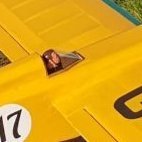
Took two days but it now has a cockpit with a printed nose cone, The nose was built as a 'half shell over the plan' and once lifted the other half of the formers were added and the skin planked, If you look closely you can see the three 0.7 mm 'magnet' wires for the motor. They run forward into the cockpit area.1 point
-
Do all of your engine setting up before you fit the cowl then its down to fine tweaks on the flying day, I'm sure you are not going to have a problem with it.1 point
-
220F seems the general consensus on the web. I'm sure you've got the motor well baffled as I seem to remember1 point
-
Suddenly stopping in mid air at an unrecoverable altitude ......and I'm not being sarcastic either. A club mate nearly wrote his Stampe off on Saturday like that. After a couple of mins after we got there it still nearly burnt your fingers.... Gradually losing power and engine speed is a good indication1 point
-
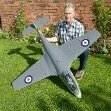
Finished this plan built Chris Golds Kawasaki KI-61 yesterday, waiting to maiden it later this week. 36" span electric on a 1300mah 3s, flying weight is 1lb 1 oz.1 point
-
Finally got to fly the barnstormer from the mass build a few years ago,it's really pleasant to fly and looked great doing loops and stall turns in the blue sky Also got to maiden the powerhouse leaks a bit !1 point
-
Glad you like it Jonathan. 👍 Steve1 point
-
Mine started to make a strange noise, Having listened to the negatives I confess to removing the engine and replacing it for a different one I did pop the cam out and had a quick peek inside and didn’t find anything out of place And having shelved the thing for a while it did end up in another plane but in the upright position as Required for the airframe once again started to make a weird noise long story short I did find the head bolts needed to be tightened down and this cured the issue1 point
-
A few from last Friday at Tibenham.1 point
-
Read the plan, get to know it and understand what the designer intended and how to get there. Visualise how things fit together. If you can't make sense of it, ask before you get started. Cut out all of the bits as much as you can and put those bits in a box and make a kit. That way, you won't be scrabbling around to try to make/cut pieces on the hoof because you need part x to make part y fit to part z. It is a lot less hassle than trying to cut parts as you need them. Make a list of all the other bits that you will need and get them ready. You might find that some of them (snakes, servo mounts etc) need to be fitted during construction. Nothing more annoying than eg not being able to fit a top decking because you need to fit snakes inside first. Keep all the offcuts, however small. Scrap is really useful for fillets, gussets, filling gaps, making supports etc. Plan ahead and don't build yourself into a hole. For instance, finishing a fuselage before fitting the wing could mean accessing formers for wing dowel holes becomes difficult. Don't assume that the position of various holes in formers on plans will be right for your motor/servo/snake/pushrod etc. Lay your rc installation out on the plan and work out where those holes etc need to be for YOUR equipment. Take breaks. Stand back. Take your time. You can easily get caught up in something and get too far before you realise you made a mistake earlier and find it difficult to undo. Making templates from card or paper is sometimes more accurate than following a plan for windshield patterns, decking sheeting patterns and so on. Some things, like stringer slots in formers, are better done from the model than from the plan. Use the plan as a guide, but ultimately, there can be mistakes, errors or variation which means that the right position to get a good fair stringer line (for example) is slightly different to the plan. If you find it hard to make a particular piece (for example cutting thick ply) then cut two from thinner ply and laminate them together with epoxy, rather than struggle to accurately cut the thicker material. Making sure that your model is straight and true is more important than sticking slavishly to a plan. If something looks off, check, especially if printing plans yourself or using very old (possibly distorted) plans. Plan your covering before you build. If you have projected seams over an unsupported area, a bit of thin scrap as a covering support can save a lot of headaches later on. Hope some of that helps somewhat! Cheers Matt1 point
-
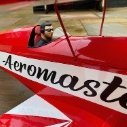
Now, I know I’m more than a little late to this party but having seen Harry’s Alpha Jet in action on the Orme I fancied building one for myself. Having read through the build logs on here and with much guidance from Phil and Harry along the way I now finally have one ready to fly. I won’t go through my entire build as it’s obviously very similar to what’s gone before but here are a few photos anyway… The weight of the original glider was 72g. I used flat carbon strip where I could and rod where space was at a premium. I used 190 micron mylar hinge for the elevators and ailerons but found the width as shown in this photo was way too much, making the hinges too stiff so I subsequently cut them down to something in the region of 4mm wide. I used a carbon rod to locate the front of the canopy and magnets for the rear. I found the elevator linkage hoop required a good width to ensure the two brass levers didn’t foul at their full extent of travel. (The gap between the two brass levers varies through their travel due to the effect of introducing anhedral to the tailplane). AUW with all the radio gear but prior to any paint was now 97g. I sprayed the plane initially with a clear plastic primer, followed by a few thin coats of white acrylic primer before applying Tamiya matt white acrylic which then brought the weight up to 101g. Now I was ready for some colour and of course I needed to find a different colour scheme to what’s gone before. As seems to be my way of late I ended up choosing something difficult! The Portuguese Air Force ASAS colours. I lightly sketched the shapes onto the primed surface using a soft 6B pencil until the proportions all looked about right and then masked up, spraying red first, followed by the green and then black. I used Tamiya matt acrylics and my new spray gun and compressor (Thanks for the recommendation Harry). There was much touching up of paintwork along the way, partly due to a little paint lift and bleeding under the tape in places but also due to the translucency of the white and red colours in particular. I also found the matt white finish difficult to keep clean during the whole process. Another first for me was making my own waterslide decals although this did require much assistance from our daughter in the Photoshop department. I have to say they went remarkably well and I’m particularly pleased with the chequerboard finish around the nose, something I had previously thought I would have to do by hand using either paint or a Sharpie. Once the decals had dried I then gave everything a couple of light coats of clear satin sealer which should hopefully give it a little more durability against any knocks or scrapes, time will tell. Weight at this point now 114g Prior to any paint I thought I had the C of G something close to the 78mm from L.E. figure but subsequently found I needed to add a couple of small masonry nails up front to bring it right meaning my AUW finally is 118g. Not the lightest but not too shabby given the amount of paint! In hindsight maybe I should have tried to install the elevator servo further forwards as Harry did with his and thus negate the need for the nails. All I need to do now is get out and fly it, I hope to be able to maiden it in the coming week or two in readiness for the next PSSA event on the Orme. Phil 🙂1 point
-
Up early and at the field by 07:30 the idea being to get my flying done before the heat builds up. I think I was a bit too early as I had to put a fleece on. The field is green 😲 and the crops have been harvested. Test flew this in the still morning air. Nice start to my day 🙂 Steve1 point
-
Great weather this morning so it was out with the SU37 again. Launch with "safe" on results in a long and stable climb out that just misses the ground, but the good news is its consistent! Lets just say its a challenging model to fly (just weighting for a mistake!). Thanks Harry for the chuck, photo and video.1 point


.thumb.JPG.051c5bb1d446ab8af8a2c911cbae321b.JPG)


.thumb.jpg.632415da66ae2d3b91c91514c153e5df.jpg)