Leaderboard


Popular Content
Showing content with the highest reputation on 16/01/23 in all areas
-
4 points
-
Hi all ! I made the grear doors as planned and after curing i lifted them off the moulds , no problem. It could be the new parts are'nt fully cured but they feel to weak for the job. I'm now sorry i didn't add airex between the layers cloth. If they don't get harder , i'll make another set with airex , but that means i have to use vacuum and 2 wing moulds don't fit in my bags ! That means another 2 days ! While i left the parts to cure , i used the time to finish the nose gear door control. Another item i can remove from the long "to do list"4 points
-
Blue sky and no wind today (Monday ) my son me and Bob who maidened his Hurricane built from a Vintage Model company free flight rubber kit with Volantex electronics transplanted from a Super Cub. Due to the servo layout he could not get two ailerons acting the proper way so ended up with only one aileron. Amazingly it flew straight from his hand no trim required. Hope the attached photo appears3 points
-
Really? a club mate brings one to our indoor sessions and can't fly at less than about 75% throttle, it just falls out of the sky with a vicious tip stall. Maybe they're quite variable in performance....2 points
-
A simple stripe makes a lot of difference! Now we are at the ARF stage! Cheers, Lucas2 points
-
I started this project some years ago and got to a point where the wings were giving me grief.....talk about that later......it's a David Andersen plan at 1:5 scale, actually free to download off his site in the US.....at 1:5 scale it has a wingspan of 114".....quite large when you think the same Fw 190 which it originated from at 1:5 is 83"......saying it originated from the Fw 190 is probably wrong as it was designed by Kurt Tank as a completely new aircraft capable of high altitudes and probably was the fasted piston driven German fighter of WW2. Only one exists not on display but in storage at the Smithsonian Museum in the US. I already fly a Fw 190-D9 and A8 at 1:5 scale so this one will complete my Fw hanger. The plan comes on 5 sheets, i bought a laser cut kit of parts from Belairkits here in the UK but not the cowl or canopy. The fuselage construction is pretty straight forward but the installation of the Sierra tailwheel assembly was a little tricky if i remember.....1 point
-
Thanks to all the tips from this forum, I spent another enjoyable evening applying some weathering. Panel lines and rivets using a fine black marker, highlighted using a white gel pen, then sprayed some dark grey weathering behind and to one side of each line with just some held card masking. A touch of dry brush silver on leading edges etc to illustrate some worn paint to finish. The best bit was peeling off the windscreen masking to reveal the result - dead chuffed tbh. Just the radio install to complete now1 point
-
They will be submitted automatically once within 28 days.1 point
-
Here is the finished wing!1 point
-
Below is an L4....but aileron the same as a Cub.....hope it helps1 point
-
Odds are against you Greg, many many people have learnt to fly by themselves, you're now 74 and have arthritis in the hands. You've already stated you'll keep well away from others, so I'll leave the safety lecture be. My advice ? Start with something light, slow and electric, a big I.C jobbie isn't the best choice by a long shot at this stage, you've stated yourself there'll likely be a disaster or two so choose something easily repaired and less likely to do harm to others. Here's one choice, plenty more on companys website. https://www.rapidrcmodels.com/arrow-bigfoot-pnp-with-vector-stabilisation-1300mm-8339-p.asp1 point
-
It would help with a top or bottom view of the hinge. As shown it does look as if the hinge won't allow upward movement. There needs to be a slot above the hinge to allow upwards movement. To me the top gap will close a bit as the aileron moves down with hinge pivot point where it is, Frise aileron:-1 point
-
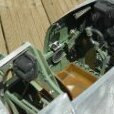
Completed the laser installation today, made the clearance for the exhaust extensions from laser engines, cut out some epoxy board and recessed the fuz so to drop in.....slotted the holes to give a good clearance Once glassed these will be made good. Also brought some more filler and added to the gun cover pattern.....the shape is coming on nicely..1 point
-
I believe it necessary to have a clearance slot where each hinge is to allow the upward travel Alan noted. Same as Peter Millers 58 inch Turbulent for RCMW decades ago. I expect Phillip Kent wanted a true scale model for competition so included this detail. Easier to do it a simple way though.1 point
-
I would imagine there would be slots at the hinges to allow the aileron to move upwards. John1 point
-
It looks like a frese aileron (not sure of correct spelling) .When up aileron is used the bit at the bottom sticks out adding drag to counter the drag effect of the other aileron going down .It’s supposed to eliminate adverse aileron yaw .The way its drawn with a bent robart hinge won’t allow any upward travel .If I was building the model I wouldn’t bother with that method I’m not much concerned with scale detail I prefer a practical model1 point
-
It looks to me that the connection on top of the aileron is cosmetic only, and probably just a short length of elastic to mimic the pull-pull arrangement on the full-size.1 point
-
Fine. So you want a recommendation for a good trainer. In my view a trainer should be 5-6 feet in the wingspan. (1.5-1.8 metres.) Models of this size are easier to see than small models and they fly more slowly or appear to do so. If you want a foam electric powered ARTF the ST Discovery is as good as any. I have flown several of them and they're very forgiving, but I have no experience of flying either this model or any other model eqipped with a gyro. When I lived in England I was a member of a club which used the Discovery as a club trainer. The club's chairman took off with me on the buddy box. He gave me control and I deliberately put it into a high-speed spin, cut the throttle and took my fingers off the sticks. The Discovery recovered and righted itself but we were four mistakes high. I use a Seagull Boomerang ARTF as an advanced trainer with my novices. It's heavier and a bit faster than all of my other recommendations but it will fly well in a strong breeze, so it's an option too. If you are interested in building a kit, my recommendation would be either the Ben Buckle Super 60 or the Ben Buckle Radio Queen. Pictures below. Link here: https://www.benbucklevintage.com/ I have built two Super 60s and bought another. They fly very well and in its day probably taught more Englishmen how to fly than any other model. Another advantage of this model is that it is automatically stable being a vintage three channel model without ailerons but once you've got the hang of flying it you can build an aileron wing for it. Have another look at Christopher Wolfe's post and you'll see what I'm driving at. But is it my favourite ab initio model for elderly beginners? No it isn't! That would be the Radio Queen. At over two metres in the wingspan it's big, tough, slow stable and easy to see. I wish I'd never sold mine now! Having moved to France in 2015, I've convinced two colleagues to build one each. They are currently under construction. The plan's not too brilliant but once you've built it, it will fly well. You can convert either this or the Super 60 to electric power quite easily. Other options include the Telemaster 40. These are nice gentle four channel models, six feet in the wingspan. I used to import them from the USA. I could sell you a plan! BUT, AND THIS IS AN ENORMOUS "BUT!" The lightest model I have recommended is the Discovery at 2 lbs 12 0zs, the heaviest is the Radio Queen at 6lbs 10 ozs. Each of these four models is propelled by a propeller which will be turning at least 10,000 rpm at maximum speed. Imagine what the result would be if you were to hit a child on your recreation ground with such a model. Jon Harper of Laser Engines has said learning to fly a radio controlled model aeroplane is not easy. He's right and believe me I am not trying to rain on your parade, I just hope you're well insured that's all.1 point
-
It’s not happened for a few years but both my mother and my wife inadvertently signed up for Prime. After complaining to them, they refunded the unused months without argument.1 point
-
Greg, there have always been beginners who were determined to go it alone. Mostly they crashed within ten seconds of their first launch then gave up on the hobby. A few persevered and after wrecking many models finally learned how to fly. Many clubs today have their own trainer and buddy boxes and you could learn to fly for the cost of a club fee. Not interested in models powered by glow motors? Does it really matter if the club's trainer is powered by a glow engine or an electric motor. The model doesn't know what is turing the propeller and some, like the Seagull Boomerang, come with all of the parts to enable the model to be powered by either electric or i/c motors. We had another beginner on this forum last year. He had assembled a model with a gyro fitted, thought, "What can possibly go wrong?" launched it and crashed it. Fortunately for him he was on the site of a model aeroplane club which he had just joined and nobody was there at the time. He has subsequently gone on to benefit from club training on the buddy box. Still determined to go it alone? Then I've one final piece of advice, in my experience all beginners are initially too brutal on the sticks. Let us know how you get on. PS. I have never fitted a stabiliser to any of my models but I plan to build a 1/4 scale Fokker Triplane. They are notoriously difficult to land and take off so I've just bought a gyro.1 point
-
Hello guys. I received the short kit first week of 2023. Good quality wood from Sarik and great laser cutting. the wing is finished. I will upload a picture later.1 point
-
Definitely variable then. We have a relatively small hall - 4 badminton courts; he flies on beginner mode as it's a tad uncontrollable on intermediate and expert. He flies constant figures of 8, and if taking off from ground, it determines it's own direction! Landings are always 'arrivals'. Nice cheap way of getting into the air though.1 point
-
I wouldn't dream of trying to fly one indoors, the turning circle on beginner mode is so wide you would need a huge hall. To fly one indoors would probably be in expert mode and then all bets are off, it's just an un-stabilised model.1 point
-
Some real progress. The full duct and EDF are in. Note the rubber band holding the nose planking to the duct once the first former has been removed and the magnet wire motor leads brought back from the EDF. Purposely over long because I am not at all sure where the ESC and battery will need to end up. The next and very satisfying job is to fit the other half of the formers as at last you feel you actually getting somewhere.🙂1 point
-
These models can literally fly at walking speed - they are more fun whizzing about - but they can be flown slowly as well.1 point
-
Wow, I have to say that spraying this model has been a hugely enjoyable learning process and is already inspiring me to build another scale model. Things I learned / put into practice ; 1. Still no success with my dual action airbrush - can't even get air out of it never mind paint 2. My single action is ok but does keep stopping / blocking - bit of patience and retrying and it kinda works 3. I used Vallejo model air acrylics that required no thinning and they worked great 4. I was pleasantly surprised that there's no solvent smell, so I got away with spraying in a corner of the kitchen 5. Drying with a hair dryer between multiple thin coats allowed a very quick paint build up 6. Spraying some clear acrylic over masking tape before painting prevented bleed through I saw this rough masking tip somewhere (Flitetest ?) to help get the loose camo edge ey Viole First colour Grey Violet Light Green Added Built up more colour, then added the decals (bought from Cambrian with the kit), and it just sprung to life 🙂 Weight so far 958 g - So paint has added 18g - not too bad Now onto some panel lines and weathering1 point
-
So removed the playdough and glued on the soft shaped model lab board blocks and added filler some more work to do tomorrow as i ran out of car filler.... So started looking at the exhausts/cowl etc......the exhausts after a long conversation with fellow scale and club member John Carpenter are basically going where i first thought they would go on the underside.....a scale set of metal exhausts stubs would be great but the cost of metal printing at the moment is too high, maybe the future.... The baffle will work well in the cowl.....the gap between the spinner and cowl is about the same as my D9 which has the 300v in as well and has never overheated...so i'm not worried about this the rear gap is much larger... Still need to make a set of cowl standoffs...1 point
-
GPS and stabilisation doesn't usually require a different transmitter, so long as you have at least 6 channels and enough switches to be able to switch functions on/off. You can get receivers with built-in stabilisation, which might dictate your make of Tx but they probably won't have GPS function. As you probably know from your 'drone' experience, you often use a standard Rx to send the signal to a dedicated flight controller board when you're using GPS, so that doesn't tie down your Tx choice.1 point
-
So progress......Laser 300 bolted in place (inverted) ...had to give clearance for the carbs which stick out about 2mm.....will have to do the same for the exhausts.....which have the extension tubes on Gun cover blank is now ready to add the bulge......rather than just add filler and discover it's wrong i thought of using some kids playdough and work out the bulge...take templates and then remove and make good with filler mirroring the other side......once all done then take a mold off and make from glass so it will much lighter... The end of the top surface still needs some work but it's looking much better... Cheers1 point
-
Cowling and the black fields under the wing are done. Striping tomorrow. In the picture I am trying out whether 8mm og 10mm wide stripes looks more like the prototype. I am leaning towards the narrower stripe, but with a 10mm gap between the red and the stripe. Regards, Lucas1 point
-
1 point
-
The problem i had with the wing was the center section has a double skin of 1/8" balsa.....the formers for some reason didn't allow for this to happen.....so it got complicated but i think i have cracked it now.....the top sheeting now needs to be added....also the plan shows a complicated wing seat with about 3 different angles.....simplified this with one shape...also re-designed the flaps and flap bays......had some new ribs laser cut at Inwoods.....these need adding to the underside of the top wing sheet which is 2.5mm light ply...again a change by me to make the whole thing stronger...by the way the wing will finally be in 3 parts......with wing tubes which have been glued in1 point
-
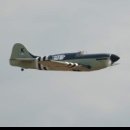
This will be my scheme.....'GREEN 9'.......1 point
-
The other 2 parts (rectangular shaped blocks) are flair vents which were used for identification...... the top surface of the engine cover which is very long has taken time to get right as there isn't much to go on from reference material.....but i'm happy with how it's looking next will be the gun cover behind this1 point
-
Made the cowl pattern and laid up a glass front section, the rear veins were made by sandwich forming around a plastic bucket i found the correct diameter.....2 sheets of 1/64" ply......also there are 2 different shapes that make up the outer part which i've made open to allow cooling of the laser...1 point
-
Thanks Gary..... Some more1 point
-
Oh by the way engine upfront.....:-)1 point
-
1 point
-
1 point
-
I can't beleive the number of people on here who are scared of joining the 21st century and having a banking app on your phone/PC. The security nowadays, is very good and unless you give someone your pin number, or fingerprint, it's almost impossible for somebody to hack. Honestly; it's far easier for somebody to forge a cheque or steal your card details at the point of sale in a shop. Many online bank apps will have 2-step security whereby you get a text or an email before they let you log in and my Barclays one has a small pin card reader with encryption before I can log in. This is so much safer to use than cash or card alone. Finally if you're really worried about online fraud, you can use an intermediary like PAYPAL for many online transactions these days, which protect your account details and give you a right to refund if there's a problem with a purchase. Come on you lot take the plunge! 😁1 point