Leaderboard


Popular Content
Showing content with the highest reputation on 21/01/23 in all areas
-
Hello all , Wth the gear door lay-up fully cured , i disc-grinded the doors out of the frame but left the main gear door in one piece .(it has to be cut in 3 pieces later) With the gear strut in retracted position , i presented the door to the door-opening. Satsified with the fit i marked the position of the mounting holes and filed these area's with a blob of thickened epoxy. Imediatly presented the door to the opening again and left it to cure. To prevent the epoxy sticking to the mounting supports , i protected them with a piece of plastic , easy to remove. After curing i lifted the door and drilled the mounting holes in the door. Now it was time to cut the door in 3 parts like the original.This was done with a very small disc grinder (proxxon)to prevent losing to much material. After some fitting i was happy with the result ! I made a video but it was too large to upload , sorry , i'll shoot another tomorrow. Sorry for the wrong screws in the fotos , these will be replaced with sunken ones later... It might take a while to finish the other wing as there's a lot of fitting !! Thanks for watching !6 points
-
Did not know that a drone could be so useful.2 points
-
Pity the electronics diagram shows AND gates when they are actually NAND gates! There should be small circles on the outputs indicating the output is inverted. Mike2 points
-
Looks like it is missing its fin, wing hold down bulkheads broken, minor repair. New fin from scratch is easy enough. Engine needs a silencer, can be sorted, but it’s an obsolete motor, so no spares if it’s ever needs any. Got a bag of bits, but not control cables. Not rubbish, worth a punt. Try e bay, no reserve, as that is difficult to value in that condition, state of sorting it out.. But my guess, £60 the lot.2 points
-
Free entry/camping, onsite toilets, food/drinks, night flying. No certs required, proof of insurance please. 100cc limit on I.C. Contact John 07934689317 or Don Valley Model Flying Club via Facebook.1 point
-
Free entry/camping, onsite toilet, food/drink, night flying. No certs required, proof of insurance please. 100cc limit on I.C. Contact John 07934689317 or Don Valley model flying club via Facebook.1 point
-
I'll be there, probably Chris as well... See you then!1 point
-
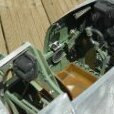
Been off the build this week as I had an accident last weekend resulting in a few broken ribs. Anyway, did a bit today and it’s setting me up for a repeat on the starboard side. The leading edge intake has had rough fairings added. I then carved out the air intake and hollowed out the inside. This hollowed out area along with the leading edge of the wing will serve as one of the wing fixing points. I also had to take fill the area behind the intake, this part is far from finished and is a difficult curve to meet. I think this will be picked up in the glassing stage. Everything I’ve done to now is to save weight as this plane will be heavy due to the set up in the nose. Retracts are still an issue I’m trying to resolve but the fuz nose gear should be done in the near future now it’s in the right hands. Cheers all.1 point
-
I'm in! Don't know with what yet but they will be foam and electric!1 point
-
Simon I was joking, obviously not very well.😧 I do have some details of the envisaged arrangement, just need to find them. Personally I found it hard to believe it would work (effectively), never mind for 45 minutes, or in a combat scenario. In some respects it reminds me of a fluidised bed, as many coal fired stations used. I guess the grit coming out of the back, could peppered the screen of the enemy. I do agree the very long duct (relative to diameter) is not helpful. I have been designing a Douglas X3 for some years now, Like yourself, keeping the weight down, and creating a goodish duct (with my limited printing skills) has not been, well, easy.1 point
-
There is what most men want in the Vicomte, that's the extra inch,,,,1 point
-
Follow the instructions, they work! 😀1 point
-
You'll also need to buy a dongle - like this....... https://www.ebay.co.uk/itm/133283588109?chn=ps&norover=1&mkevt=1&mkrid=7101533165274578&mkcid=2&itemid=133283588109&targetid=4584826055637456&device=c&mktype=&googleloc=&poi=&campaignid=412354546&mkgroupid=1299623041023876&rlsatarget=pla-4584826055637456&abcId=9300541&merchantid=87779&msclkid=344190a514d11a4ea6f9f36c1eaa0f49 I use Phoenix with my FlySky tx - works flawlessly and Phoenix is rather good.1 point
-
I use Phoenix. It's abandon ware and is now maintained by enthusiasts with a wide range of models and flying sites being added all the time. Download links in first post:. https://www.rcgroups.com/forums/showthread.php?2382571-User-Built-Models-for-PhoenixRC1 point
-
We are not far apart with me being in North Lincs. Bridlington was a day trip either with the family or sea fishing on a cobble boat with Dad, some 60 years ago. Obviously as you send the cold north wind to us it is the same wind, a lazy wind as my Dad calls it because it goes straight through rather than around. In the shade here the frost has gradually built up.1 point
-
Hi and Welcome Chris How wonderful to have your own little strip, enjoyed the video and the lovely countryside views. I noted you started with the Mini Skyman, last year I added one to may fleet built from the online plan and my scrap box of wood. I added ailerons to wing and converted it to electric. She still needs rudder in the turns so I may go back and build the original wing. Gentle flying in the good weather.1 point
-
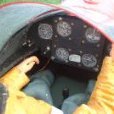
As well as the airframe, i've been working on a new instrument panel, as the Ta differs slightly from the Fw 190 series.......more to come as this isn't a 5 min job....:-)1 point
-
Greg, just press the start button! If you've got to this point you've extracted the files and installed the program. You can run the program and get to the main screen at this stage. You can click on the 'setup transmitter button' and read the prompts, but, it will fail when it looks for the Phoenix dongle. So you need the dongle pack I posted the link to a few posts back - the one which includes to 'mini-DIN plug' needed for your transmitter. The FlySky transmitter will fly a plane which needs throttle, rudder, ailerons and elevator so at this stage there's no need to spend more cash. Wait and see if you like it before buying a more capable transmitter. GDB1 point
-
Probably for me as much as anyone in future, the hyperflight page has some more details on how to use this solution. Looks brilliant I have to say! https://www.hyperflight.co.uk/products.asp?code=SRIDSM-MKS6110&name=integrated-drive-system-mono-for-mks-hv61101 point
-
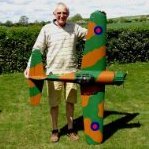
And here she is loosely assembled, painting operations complete thank heavens! Next I have to complete the glazing, then final assembly and complete to airworthy standards, looks OK from a few feet away but does not bear scrutiny!1 point
-
We bought a Dualit toaster years ago. It cost an arm and a leg but having struggled to repair cheaper ones by fitting a new element I wanted one with a spares service and was designed to be repaired. It's simplicity itself with just a timer function but no pop-up feature. It's British made and so far has worked faultlessly.1 point
-
1 point
-
Let the Phoenix configure your sticks Greg, it does not matter that you have a Flysky; The correct lead just connects your controls and switches to the computer, and nothing else, no transmissions or signals, nothing from the RF board. Connect your Transmitter, Switched OFF to the computer by USB lead, and it will come live. Ok, your Tx needs to be calibrated to the Phoenix, and is very simple. The Phoenix has to deal with people who use left of right, up or down in all manner of ways, so all that it needs now is for you to go to Settings, and push each stick carefully, as instructed by On screen prompts,to all four corners for both sticks then set your switches for flaps and retracts. I am your age by the way, as are many on this site. And we all keep this hobby going.1 point
-
Fuel tubing is a common option for this.1 point
-
I was lucky to obtain almost 6 metres of Solatex, I am not entirely sure of the colour name it is either Antique or Linen, it gives me the basis I am looking for, for a classic aircraft, still not decided on the final coloured decoration. Virtually all 6 metres were required, but not enough for the wing struts, since the colour is so close to the tone of the wood I may just sand the struts and varnish them with water based clear varnish that I already have available. I have never used Solatex before, it goes on easily shrinks really well using my Protech Iron and a domestic heat gun, which when set to the lowest heat 300c and keeping the heat gun moving worked perfectly. Took me three mornings to get it all covered, now I have put all back together again.1 point
-
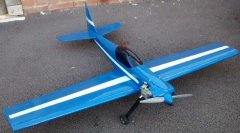
Alec This was mine from 2005,waffled around like a big trainer.1 point
.thumb.JPG.051c5bb1d446ab8af8a2c911cbae321b.JPG)