Leaderboard


Popular Content
Showing content with the highest reputation on 01/02/23 in all areas
-
Tend to agree with you Paul - certainly not a one size fits all issue, but I found that the limited flight envelope of many of the classic old timers to be very restrictive when it comes to learning. Fine when radio was in its infancy with single channel, or all the push a button for left and two pushes for right, or whatever it was, but not with modern multi channel proportional gear. Depends on the pupil and how they wish to progress, but IMHO a good 4 channel trainer that is not over-powered and is set up for a beginner will be a far superior teaching instrument than a very lightly loaded vintage type.3 points
-
It depends what you want the 123 blocks for - If they are just to be used as a weight with square edges then a couple of old 12 v Gel Cells like the 6 amp hr ones used for starting glow engines will come in very handy.3 points
-
The one thing I havent done is to position the motor battery (a 6s 6500 mah lipo), I deliberately left this operation until last as I wanted to see where the C of G was going to come out, I made a battery tray out of ply with the idea thet I dould slide it back and forth to adjust the C of G as required the fix it in position, but since I have now fixed the glazing in position I cant get it in so will have to cut it down, best laid plans etc! So I put the Centurion together and got my Multiplex balancing machine out, no way would the Centurion fit on! I need someting much more heavy duty, so back into the cold garage to raid the scrap box and knock something up, I had a set of pine shelves that I rescued when we emptied out my mother in laws house recently, I knew they would come in handy at some point, and a section of garden rake handle. So this is what I made. , just the job. Should do the job, probably a one off as I dont envisage building another model as big as this any time soon.3 points
-
Sorry but not a Junior 60 fan for a beginner, if you are into 3 channel planes a Baron is a cheap and easy alternative the planes are on theouterzone site, I would get a std high wing trainer type with ailerons 3 wheel undercarriage and a .40 size engine that will take std size servos, there is more fun flying a 4 channel plane.3 points
-
Still a lot of work to do to the aft fairing but it’s enough for a rough shape and has been glued in place now. I started the top air intake on the fuselage and have hollowed out. This intake is attached to the rear access hatch. The idea is that once I glass the model I will layer up glass cloth on the hatch area and replace the wooden hatch with a glass cloth hatch and the intake will form a handle to remove the hatch. Through the hole I will place a hatch latch and to the rear I will have magnets. Hopefully this will do the trick. Cheers3 points
-
With the usual rib block there is always the danger that one also sands away the template ribs a little. This method prevents that. (May be someone else also has figured this out, I don't know . . . ) The cardboard has to be splippery, and must be exactly the same height as the sanding paper (I used P80). For the spars: make exactly fitting, similar, dedicated tools. Tapered wings etc.: everything is possible. Have fun! jan brilman.2 points
-
This stuff works very well for iron on fabrics. Reasonably price too.2 points
-
My only advice "it is not so much the quality of the tool as the skill of the user." Yes having the right tool can make a job easier but working out how to "make do" with what you have available is an important skill to keep the budget under control.2 points
-
Hey Steve, I had a similar idea for my Tepee (=Berlingo)... I found myself between camper vans so I decided to make up a kitchen unit for my Peugeot Partner Tepee as a removable day-van project. There's bags of room, even for sleeping full-length. I'd measured up and was pondering ideas when I came across this £59 Duktig kids play-kitchen at Ikea: Now I reckon the bloke who designed it for Ikea was definitely a Tepee or Berlingo owner, because its just perfect, made-to-measure! The quality is superb, really strongly built, it looks neat and does the job a treat! It fits perfectly behind the left seat (of three) with the middle one folded away and the right-hand one removed to make a sleeping space, and its all held in place by bungee straps. I swapped the toy tap for a proper plunger pump tap (ebay), plumbed to a water container beneath in the right-hand cupboard. The gas-can hob is the standard £10 jobbie like yours, on peg retainers. In the left hand cupboard there's pots, cuttlery, a stack of MRE packs courtesy of the MOD, teabags and long-life milk, and underneath there's a folding stool and a small picnic table. The 'microwave' is used for dish-towels etc, and opposite theres a cig socket for one of those tiny 4-cans-of-coke peltier mini-fridges. It has a highly advanced grey-water disposal system - you lift out the bowl of dirty water and chuck it out the back! I also have a rear tailgate awning for it, overall its become a very cheap but versatile day-van that can be reverted to standard in 5 minutes. With the tailgate up and the kettle on, you're never short of visitors! Slightly beyond the topic but I hope its of interest! Cheers Phil1 point
-
In the case of Peter Miller’ o-Four9ier it is really such a simple design that you could probably cut out a set of parts for it in an evening if you had the wood available. I rather enjoy the process of making parts for a model, when starting a build. Many seem to hate it. I wonder why?1 point
-
Super 60 is a much better flyer than a junior .It’s also possible to build one with ailerons which improves things further1 point
-
I don’t disagree. I once acquired a pupil who had one, found in an attic. It was a very forgiving thing to steer about. Now it suited my pupil as it turned out. He never disclosed his eyesight problems. But it is what it is. But as a first build, not complaining. No messing with ailerons, making the goal, build a straight wing. All complicated enough to challenge, simple and short enough to finish. And if it fly’s, and you made it, you just might be hooked.1 point
-
Yes probably private all I get is this,, A local at Montpellier was starting his Longeez and that went bowling across the aerodrome and into the marshes, and I remember when I was doing my PPL at Washington ( Sunderland) a Tipsy junior was turning when he got it started and the pilot was hitching a ride on the wing, luckily we managed to stop the plane.1 point
-
Its a private group, presumably you're a member Martin1 point
-
As far as twisting is concerned: in the case of an airfoil with a flat bottom, sanding of the top of course is not a problem. Otherwise you wil have to support the block and template ribs to prevent them from twisting. As you can see I use magnets; that makes it very easy to adjust the supports. jan.1 point
-
I use Balsaloc, still available from Solarfilm. I added another jar with my last order to keep in stock: https://solarfilm.co.uk/collections/frontpage/products/balsaloc1 point
-
Try Arc Euro Trade they do metric blocks for a reasonable (always subjective) price. Dasqua do fair priced imperial ones. Hope that helps, Laurie.1 point
-
Does anybody have a cheap source or alternative to steel 123 blocks, they seem expensive for what they are?1 point
-
I beg to differ. I fly all sorts - EDF, 3D, Aerobatic, Gliders, Helicopters etc. But I get just as much, if not more, fun flying my 3 channel electric Super 601 point
-
It would be best to visit your local club and see what the instructors suggest. Most instructors have a favourite - maybe the Chris Foss Uno Wot etc. Many clubs have a club trainer to give newcomers a try first, this might give you a clue as to whether you need a slow flying model that corrects any errors you make ( Junior 60 would do this ) or a heavier faster trainer which has ailerons and less dihedral ( needs more constant control) if you get the hang of it straight away. All depends on personal factors -age, eyesight, reactions or experience with model cars etc.1 point
-
Yes, should be online in the next couple of weeks1 point
-
Whist the In the Air Tonight session turned out to be Part 2 of 3D printing it was another very good session. But the most interesting thing was that Andy will be setting up a BMFA repository for member's 3D and Laser designs so that we can share what we've done!1 point
-
Yeah, a small razor saw would make cutting stringers easier. BB J60 is an excellent kit and flies beautifully.1 point
-
Super 60 is a later version of the Junior 60 and made for RC instead of free flight . Longer nose which helps get battery forward. Looks better? Flys beautifully and is a better trainer. Plans on Outerzone and plans and kits from Ben Buckle. You won't go wrong with either but it's your choice.1 point
-
I would be surprised if they were not the same plastic, a variant of ethylene vinyl acetate glue. The likes of Oracover and De Luxe don’t develop adhesives, they buy 200 litre drums in, and repackage. We are small time users, book binding, interlinings of shoes, clothes use tanker-loads1 point
-
I have used cover grip but only for film on film joints or over epoxy / painted / fuel proofed / metal areas. For me, large sheeted areas of covering are heat shrunk with a gun and pressed down while still hot with a microfibre cloth to ensure adhesion.1 point
-
A double sided razor blade snapped in half is all you need. At least that was all I started with when I were a lad.......1 point
-
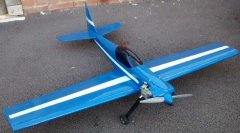
Almost finished. Weight without fuel 1270 grams even my cat likes it. 😸1 point
-
So while looking through my tubs on my projects shelf I found this Enya SS50 that I picked up a while ago, it was missing the cylinder head and prop driver and the piston had suffered a bit of a trauma. I had started work on it making new head,removing the dead bearings and bead blasting it and then sticking it in the tub along with a SS40 that needed reassembly after cleaning and then forgetting about it! The piston was the biggest problem and was the reason for putting it aside. the piston crown looks a bit of a state but that's due to me attacking it with a file,and here's the reason why in the next two pictures not sure what happened to cause that damage, but it jammed the ring into ring groove, the distance from the top of the ring to crown is only .8mm so the only safe way to release it was to file it (carefully) away, so with that done....... that's the easy bit ,making the ring groove, pinning it and making the grooves for the circlips will be more of a challenge i1 point
-
I thought you were going to plug the old holes and then drill new ones in almost the same position. If you plan to move off the existing holes and drill new ones say 90- degrees off then then i agree with solly. you risk weakening the hub too much as it will be like a swiss cheese by the time you are done. Chuck it out and buy a new one.1 point
-
Happy to help Kerry, I've seen Stephens fly, have fun. 🙂1 point
-
Laminating epoxies tend to be more critical on mix ratio than the run-of-the-mill 5 minute epoxy glues.1 point
-
All the resins Iv'e used give the weight ratio which is very helpful.1 point
-
Maybe the Lions hoping to be sent to Rhwanda ?1 point
-
Getting excited now, spoke to Century Jet and my retracts are now ready and just waiting to get packaged and sent off. Really can’t wait to get these and install them, it will really help with me getting the wing finished now and once that’s done the fuselage.1 point
-
After a long break holidaying I’ve restarted on the project. Fuselage has had a rough sand and put to the side. Framed up the wing and sat down for a while whilst I figured out wiring routes, tube mounting etc… Quite happy so far and can’t wait to get the top sheeting on. Still waiting on retracts though so can’t sheet the bottom until I have them, what I can do though is make both wings, mount to fuselage and finish the fuz 😃😃 Quite excited about the next phases. Cheers1 point