Leaderboard


Popular Content
Showing content with the highest reputation on 20/03/24 in all areas
-
Quick update, I am now out of hospital in an amazing rehab centre , and am now doing loads more physio and they have lots of incredible specialist equipment including an exercise bike that has electrodes that you attach to your weaker limb that fire in time with the rotation of the pedddles to encourage your less good limb to relearn it’s role! I am so lucky to get a place here, as sometimes people wait weeks, but I got in last week only about 2 and a bit weeks after my stroke. That is ke, as apparently the early days after a stroke are when you have the best opportunity to improve.18 points
-
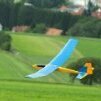
Hello everyone, I captured a nice day end of January. Splendid weather and beautiful gliders. Two clubmembers were winching their big F3J machines, and it was a marvelous sight. I especially loved how they zoomed of the line, and how you can see the fuselage warp under the all the stress. That must be a lot of force! Anyway, I thought I might share it here, if posts like these are not appropriate I will happily remove it ofcourse. Here is a link to the video:4 points
-
Good day at the field today, weather was not too good with some light rain early on but it turned warmish by midday. Anyway today was my tribute to Laser Engines and here is a vid of the Laser 160 inline twin powered ESM Mustang - Long live Laser engines (in my dreams).4 points
-
I have made one using Arduino, gps position/ speed with barometric altimeter which costs about 20 quid for the bits. Was thinking of detailing it on this site if anyones interested? I use this in my Hotspot jet so size wasnt a key requirement but it could be shrunk with a proper pcb c/w processor chip. I have since removed the display and now vary the sampling rate up to 4 times a second depending on speed. CSV data can be read into Google earth as seen below!3 points
-
Back to the wing . The ailerons can now be detached from the main wing . Its easy to do as the ply core that keeps them together is very thing and partially cut already . I sanded an angle on the front face of the aileron which allows the ailerons to pivot down . I've set in three mylar hinges on each aileron . They will be pinned with a wooden cocktail stick . My usual method for installing the servos is shown below . Its quick and effective . Start by wrapping each servo in masking tape , then simply hot glue (or epoxy ) the servo to the wooden servo box lid . If you need to change the servo at a later date , you just cut through the masking tape and out it pops . There is a little silicon ring keeper on each kwik link . Its made from fuel tubing. Finally you can screw the lid down . When you do the other side , position the servo in a mirror image of this one to ensure that the ailerons work opposite rathe than together.3 points
-
I've made a dolly from scrap plywood and a pair of wheels on aluminium legs. These were in the 'bits' box at the flying field, one mans scrap is another mans gold and all that. The tail wheel can be bent to adjust the track and I'll spend a bit of time ensuring it runs straight, ish. Field trials on Saturday I hope.3 points
-
I think he's probably "neither here nor there".3 points
-
Craig here. 62 semi retired. I live in Stockport area South Manchester. Completely bored with mundane TV programs I decided I wanted to do something more with my "down time" So I purchased a 1/35 scale plastic model WW2 vehicle kit and began my journey of building painting and generally being creative. After completing my first attempt and even doing a diaorama I was quite pleased with the result. What to do next I thought and as I have always had an interest in Aviation in particular WW1 and WW2 aircraft I thought I would build one of these next. However on my perusing of the WWW and various on line retailers web sites my fancy started to become tickled by the thought of actually flying something I built myself. So in my usual compulsive way I bought a kit thinking I'd learn to fly it afterwards. Yes Yes I know I already know now that I have gone about this in completely the wrong way but the deed is done and so contrary to all advice I will proceed with my build and then maybe buy a little RTF trainer aircraft of some sort and join a local (ish) club to continue my journey. According to google I think that Sale Model Flying Club might be the nearest to me. I opted for the Belair Kits Nieuport 11 24" wingspan model as I think Bi-Planes are a thing of beauty and I have been busy buying tools adhesives and stuff. All very exciting. I'm not much of a blogger or vlogger but I might post some photos of the various stages of the build etc. I am thouroughly enjoying reading the various posts in the forum and I am grateful for the resources and the time people take to offer advice and tips. thanks for listening. Craig (my forum name is due to my love of riding motorcycles by the way)2 points
-
Ok , so a bit more done today . I'm going to nip about form wing to Fuselage in order to firm things up . My plan is to get the model flying and modify the plan with little mods to make yours a smooth build . I will do the covering (well most of it ) after and paint it later . So here is the beefing up the front bit . You will need these five balsa pieces which come in the plastic bag . The is also a ply tongue which I forgot to show but there is an obvious indent in the bottom of F2 which takes the ply piece referred to as "motor support " . The idea with all the balsa is to fill in the gaps between the main formers in the chin area so that any impact there is dissipated . The cowl should be a tight fit over F2 and the main fuselage has a hard step to stop it going back . I'm going to saw off some of the balsa block. Its pretty soft , so easy to do . Then on with sanding .2 points
-
Or the bad news , we have amputated the wrong foot, -------- the good news is the man in the next bed wants to buy your slippers.2 points
-
You cannot (and, nor can I) simply look at a picture and say "I see more redundancy therefore must be safer" because the actual safety and actual engineering behind both those craft is totally invisible to a casual observer, which, I think, is what you and I both are. The real value in any aircraft is in the guarantees that certification provides. Neither of us know what Velocopter have got in the bag so far - although I will note they are late with their TC. Splat. Or more likely, a parachute pops out the top and it lands on the nearest field/person/house. Got it in one. If, and it does look like quite the big if right now, multirotors can beat helicopters as an overall package, then they will win out. And I will fly to my job at the nuclear fusion power plant in one. 😈2 points
-
Welcome to the forum Craig, is your surname really 'Here' ?.2 points
-
I am now the owner of a Sky 40 thanks to @martin collins 1 - nice to meet you 👍 I have also purchased a few motors: SC 25a (brand new) OS 40 FP (which I plan to put in the Sky 40) Os Pet 099 (cheap and will likely need restoring but I wanted something to mess with) The best buy is a 4 stroke Saito FA-45S 😁 I really wanted a 4 stroke and this little gem was up for sale with the OS 40 FP so I had to get it. I'm fairly decided on building the Super 60 and putting in the PAW 19. No idea what to do with the 4 stroke yet...2 points
-
@Paul De TourtoulonNobody is saying that it's new Paul but a lot of people haven't seen it before so that is why I created this topic hoping that members would add useful comments! To the rest - keep the tips coming through guys, it's turning into a useful 'Wiki' type thread.2 points
-
Quite agree re the challenges in getting certification but if the operating costs of say the volocopter are significantly lower than your average small heli then that may be enough to swing the argument. As you are very probably aware small helicopters are ferociously expensive to run and maintain with so many parts needing replacement or complex servicing after quite low hours in comparison with fixed wing. I have only ever been lucky enough to experience a couple of short hops in a Jet Ranger, but even in a turbine powered helicopter I was quite taken aback by the noise and vibration in the cockpit. I see only 18 moving parts in the Volocopter and probably three maybe even four times the redundancy over a single rotor helicopter. I think I would feel safer in the Volocopter than in a piston powered R22. It is going to be really interesting to see how this all pans out… idd2 points
-
My last two Lancasters were covered with brown parcel paper applied onto the veneer with slightly watered down Pva .Then a thin coating to the paper and slowly laid onto the airframe,gently pressing out any air bubbles.Very strong when dry and any overlaps can be lightly sanded. The paint was applied thinly for the first coat and then thicker for the second and third coats. I found it was a good cheap way for covering large models.2 points
-
I have access to three 4000mAh 3s LiPo that look brand new. My biggest capacity battery a 2800mAh 3s is used in the Big Dragon 2 A Depron/printed lightweight pusher that is itself a rework of the original all Depron Big Dragon. As I still have both the CAD and stl files for its printed components the intention is, whilst retaining the same configuration, to modify the files to accept the slightly bigger 4000mAh 3s battery. The circular nose of the Big Dragon 2 is an "exact" fit for its battery so virtually all the pod files will need adjustment for the 4000mAh. To account for the extra weight a slightly more powerful motor and bigger prop (11x3.8 instead of 10x3.8) means the wing "pylon" will have to be slightly taller as well. The wing itself will be slightly bigger and stronger too. Anyway after many, about 24, hours printing and in some cases reprinting the 6 major components are now glued together with a slightly bigger, longer glass fibre boom. Not surprisingly it looks very similar to the Big Dragon 2 version. It has a 50A ESC inside the wing pylon that has built in cooling ducts. The 4000mAh battery is indeed a tight fit. It has been run at full power with a battery at just a storage charge and it delivered 254W at 25.3A. It blew a lot of air around the room! Now all I have to do is build its wing and tail. 😉1 point
-
I should also have said that with the grit you have used, the inside finish should look an even Grey, before you then use the 1200 grit. Keith1 point
-
Thank you very much, that means a lot. This was done with limited equipment, but it was loads of fun to make. I have a better camera on the horizon.1 point
-
I can see some high spots in your cylinder so you are not quite there. You really need 1200 grit for the finish and it should look polished when you shine a light into it. By the time you have finished ,you will have most of the tools for the next one! Keep at it!😀 Keith.1 point
-
Those were the days.1 point
-
Welcome from me Craig... Ken Anderson....ne.....1....welcome Dept1 point
-
Meanwhile in India1 point
-
PS. I sold my last bike last year. At seventy-six my knees are no longer up to managing a big bike especially with luggage and a pillion on the back. Mind you, one of those little SV 650s look interesting..1 point
-
If it's an Overlander motor then they should be able to provide all the necessary details, even for their discontinued products. https://www.overlander.co.uk/contact/1 point
-
Welcome to the forum Craig. I'm glad you're going to join a club because you'll probably meet many like minded souls who'll help you in your aeromodelling career. I'm pleased that you've chosen to build a model stick by stick because that's what I enjoy doing. However, if you'll take a bit of unsolicitated advice from me, please learn to fly before you try to fly the Nieuport. Flying an r/c model is not as easy as it looks and I'd hate you to crash the model after you will have put so much time and effort into the build. Even the real Nieuport pilots didn't learn to fly on Nieuports did they? Leave it till your third or fourth model. The Sale club may well have a trainer which you can learn on while your transmitter is connected to an instructor's transmitter. It saves a lot of heart ache!1 point
-
Good news Matty. 👍1 point
-
Hi Craig and welcome from the other side of the hill.1 point
-
I have to agree that brown paper is a great covering material. I've known about it for donkey's years but never seriously considered using it until recently. Since I started using depon and similar foam sheet material for building models, I have found brown paper to be something of a revelation. It works out a few pennies per metre and is readily available. A bit like applying very thick tissue. I use Titebond wood adhesive because it sands really well. Some PVA glues stay rubbery when dry. It is a lighter and significantly cheaper alternative to skinning a foam surface with balsa. And is surprisingly strong. For open structures I am happy using 38 micro matt laminating film.1 point
-
Thanks to all, the brake fluid did the job, now to see if it will get rid of the dried 2 pack polyurethane paint.1 point
-
Steve, That's good news. A quart is a quarter of a US gallon = 946ml, so near enough to a litre when estimating how much you'll need. I would strongly suggest getting fabric cement and its reducer (thinner) from the supplier if they have it, its purpose made for the job so will make the task of adhering the covering so much easier. Ask if there is an instruction sheet for the fabric cement - to tell you how much thinning is required for initial application and then adhering the covering. The instructions are unlikely to be on the can, so best to know the start points for thinning before lashing on the stuff! If stored correctly, dope will not deteriorate in the can over many years. Fabric cement, or at least the stuff I use, will discolour in the can over time but is still useable.1 point
-
Brown paper works well as a covering material. It is brilliant for strengthening foam cores. . . I use wallpaper paste on mine. When covering foam, be aware that if using any adhesive with water in it, there will be shrinkage so apply to all sides at the same time or there will be warping.1 point
-
Here is my simple EDF design. It’s made of domestic insulation foam from B&Q (therefore very similar to depron, I think) and it’s covered with brown paper then painted. I did it as an experiment, but it worked pretty well. I didn’t use heat to activate the PVA - it just air-dried.1 point
-
As a respite from steel, decided to make the 'carb' from the brass rods supplied. Machining the brass need some keen or new tools and the parts are quite fine and certainly awkward to make true and straight. Drilling some of the tube with a 1/16" dia drill for over 1" is a heart stopper at times, and near impossible to keep it straight over that length. Had to buy some 4 BA taps and die for part of the job, but this part has AF/BA/ISO threads all over it. The carb is made from 3 turned parts, two are silver soldered together, the third is essentially the jet which the 1/16" dia needle sits into, the lot fed from the tank I have yet to machine. Anyway, bar one thread it is all done, nut not my best work. I'm quickly realizing this fine machining is not my best skill...even if I had a new Myford! That lot to one side, started to make the lapping tool for the cylinder. The lapping grease now here. 73T 911 Co1 point
-
Having an open mind on the whole subject of drones and personal flight vehicles clearly puts me in the minority on here! Lots of naysayers and general hatred to ANYTHING 'drone' related from most people involved in other aspects of the hobby of RC Flight...perhaps they feel they are to blame for the increase in regulation etc1 point
-
I would not mess about with much theory. Assemble it, use a cg calculator, balance it and go fly. I’v done a few Frankensteins over the years and no huge surprises.1 point
-
Hi Ton, managed to maiden the Yellow yesterday between rain showers. Flies like on rails from the beginning, setup almost as recommended. Love it! Span is a little shorter, only 78 cm. Akku is a 1300 mAH. And the prop is an ApC 7x6, motor as recommended. Speed ctr. is Wasaby 35 Amp. Regards, Franz1 point
-
Yesterday I hinged the rudder and elevator to the model. I used large Kavan pinned hinges and for the first time I used De Luxe Materials Superphatic glue as the adhesive. I had been impressed by the quality of this glue when building a wing for my Baron which featured depron wing ribs, also a first for me. Previously I had always used epoxy as the glue for hinges and I'd always applied some form of grease to the pivot before applying the glue. I usually used butter for this purpose! As Superphatic is a water based glue I did not bother with greasing the pivot. I placed five spots of Superphatic on each side of one leaf of each hinge. These were then inserted into the tailplane. Five more spots on each side of the other leaf then I fitted the elevator. I did the same with the rudder. By yesterday evening I was able to lift the model and wag it about holding on to the rudder and elevator! Thats without any pins or cocktail sticks. Note the usual immaculately tidy workshop! Having turned 76 earlier in the month I have decided to treat myself and the model to a white GRP undercarriage from Carbon Copy.1 point
-
Only just seen this. Sorry to hear your news Matty but sounds like you're getting good treatment. All the best for a speedy recovery.1 point
-
At long last the crankshaft is finished, it fits, and it goes round with no radial play and 0.25mm end float. Nice to use metric! This is the completion of the bottom end and time to fight the con rod. It is a fight due to the lathe and my accuracy, nothing hard, just fine machining and for a lathe that has had a big chunk of the cast iron cross slide knocked out of it, it has led a hard life in the past. It has it's limits! You can see the missing bit in the pic below. It seems to me to be very hard to find the centers on these smaller pieces, and heaven knows how I will get the small end pin square through the iron piston. Never ever machined cast iron before, but what can go wrong? Anyway, a few pics as ever. Funeral and MoT tomorrow, but hope to get a good Thursday on the rod. 73T 911 Coupe,1 point
-
She flew! And flew well I might add, no flying shots as my photographer was acting as a ‘trim buddy’. The weather was calm after the early frost and mist and all checks completed. It required a decent heave for the hand launch and after some click of trim, she was flying hands free. I only flew for 5 minutes, the battery showed 52% left, it’s a 4 cell 3300. The spinner and prop vibrate a bit so some more work required. Landing was a doddle, I landed her on the very wet and soft grass without any damage! I'll build a dolly for launching it think.1 point


.thumb.JPG.76d75238b980680cf080513c0401be84.JPG)