Leaderboard


Popular Content
Showing content with the highest reputation on 06/04/21 in all areas
-
Soarcerette. 34.5” Span 2 ch Miniature Slope Soarer. Continuing my nostalgia theme of late here is my latest. Built from a FEB 86 Radio Modeller plan by Mr P Startup, It’s a 2/3 size version of the Dave Hughes Soarcerer (RM Oct 69). It needed to be a small model, ideal to keep (hide) in the car to take away any time for impromptu flying. I’ve added a small power pod for flat field operations, also split the wing in two parts (easier storage) & added ailerons. All materials i.e. balsa, ply & coverings have come out of my off cuts box. Now just need a chance to give it a go!5 points
-
While I'm waiting for the wind to drop a little, I decided to do a little titivation so knocked up a basic interior on my 3D printer. Fresh off the printer I printed it very thin and it weighs 3/5ths of not a lot... A splodge with a paintbrush and some scraps of Velcro later: I'll need to paint the interior woodwork now!4 points
-
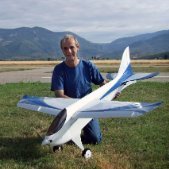
My latest creation, a BillKits Slingsby T67 FireFly - awaiting maiden flight.4 points
-
Oily ??? ? D.D.4 points
-
Built over a couple of evenings, this is a Wooden Shoe Aviation Tpys 'Speedster '. Free flight powered via a 3.7v 2F capacitor. I've scaled two trees already to retrieve! Something for the nats if it lasts that long.3 points
-
Thanks David. Tbh it has been pretty straight forward so far and certainly not as challenging as the BT Razorback. I spend plenty of time looking at other peoples builds which is such a help. Bought one of these today which I will use to drive and sync the four flap servos (HiTech 5245 mg minis) from a single channel. I have a DX9 so channels are limited for a model like this. One of the features I like is that you can connect a dedicated battery and mount it together in the wing centre section so just one flap wire instead of four to the fuselage and no worries that those barn door like flaps are not adequately powered when fully deployed.2 points
-
Ive got the kits chaps , so will start packing individual requirements and organise post . Those that have a clean work bench and ready to go , message me and Im sure the others wont mind waiting a couple of days to get theirs . I think we need to get this thread busy , so lets get some postings and pictures up . Dont really need a blow by blow build as already done but ideas of piste and colour schemes etc will be fun . Like I say , ready to get some out , so if you a good to go , give me a nudge . Richard2 points
-
Not been well for a few days, always happens to me, relax and I get ill, ah well better now. So thought I had better face the music and attempt to run one of these oily's. First I had to bend the pipes in the tank. Fortunately a bit of advice from Andy S had me filling the brass tube with salt, with the ends plugged with bamboo. Then what a faff to get them in the tank! a strong light helped me see what was going on. With hindsight a clear tank would have been easier. I then made a test rig to clamp into my workmate. Why am I petrified, should stick to electric...... wish me luck lol2 points
-
Here is a video of my Mk2 Autogyro i made from a Lidl foam glider. Still waiting for a chance to get out and test fly / crash it. Will it work or not. Steve.1 point
-
That's fine leccy, if Richard has despatched the Kit before I have done the Decals I will post them on to you1 point
-
Here's the long-awaited Maiden of my Kamco Kavalier1 point
-
Oi - I resemble that remark...1 point
-
Excellent Ken, brings back such great childhood memories.1 point
-
Just to remind you chaps, I do the Decals for Richard so if you want a specific aircraft and have a picture of it I can do the decal sets for you. They will be in high quality vinyl and include the Crosses, Swastika's and Codes for £201 point
-
Well I must say that was interesting. It was either pouring fuel out the carb, or spewing oil all over the garden. Started nicely with a good firm flick. Not sure what you are supposed to do so aimed for a fast idle, with some blipping. no high revs. Ran two tanks through it. Not hot at all, well the exhaust was lol, but the head and crankcase wasn't. Cheers Danny1 point
-
Bolt it to the work bench .....clamps will slip off when you're not looking1 point
-
I don't believe starters break engines, the bit holding the starter can, in all the years I've been flying only seen one engine broke, an O.S 120 pumper, stood watching and advised they would break it, a myth where a tool gets blamed for poor usage.1 point
-
Hi Jon I did get a few of the issues ironed out before winter, but the next spring i was given a well sorted chilli wind, and I ended up retiring the puma.1 point
-
Sheeted top of centre section which used up a substantial amount of 3/32nd 4” sheet. At its widest the cord is almost 55cms! I inlaid some .4mm at the trailing edge as it really does protect and steady final shaping for very little extra weight. Plenty id sand/gravel bags and anything handy and heavy to weigh it all down. Interesting asymmetric step back at the leading edge.1 point
-
Here is mine - only had a couple of flights so far due to the current restrictions so not trimmed out properly yet. The most difficult part of the build for me was getting the rudder servo linkage right. I prefer to used metal rods for servo linkages not the plastic snake types. So bending the rod to get correct linkage took a little time to get right. Hope to get more flights in soon. Steerable nose leg also fitted.1 point
-
Hi there here is a short test flight video. Dam wind / blustery conditions has foiled me again. Anyway i think it is a flyer I will reduce the control throws and try again in better weather conditions. Steve.1 point
-
It's been a while since I've been in here! Managed to figure out the messed up login but still can't find my old photo albums, and I'm not sure how to add a new photo to this post! Still, onwards! Managed to get a bit more done on the Sabre. Cockpit has been fitted out & painted, canopy stuck over it & blended in to the fuselage, plenty of sanding & filling too! Finally got to the stage where it was ready for some shiny paint, along with the Meteor. I started by spraying the underside which was left to harder over 24 hours. This was then masked off & a coat of grey applied to the upper surfaces which was left for another 24 hours. The masking for the camouflage took nearly 2 hours, which was quite long considering the much larger Meteor only took 3 hours. Finally the green was sprayed over the grey. Next step will be to add those small details that take forever and some airbrushed insignia and markings.1 point
-
About 15 years ago we spent Christmas with some friends in a holiday let in the Cotswolds. On Christmas night we were walking back to our accommodation after having a slap-up evening meal in a nearby hotel and there was a spectacular comet/shooting star streaking across the sky. It was in sight for several seconds (15?) and certainly not fleeting. Perhaps it wasn't a comet but a piece of man-made space junk obeying the law we all understand only too well at times - gravity. It was certainly something I'll never forget.1 point
-
About time I posted on the new forum. Just finished a SLEC Limbo Dancer in time for the glorious 29th. Nice straight forward kit (apart from messing up the push/pull rudder & elevator several times). Started in January, so a real quick build for me. Powered by a ASP 40.1 point
-
I don’t think I would worry too much. Flair kits were sorted. Adding weight won’t be a benefit. The solartex will stiffen it fine.1 point
-
This is the planned scheme because the previous photo didn't seem to load1 point
-
My thoughts were that there would be a larger pool of possible participants if the engine size was reduced from those 100 or 250cc machines, beautiful as they are it gives a poor guy like me no chance of competing at top level world or national championships. I definately don't have the skills right now to put a masterpiece together but it could inspire others to try if the models were in a comfortable, convenient and affordable engine size. I know i would have a go if it were so. formula 1 although not the same has had some similarities in that biggest budget helps a long way to the winners podium. the same names pop up time and again as they have the budgets to be there. I am not trying to take away from the absolutely great skill and talent to produce those flying machines that take out the top spots in aeromodelling it is just out of reach to the average bank balance. mine is less than average. maybe an undercard of scale models in the 60, 90, 120 and 150 size engines non arf? me rambling again just shoot me and put me out of my misery1 point
-
Now me, I am old fashioned. I liked the days when there was a 10 lb limit and anyone had a chance of building a winning model. They then said "Ah but we can't get the detail in" Well people DID get the detail in and everyone was in the same situation.1 point
-
I wish you could print off a new bonnet for my car.Only plastic but the wind ripped it off.Lots of broken spare ones. A new one from Italy £200 for a bit of moulded plastic.0 points