Leaderboard


Popular Content
Showing content with the highest reputation on 09/11/22 in all areas
-
So the Centurion is now complete, in terms of construction, the radio gear is in,the motor and speed controller are in and working. I am using the Turnigy 80 amp esc and having read the instructions on programming it, I still had no idea how to do it, anyway someone must have been there before me and It was set up already so happy days! using a 6s lipo. Just got to cover it, make up the glazing and do some fancy decoration, not decided yet. So time taken about 6 weeks of a couple or 3 hours a day, weekdays only, weekends are for the wife! Very happy with it so far, if the electric gubbins does not work out I will cut off the nose and fit a nice four stroke of some sort. Thers pics taken this morning, had to open the garage door as it was too big to get round and photograph properly. More pics to come when it is covered7 points
-
The dark and cold days are here now, so unlike Lord Tennyson’s young man’s fancy in the spring, an old man’s fancy in the autumn turns to thoughts of the next project. What better than a little modelled subject of a world beater in its day. For a long time I’ve liked civilian aircraft of the 30s and while I especially admire De Havilland designs, there are others of course so why not try a Percival Vega Gull. It was one of these that Beryl Markham flew to be the first person to fly east to west across the Atlantic As a model it has quite a lot going for it: long nose - to house a Gypsy Six, a thick wing at the root, not too complicated in the glazing department and of course, spats. The crowning touch is that it has folding wings. Having built two models now with folding wings and appreciated the time saving in rigging and derigging at the field, I thought I’d try the idea again. Neither of the previous models (a DH84 and a DH85) were true cantilever, so this is a bit of a challenge but hopefully achievable with the thick wing. I’ve settled on ¼ scale as I find light aircraft manageable at that size, both in the workshop and when transporting. The Vegas Gull comes out at 118.5” span, so a bit larger than the average club model but not in LMA territory. The target weight is 25lb…..he says, optimistically. To check out the feasibility and test a few ideas, a mock-up of the wing fold was made. I wanted to have a single bolt, inserted from above, acting as the hinge point with another single bolt to lock the wings in the extended position. At first I couldn’t find 4mm bolts long enough so used 5mm bolts, which were way over the top for the job they have to do, they did however prove the concept. I’ve now found, courtesy of Model Fixings, 4mm bolts long enough to span both hinges so while the original plan was to use the concept hinges, I’ll now have to make them over again and only drill out for 4mm. The hinges are nothing more than 2mm x 10mm flat bar from B&Q. The double part has a layer of litho to pack them out a bit. The only complicated stage was silver soldering a doubler to achieve a 4mm thick piece which could be tapped. Trying to retain small pieces while silver soldering is not easy for me, but the problem was overcome by overlapping two strips, soldering and then cutting off afterwards. I now think that the strips don't need to be as long as they are, a bit of weight can be saved by making each 1/4" or so shorter. Another aspect I thought it worth making a mock-up for was the main fuselage stringers. There is quite a curve from the cockpit to the pointy cowl and the stringers would also be the main loadbearing members for the cockpit bulkhead, which in turn carries the engine firewall, so laminating three 1/8 x ¼” spruce pieces around a simple jig came to mind. There are two stringers either side which run the whole length of the fuselage, this would mean splicing as well as laminating. I tried one mock-up and it worked but it was time consuming and was going to mean buying (sending for) more spruce. A eureka moment occurred when I remembered I had in the loft some ¼ square cyparis, 6ft long. While the cyparis will easily bend around the curve, and would probably hold its shape once the 1/8 spruce was glued on, there was an easier way. Running the cyparis through the band saw to cut it down the middle and then inserting a strip of ply, the width of the saw cut, I decided was a better way to go. Two longerons have now been made and they hold their shape well even without the third layer of spruce, which I’ll add once the formers are in place. The next task is working out how to support the engine firewall which is 6.5" in front of the cockpit bulkhead.2 points
-
There are a few old magazine retailers who would probably love your collection and would arrange their own couriers. here is one for example. Magazine Exchange.2 points
-
It is not widely known that William Tell invented yodelling, he was being chased up a Swiss valley by soldiers when a farmer saw and hid him in the barn. After the soldiers gave up the farmer gave him a meal and a bed for the night in the morning the farmer stood with Tell and showed him the track up the mountain which led to over to the next valley and safety .As he watched William Tell climb high above the farmers daughter appeared and said "father, that man came into my room and had his wicked way with me" "Tell , after all I did for you , you ravaged my daughter" called the farmer up the mountain William Tell cupped his hands and shouted back "And your old ladeee toooo"2 points
-
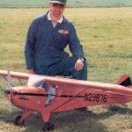
Once the house move was completed, and my son was born, new kitchen done......so busy, I managed to complete the model, fitted with an SC91 (which if I remember correctly had a very low serial number 0002 stamped on it) any way it ran perfectly and flew very well indeed, radio was my old Futaba Gold 35mhz. I passed my A with this in about 2000 Here it is in the garden of our old house in Blackburn, and at Pleasington, home of the Blackburn Model Flying Club just about to have its maiden flight.2 points
-
Pat previously had athlete’s foot. The doctor told him to put some fungicidal stuff on every morning, and to be sure to wear a clean pair of socks every day. within three days, he couldn’t get his shoes on.2 points
-
Pat goes to the doctor with chest pains. The doctor examines him and diagnoses acute angina. Pat says - "is there anything you can do for me doctor" The doctor says "Sure Pat, I'll give you some tablets and you'll be grand. Here you go. " "Do I need to take one every day, Doc" says Pat. "No Pat, you take one on Monday, then skip Tuesday, take another on Wednesday, skip Thursday, another on Friday, skip Saturday, then take the last one on Sunday and I'll see you next week" Anyway, Pat doesn't turn up on the following Monday but the doctor see's Pat's wife in the street and he asks her how Pat is doing. She says "Ah, Pat's had a heart attack, doctor and he's dead" "Oh, that's a terrible shame" says the doctor " I thought he'd be okay with those tablets I gave him" "Ah, now" she says "The tablets were fine - it was all the skipping that killed him......"2 points
-
Thought I'd start building the Andy Conway PSS BAe Hawk T1 which is considered by some to be the ideal starter PSS model. The photo shows the short kit that I acquired from Neil Gilles of www.igull.co.uk and also the required canopy can be acquired from www.vortex-vacforms.co.uk. The plan is offered online from the Power Scale Soaring Association at www.pssaonline.co.uk Have started this between doing jobs on my F86 Sabre whist waiting for things to dry on that model.1 point
-
Tiny James, your transmitter as shown in the picture that you posted earlier today is a Mode 2 transmitter. Most British pilots are Mode 2 but a substantial minority, (30%-40%) are Mode 1, throttle on the right. It does not really matter if your instructor is Mode 1 or Mode 2 but it will be easier if he is Mode 2 as well. I live in France where all of the other pilots in my club are Mode 1 but I can still instruct even though I am Mode 2, it's just not quite so easy!1 point
-
Only 2 metres high? I have a 10ft long wall to head hight of old mags and books in my 5th bedroom. RCM&E from issue No1 with a gap of a couple of years in the mid 2000 teens.1 point
-
The manual can be found HERE The stick mode change is explained on page 91 for the menu settings. The internal mechanical adjustments are easy enough. I managed to figure it out on one of these a while ago anyway.1 point
-
With the function INH [ inhibited ] in the program menu nothing will happen.1 point
-
Max is right of course, but it may be possible to inhibit the action in the menu. A new switch will be best. Changing the spring on the stick to convert to Mode 2 could probably be done by threading some thin thread through the eye of the spring and pulling it off. This stops the spring flying off into the unknown! Then putting back on the opposite side. Then there is some other ratchet stop to swop over too. That's the way the dealer did it to convert my new Futaba 6EX many years ago. Then changed Mode in the menu. Probably the same in later Tx too. I have a Phoenix due to be fitted out with motor and Rx soon. One thing I realised is that the motor bolts may be tricky to fit, so I found that the motor bolt thread was the same as 2 normal 'quick link' rods (SLEC etc) which being much longer than bolts could be pushed through from the nose into the fuselage then threaded into the motor in order to pull it up into the nose. Then two bolts could inserted and the quick link rods unscrewed and replaced with 2 more bolts.1 point
-
I don't know a lot about Futaba Txs, but would it not matter in which position the switch was left when it broke? It would be a pain if you had to live with a flap or airbrake bias on your ailerons or elevator all the time.......1 point
-
After a little head scratching I have made and fitted a pair of canopy rails. Brass tube slotted with an angle grinder (eek) and sandwiched between a split square section carbon tube. There is a round opening in each at the forward end into which a ball link fits in. This should mean I can remove the whole canopy if needed. I have offset the rails a little to minimise the taper but the top forward part of the canopy will still require splitting and a hinge fitting, as per the full size to allow for the rest of the taper as it is slid back. I do like shaping wing fairings and although a little fiddly on this model, due to the pair of panel hinges and various steps in the shape, it has worked out ok. As per the cowl the hinges are simulated. The rear portion is thin steamed balsa sheet and the front balsa infill with a final top coat of Fat Boy lightweight car body filler (lovely stuff to shape). The red blotches are 3m cellulose putty. Good stuff but messy as. A thin litho panel has been formed for the upper area above the vents but won’t be adhered until after glassing the fuselage. Here with the cowl in place. Not easy to see from this angle but that a a fair sized gap where the 4 simulated exhausts will go. Along with the other exhaust exit at the lower back of the cowl and the venting through the cooling flaps I have no concerns of an overheating engine.1 point
-
A list of all compatible Rx for various Futaba Tx can be downloaded here. You can see that the T8J is compatible with only a few Rx but will be suitable for flying most models including the Phoenix and any trainer when using a suitable Rx.1 point
-
It won't because a) registration is seen as foundational to the future control of low level airspace (e.g. remote ID cannot work without some form of registration scheme), and b) doing so would put us out of step with pretty much every developed (and developing) nation who has brought in registration in the last few years. Ineffectual it may be, but it won't be transient.1 point
-
Silicone fuel tubing tends to swell and soften after long term immersion- do you make a habit of draining your (glow) fuel tanks?1 point
-
I use a T8J and you do not need that switch for basic stuff. Can be fixed at a later time. The R2106GF mentioned above is fine for small foamy's, I have one in a mini Spitfire. For general use I recommend R2006GS this is also a full range RX. Pic is of the Spit and a vintage type Veron Cardinal.1 point
-
That will do nicely. For receivers, the clue is at the bottom left of your picture where it says S-FHSS. This is the communication protocol for the system. For 6 channels, this will work: Futaba S-FHSS 6ch Rx (but it does say only 300m range) For the full 8 channels: Futaba S-FHSS 8ch Rx (probably better as it is full range) It's confusing with Futaba, because there is also T-FHSS. This is not compatible for your system.1 point
-
That's interesting Gary, strange to see the mounts in different places from the same company. I would have went for unitracts but no joy when emailing them even though I was asking for 3 different sets of retracts. Don't feel like your hijacking, this is the main reason for these forums so we can all see and learn from each other. Get as much on as you like!! Gary1 point
-
Alec This was mine from 2005,waffled around like a big trainer.1 point
-
A couple of years later work took me to France for a few years, so no more aeromodelling for a while, when we came back to England I had such fond memories of the centurion I wanted another even though I could not spare the time due to work and kids, I had two now. So I built a third one, this time with a RCV91 four stroke and my old steam powered Futaba Gold, unfortunately no photos remain of this one as I had gone digital and the files have since vanished. Work was mad, kids needed attention, schooling etc my wife was not keen it was just the wrong time so that one went via E Bay. Now I have finally retired and have plenty of time, my wife's attitude to model aeroplanes has mellowed ( a little bit anyway) Leading up to my retirement and since it seems that model shops have all but dissapeared I bought as much balsa and R/C job lots as I could find on E Bay and Facebook market place, my garage is now an Aladdins cave. Retired in September this year so I have made a fair bit of progress, I have not taken too many pics as I has all been done before. The basis of the start is a plan pack from DB Sport and Scale, which includes a plan ( which must have been drawn for a kit at some time as it does not show any wood dimensions or shapes of formers etc.) a set of the main wing ribs laser cut and a set of templates printed onto label sticky back paper. Here is the fuselage being dry fitted, already making mistakes here and a big one that I had to sort out later!1 point
-
Good stuff, I'm a little bit further along but I did start it about 15 years ago!! My kit was cut by Bob Holman in the US, pretty good apart from some upper fuselage formers being cut to the outer skin line. I can measure parts for comparison. Had a lot of trouble with the retracts which resulted in a rebuild of that area once I had obtained the original retract units. It needs the lower wing skin adding (saving up for the balsa!) and I will probably rebuild the tailplane/elevator. Have to decide how to power it, I do have a Laser 75 but I'm thinking about electric now. Cheers Gary1 point
-
Thanks chaps. I know Nick, the P-47 isn't finished either but I've got all my other projects complete so that I can focus on this. It was a toss up of the two and to know this was mocking me from the loft was too much so had to get it out again. It's probably more work than I thought it would be so feels like I'm starting from scratch a little so hopefully it starts to look like a model I'd be happy with again. Gary1 point
-
Hair lacquer, a quick zzzzt on the build plate before warming it up to working temperature and it works every time.1 point
-
Not if he hasn't set up a model in OpenTX it won't.1 point
-
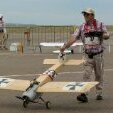
Well progress is fast The orginal firewall just has a spacer to bring the motor The battery platform has been fitted The under carriage is freely pivoted. It will have a v brace underneath after covering which will have an elastic band holding it withla forward rake This is the view when it is mounted The wings are just about the easiest ever. Just got to raise each tip 2 1/2 inches,add the tips and sheet the centre sectiom1 point
-
I used to work in a kitchen as a chef and swore and shouted alot. I then discovered oven gloves1 point
-
1 point
-
Just thought I'd add a few flying photos of JP150s to the blog, quite a few of them in regular operation now and all flying brilliantly on that revised balcanec point!!1 point
-
Perhaps its time to broaden your horizons? There is nothing wrong with ARTF, but you will always be limited by the models offered by the various manufacturers so if you want something else, you have to build it. Building is a skill, no argument there, but it is one that is not impossible to learn and its immensely rewarding. With the rising costs of ARTF models building may also be more cost effective. Even if it is not cheaper as such, the cost is spread out over the build time and you are likely to end up with a better model at the end of it. It is also your model, inside and out and is completely unique. So when someone says something nice about it, you can take real pride in your work. There is also added advantage of knowing how to put it back together should you break it. At the moment i see two good choices. Grab the Seafire now to solve your immediate want for a new model. In the background, pick up a kit of some kind that is relatively straight forward to build and have a go t that. Make it a model you actually want to fly, even if it is a kit built acrowot, the kit version of the seagull challenger, or something like that. use it as an intro to a full build to see how you feel about it. Then you can build a Sea Fury a little down the track if you feel more confident. Alternatively, kill two birds with one stone and pick up the kit build version of the seagull ARTF P47 (link). Its a model that is known to fly well, suits your engine and is relatively straightforward to build as it is basically an unassembled ARTF with all of the parts pre cut. You can then customise it as you wish with a new paint job and so on. This latter option is a little more like throwing yourself in at the deep end, but If you get stuck with building there is no shortage of assistance available here on the forum with some very skilled builders on hand to offer advice. With the winter coming and flying weather likely in short supply you could have it turned around and ready for the spring even if you only spent your normal flying hours building. Add and hour or two here and there in the evening and progress would be quite rapid. If you are sure building is not for you or you are very limited on space and have nowhere to build then that is fair enough. But, if your hesitation is down to worry about not being good enough then my strong recommendation is to shelve that, buy a model, and get stuck in. 🙂1 point
-
I picked up an new/old stock Seagull Seafury recently and repainted it to a Dutch scheme. Also fitted electic retracts from HK and bigger wheels. Fitted with Saito 1151 point
-
Ok Jon, no need to show off your lovely planes with super engines, 😉, Just fitted my RCV .58 to a rubbish falling apart Gambler, talk about Chalk and Cheese,, but it's all fun Rubbish or Scale finished planes it's all modelling fun,,,🥳1 point
-
Cessna A37 Dragonfly (tweet).Just finished my Pss A37 ready for test flying at the Great Orme October do.Upscaled from the 36 inch Paul Sampson plan from the 90’s to 54 inch so in a way scratch built,having to change model from a one piece to two piece.Canopy is home blown and armaments removable.1 point
-
Word forms and origins are interesting to follow and to unravel, and similar in word " dentist " the " dendri " part of words refers to " tree like ", from observations of tooth roots appearing to follow a branch like pattern. In Technology, dendrite was adopted to describe crystal formation observed under the microscope as forming " tree like " branches of crystals between anode and cathode inside cells creating a path of least resistance thus self destructing the cell. This dendritic growth is a very slow process.0 points
-
You know what it is like, just had a big bust up with the Mrs.. I accused her of smearing glue all over my rifle collection, which she denied. But I'm sticking to my guns.🙃0 points
-
I got my chain saw out and taped the cowling up with building tape, it won't stick "except" when pulling it free it took the varnish from the cowling, so I lightly pulled on the varnish, it doesn't stick at all !.😮 you can also see that the cowling doesn't ligne up with the propeller cone.0 points