Leaderboard


.thumb.jpg.632415da66ae2d3b91c91514c153e5df.jpg)

Popular Content
Showing content with the highest reputation on 29/04/21 in all areas
-
A similar masking principle was used for the sharks mouth on the underside of the nose. The outside area was masked with tape and then the mouth was drawn onto the masking and cut with a sharp scalpel. This was sealed with clear coat and, when dry, sprayed white with a mist coat first followed by a heavier gloss coat. When dry I covered the entire mouth with vinyl masking and drew the gums and teeth. When happy with the layout I carefully cut through only the masking and removed everything that wasn't going to be white. The unmasked area was the airbushed with clearcoat (again!) and then red. Vinyl masking was also used for the ID letter and fin flashes. The gun ports were painted from a built up mask drawn and cut on the Portrait cutter. This was to ensure accurate spacing and positioning. The masks were applied to the nose and again the surrounding area masked off. A sealing coat of clear coat then black shading half on the mask and half on the Sabre, heavier across the rear and top edge of the port graduated to lighter, almost non existent towards the bottom and front. I still have to colour in the eye! Next is panel lines, shading, jet intake and serial numbers.5 points
-
Latest Phase 6 maidened on Sunday. Wind was marginal but lots of thermals coming through to gain height for a few basic manoeuvres. Looking forward to flying it in some proper lift.4 points
-
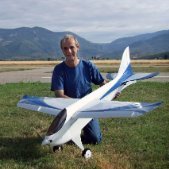
I combine my two main hobbies. Flying and photography.3 points
-
Besides the toy aeroplanes, these days my other main interest is helping to run and lead a couple of local ukulele clubs. I've been strumming a guitar for decades, and always found it to be a fairly solitary exercise. Fun, but lonely. A few years ago I stumbled into building a uke from a kit, and sought out the local club - which was a revelation. It's a complete social world in itself - with festivals, holidays, gigs, charity events etc to enjoy. The difference it's made to my own self-confidence is phenomenal; I'd never have dreamed of 'fronting' a band a few years ago. These days, I love it and I'm looking forwards to kicking into gear again. Oh, and the other aspect is that, being a modeller, I've been making my own instruments (in the cigar box idiom). It's a whole new challenge to produce a playable uke or guitar. I've even built and sold a couple for friends too! During the last year we've been able to keep the clubs alive via Zoom (not perfect but better than nothing), and a couple of mates and myself have been working on compiling a new songbook for the local club. Tim2 points
-
Out flying today, using my 14th iirc wot4. I chose to power it with an OS 52 Surpass 4 stroke which is the least powerful engine I have ever used apart from an HB 50pdp in an early mk 2 back in 1982. I found an apc 12.25 x 3.75 prop and it matches the combination exactly. I won't say there's unlimited vertical or that the loops are the largest I've seen but it doesn't seem to be much different to one I had that used a saito 82 as prime mover. Ordinarily I would have used a 13 x 6 or a 12x6 on this engine as I was worried it would over-rev on this prop. Well pleased with my day out. Oh and it came back in one piece!!!!2 points
-
I like to build guitars. This is a recent build.2 points
-
Cambrian Models Midget Mustang electric conversion maiden flight today, no problems and a lovely flyer. Very fast on 6s, may be tempted to buy a kit from Cambrian and build it myself, found this one dangling from the rafters in an Antique shop, it had a 4 stroke glow in it when i bought it, no more oily airframe now...........2 points
-
Ordered yesterday came this morning, thanks K.LM.S ? This will be my attempt to convert this rubber powered model to 4 channel RC, at 30 " WS, it should be easy enough, and there are a few examples on Youtube to prove it. Seems to be a decent kit like the smaller version I built, but I have spotted some duff timber in there, the scrap bin will save the day tho. This should be a fun project. Ailerons will be the biggest challenge I think. I love the plane and intend to build the Big One at some point. This will also be my first tissue over Lam film finish too. ??? No pressure then !! D.D. Some comparisons with the smaller RP version1 point
-
Good parking, portaloo and BMFA Northern Area are supporting our clubs event. An admission charge of £5 will be levied for BMFA Members and proof of BMFA Membership will be required. We are also looking forward to anyone who would like to attend via the BMFA trial flight ‘Flightfest’ program and get a feel for model flying. Our event director, Jon Edison and his team will be pleased to answer any enquiries. Contact with York Model Aircraft Society can be through our website contact page and arrangements can be made to take a trial model flight at our club flying site near York. We regret that we cannot carry out the trial flights on the Knavesmire, but will be pleased to give information on model aircraft flying and arrange a convenient time slot to visit our club flying site to take a trial flight there. Details are on our club website, ymas.org.uk and initial info is on our front homepage and further information can be found by following the left side menu link, EBOR fly-in. Why EBOR fly-in? Well, in Roman times York was called Eboracum and the event is being held on York Racecourse known as the Knavesmire. We have had a good number of new members and enquiries regarding joining our club and would be pleased to welcome any more new applications. Members are established at all levels and enjoy flying a wide range of models types, both Fixed Wing and Rotary. See our website for details. “It’s great to be back flying”1 point
-
The often forgotten member of the momentous Apollo 11 mission, we all remember Armstrong and Aldrin but rarely Collins. His photography during the mission is iconic.1 point
-
First part of tuning flight vid - apologies for the sound of ethnic wind, it was a bit strong again today!1 point
-
Managed to cut the ailerons out without removing the wing from the board. I reckon if I did it again, I could get the raised tip and the ailerons, but it's a bit more work. D.D.1 point
-
With ailerons you can use scale dihedral. Check out the 3 views and photos of the full size.1 point
-
Looks nice, what is it. Thicko, one post back. Very nice.1 point
-
The model has a fair old dihedral, and the tip is supposed to be lifted. So to get the ailerons in the right place I have done away with the tip lift, making the wing flat on the bottom. To achieve this, I had to fit the main spar upside down and alter the end by rotating it 180*. The pics will explain better. It has worked well. I have a question tho......How much should I reduce the dihedral by, or should I just leave as is.?? The plan says 1 1/4" under each tip and the wingspan is 30" I will have to make a leading and trailing edge for the aileron, but that should be straight forward, with a couple of lengths of 3/16th from the scrap bin. Also some servo boxes, I may just stick them in with tape to save weight. D.D. 3 laminations at the leading edge tip The main spars, the one at the back is how it should be fitted. The cut. 180* Plus the rib. Some of the kits fit leaves a bit to be desired, unless that is on purpose. Almost a wing.1 point
-
Well I took 'Spatty' out again today and got flights of up to 10 minutes! There problem was to do with the needle assembly so to avoid messing around I replaced the complete rear cover plate and needle (thanks to Just Engines) - sorted! Trouble is I just 'won' an eBay auction for another, this time brand new, OS 15 LA!1 point
-
Matty, Thank you very much for the above info. Looks very promising. Shall also save this.. RCG Andy Kunz.1 point
-
I also put together the occasional plastic kit and used to draw but not so recently. My other main hobby is photograpy; mainly portrait and landscape and lots of model planes too of course.1 point
-
Hi Rich, I'd be interested to see a video on calculating rotor loading as I'm sure others would too. Cheers Mike1 point
-
Very fancy gun port spraying Chris - neat and ingenious - bravo!1 point
-
In which case I apologise for my incorrect assumption and retract my post! I originally read 4S2300 as a main motor pack... would expect "4.8V" as the usual nimh description.1 point
-
I’m sure most of us do take the easy option on occasions but it’s worth pointing out that every plug/socket introduces a possible failure point or high resistance contact after some time so the extra effort of a well supported soldered connection may be worth the effort in the long term.1 point
-
I should also add, keep the paint products separate! Twice I thinned the coloured base with clear coat not thinners and I nearly wiped the prepared area down with thinners instead of degreaser! ?1 point
-
Strange coincidence? It is in fact modeled on the one hanging from the ceiling at Cosford Museum except in a former life with 112Sqn, mid 1950's. Not quite at the panel lines stage but they'll be airbrushed on over tape. So far I've been working on the markings and roundels. The surface has been flattened down first with 1000grit then 1500grit which helps to get rid of the raised masking lines. I cut vinyl masks with my Silhouette Portrait and laid the outer mask in position, masking the surrounding area. I then airbrushed inside the mask with clear coat to seal the edges of the mask to prevent paint bleed. When dry I airbrushed a light "mist coat" of white to aid adhesion to the clear coat. This was then over covered with a heavier coat of white. you can see why I flattened down the camo lines so they don't show through the decals. When dry I applied the two outer circles of the mask. Masked off the joining lines of the circles and applied another coat of clear coat to seal the inner circle of the mask. Again, when dry I sprayed the inner circle with red, let it dry then removed the masking tape from the joint lines in the mask, taped over the fresh red and removed the outer "blue" paint mask. More clear coat to prevent bleed and a blast of blue. Finally, when really dry I removed all the masking, cutting the circles so that I can peel the masks off perpendicular to the paint edge so it doesn't pull the paint up! This is where you find out of it worked OK, or not! This was done for all the roundels and fin flashes at the same time to save time on paint mixing, layers and drying times. P.S Thanks Pete. After reading your instructions and a bit of head scratching I have managed to figure out how to insert the photos within the text! ??1 point
-
Mike, Yes it will use the Coolwind Razer head, though I will be testing this head unit on top of it. It's been sent for me to me by a friend and features a 15 degree delta offsite with a free flapping hinge, all 3D printed. Uses a 3mm wire as the hinge which is inserted into the main fixed parts. Need to add bearings and M2 bolts/nuts. The U/C is a simple home made job and the spats were picked up from the Much Marcle LMA show in 2019, I bought a couple of sets as they were £2 a pair, wish I'd of bought more! Rich1 point
-
Not that sure regarding the 'sprint qualifying', Charles. But as you wrote, let's wait & see... One thing is for sure, the tyres quotations are far from simple for those weekends. You nearly need an Excel sheet to find your way through it. Regular F1 viewers will be totally 'submerged', I'm afraid... In the meantime, Portimao is next at our door... Think about your predictions, gents. ? Cheers Chris1 point
-
Hi again all, @Dwain Dibley. > thanks, young man. A bit of progress to the fin/rudder with a partial coat of black. The first pic is still a 'mummified' version. ? On a side note the black part of the Belgian flag is wider at the base of the fin than at the tip... I realise that the pics are showing it differently. Those wide angle angle lenses are often quite 'offending'. Think of it like those heavily followed 'influencer' pics on Instagram... the reality is often totally different than the pics they want you to believe... ? Hakuna matata Chris BRU - BE / CTR Mummy #2 Control1 point
-
I've used poly c for many models, both Brown paper covered and glassed. Often mix poly c with lightweight filler to a cream like consistency to fill the weave. I believe some call it spakle, also good for filling polystyrene models.1 point
-
Mike, Hard Glaze is one of the newer water based varnishes that come from Dulux and Ronseal, It's like Deluxe Materials Eze Kote but much cheaper although you have to buy a minimum of 1 litre. It can be used instead of epoxy for finishing a glass covering etc.1 point
-
I have been working on the flaps and in particular the hinge line that like other builders, working from these plans, I discovered that there were some discrepancies. The inner flap hinge line was 1/4” too far back and to fit the outer flap 1/4” square hinge spar correctly the cut outs in ribs 6 and 7 needed adjusting. Altogether not too problematic and with the addition of some gussets and extra 1/4” sq the hinges have a solid seat to be adhered to. I have stated adding diagonal bracing internally to the wing top sheeting are above the flaps to stiffen the area. Some modellers, particularly when building the larger 1/4 scale Bates Fury sheet this area with Proskin for additional rigidity. The flaps are 1.5mm ply with a 1/4” sq leading edge notched 1mm deep to take the Dubro flat hinges, prior to gluing in place. Next task is repeat for the other side and make up g10 actuating horns.1 point
-
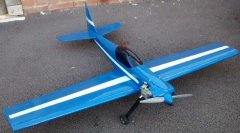
My Bowman Spatman build completed, awaiting maiden. OS15 Max fitted, sidewinder style. Brown Paper/PVA covered, hot wire cut, polystyrene wings. Deviated from plan with fuselage slimmed to accommodate engine orientation. Light-ply (popular) fuselage sides due to lack of balsa. AUW 870g.1 point
-
Alive , but working on the kicking -- LOL, I have been at home with Pandemic and all that, suffering from being Immune suppressed. The store has stayed open and never stopped regard Mail Order and Click and Collect in the last lock down and I'm pleased to say re opened on 12th April. Monday to callers. Its going well, we've had a slight refit improving the down stairs store to allow customers around it this time. The first lock down was severe with the counter across the front , but I think such measures proved correct when the 2nd wave hit. Now there's still perspex on the counter but at least the shop is open. Our upstairs showroom is closed. Most people understand ( not all do) that it has to be that way. Because of social distancing the upstairs can't be used. The mail order office is small and works fine, unless all the staff a need to be 2mtrs apart like now and so upstairs has been taken into office / mail order temporary until the all clear gets rid of social distancing. These measures are not optional and anyway people expect SWM to do the right thing and we do as far as I know. Its all about keeping staff and customers safe, while trying to stay open. One reason I came to post this is I heard from Paul Marsh via my personal face book pages ( Facebook at SWM is taken care off. Its not my realm) . Earlier this thread Paul mentioned he got a Force Engine from China , it was cheaper than the UK and apparently no UK stores had them at the time. BUT Paul said that his was a different colour to the ones we advertised. His was Black / Purple and ours had a silver head. At least you would think it had as our website had a pic of it with a silver head. This prompted me to say to Paul that sometimes there are European/ USA versions and there's Home Market for China. Its easy to understand this happens because when this is done in China we see it as copies the Chinese Government see as capitalism. A company like Tower Pro makes 9g servos. Everyone knows the ones and yet I would gamble that many 9g servos that at Tower Pro are not made by Tower Pro at all, but by many different factories. It can be like that with any product. Often the home market can sell things the European market cant . Like decent solder. LOL Hence when Paul said his was different that ours I presumed it must be that. Turns out our website had the wrong picture. So we could not fulfill Paul's dream of a Silver Headed one as they don't seem to be available. That's not to say that Chinese market version might be different than the UK market version. I don't know. I only found out about the website error and like Paul I believed we had silver headed ones as servoshop had that one in the main pic. How could his happen!! Heads will roll... seriously we had got the picture from the J Perkins website the UK distributor and so there was no reason to think it was wrong. The staff at SWM have been happily selling Force not realizing the ones we had were different than the picture. I should assure Paul the Anodizing wont effect he performance. I think he wanted the silver version as well. That might not exist it would seem. Its possible the engine JP photographed was a sample? Its possible its a later model? I dont know , the store will call JP on Monday and try and find out. Strangely most other UK stores have the silver pic. I guess they all used the distributors picture like we did. What could go wrong? Well it could be a different colour apparently. I just wanted to clear up one possible why it was different was it could be a different European version and now I'm not sure it is, If I find out I'll post back. Of course I have substance here that removes anodizing. We could always make one silver... LOL. Keeping on track with the subject of the thread. I have acquired and Super Tigre 2000 glow. Its such shame the low prices these go for on eBay. I picked up a hardly used version for £61. I had forgot what a huge lump of metal they were. I was after a 2500 , but the 2000 will do. I posted some of the Diesel Conversions Peter Tarn has done. I have quite a few 40 FP and I have Fox 60 Dieselized. That's my largest. I said to Peter ' could you dieselize and Super Tigre 2000. The answer was yes but it might not work and so we are going to try and see. If this works I want a Super Tiger 3000 next... LOL.. Why dieselize one? To see if it can be done I guess. I think what might let us known is it has a ring and ring engines dont convert as well to Diesel as ABC or plain Iron Piston/ Liners do. The SS 25,30 and 40 all Dieselize great because they have Iron Pistons/ Liners. I have an SS 40 Diesel and SS 25 Diesel. My Latest engines going into the collection are some I had for a while but they've been refurbished my a pal. A ED 2cc - not a Comp Special. The way to tell is the Comp Special has cut outs on the lugs. The 2cc doesnt it has straight Lugs. There's always Comp Specials for sale with Broken Lugs. I do wonder what a scallop out of the lugs did for performance? It seemed to make lug breaking easier. An Alag X5 - 2.5cc (15 cu in) and a Jenna 1cc (060 cu inch). Hopefully you will see the pics. I finally got a Saxby Nipper 030 also! Hopefully you can see the pics. Steve1 point
-
I love your work Ron. It just tickles me that the bloke who originates the design glues his servos in with a hot glue gun because he can't be bothered with screws, and then we have the "Heart Surgeons " (Ron and Paul ) polishing up after me . ? I suppose my only comment would be that if any of our models become lawn darts , I will have wasted less time ............ I also have another theory . Us at the "shirking " end of the building spectrum , are less likely to post a "building shot " because of the chaos that might reveal , with or without feet . For those of you out there , who are like me , working on the last two inches of the bench , with a broken hacksaw blade because you cant find your razor saw . Take heart . You will build two models in the same time as everyone else ..... and have the capacity to fix your model at the field with something you found under the spare wheel , even though it wasn't the "right tool for the job " ?1 point
-
My flying pal, Mike, maidened his little Bristol M1 yesterday. Built from the Peter Rake plan/parts from Belair. Flew great. Detail and pilot to follow now he knows it's a good 'un.1 point
-
It's been a while since I've been in here! Managed to figure out the messed up login but still can't find my old photo albums, and I'm not sure how to add a new photo to this post! Still, onwards! Managed to get a bit more done on the Sabre. Cockpit has been fitted out & painted, canopy stuck over it & blended in to the fuselage, plenty of sanding & filling too! Finally got to the stage where it was ready for some shiny paint, along with the Meteor. I started by spraying the underside which was left to harder over 24 hours. This was then masked off & a coat of grey applied to the upper surfaces which was left for another 24 hours. The masking for the camouflage took nearly 2 hours, which was quite long considering the much larger Meteor only took 3 hours. Finally the green was sprayed over the grey. Next step will be to add those small details that take forever and some airbrushed insignia and markings.1 point
-
I'm thinking about an electric sports-aerobatic for clean, low-fuss winter and lunch-break flying on our often windy hilltop site - both for enjoyment and to help work up eventually to my B. Have had the Acrowot ARTF with a 70 FS for a couple of years now and would like something a tad smaller to fit assembled into the car but with a similar wing-loading (the AW is about 21oz/sqft). I'm not after all-out power or mad aeros, and would like to be getting 9-10 minute flights with moderately-paced aerobatics at various throttle settings rather than 5 mins at all-out welly - so I'd fit the largest capacity battery in the suggested range. I don't currently have the time to do any proper kit building. The 53" WOT 4 MkII balsa ARTF seems the closest to my IC Acrowot in terms of size and weight for penetration, and the volume of sky I usually fly in (and can see!), and shouldn't take too long to put together, but the total cost (including 4x 4s 4500mAh batts) is just over £500. The 43" WOT 4 E balsa MkII ARTF is 80% of the size with a loading of 18oz/sqft, and would involve a similar fit-out time Total cost (with 4x 3s 2600mAh batts) about £325. The 48" WOT4 Foam-E MkII appears to use exactly the same electrical components etc as the E balsa but, whilst marginally bigger (easier for my eyesight), is much lighter - its loading comes out at about 11-12oz/sqft. This would make it very similar to the Riot I originally trained on - too light for satisfying flying in all but calmer conditions, and I really don't like foam. But it would be much the quickest to go from box to air, and the total cost (with 4x 3s 2600mAh batts) about £230. I'm inclining towards the 43" balsa ARTF (which would usefully fit the car without having to put the back seats down), but there's little by way of reviews etc online, and I wonder whether it would be too fast for its small size? Any suggestions or prejudices on which way to go? Cheers Jon Edited By Jonathan M on 07/10/2018 07:52:201 point
-
Just finished my first single channel model in 40 odd years. This was from a plan first published in Aeromodeler in April 1968 and was the first model I ever built, for free flight. It wasn't successful then, but I knew nowt in those days so I'm hoping for better this time with 2.4Ghz single channel courtesy of a Phil Green encoder. The model looks really cute so I hope it survives.1 point
-
My 240v sucked up some grit and was rather expensive to fix so I don’t want it happening again!0 points