Leaderboard


Popular Content
Showing content with the highest reputation on 24/07/22 in all areas
-
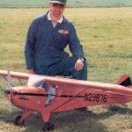
That’s interesting. Some time ago, I wrote a feature on the Supermarine Spiteful/Seafang and the 1/10 scale model I had designed and built. David Ashby was interested and I sent a copy of the plan and a wooden pattern for the canopy, but he said the flying photos weren’t high enough resolution. Danny Fenton very kindly came along to the field to take some pictures, but I got nervous and flew it into the hard runway in a low pass that he asked for and did some damage! Danny said that the pictures he had got weren’t good enough anyway. I did repair it later, but haven’t flown it since. Perhaps I should have another go, but I don’t have an answer to the photo issue.5 points
-
I cannot see why so many people make such a song and dance of this. It’s as if there is some king of black magic involved. Just flatten the damn things as gently as you like through a bulb. When the light goes out they have no further energy to set anything on fire. As someone said the salt water business has been discredited. Never really understood the need for it anyway4 points
-
There are more than a handful of literate lads on this site who contribute common sense daily, and could fill the Magazine monthly, with useful, informed articles. At least 5 or 6 of you stand out, and should consider contributing to the magazine. Your skills shared daily include builds, materials, printing, scale builds, scale flying, gliders, glider set ups, Tx and Rx set up, charging packs, purchasing, motors, ESCs, I/C motors, purchasing, tuning, cleaning, servicing and On and on and on.3 points
-
I'm the same with magazines. They do take up a lot of space, but they are a marvellous resource - most of all you can't really safely read a tablet, laptop or phone in the bath, which is my preferred location for soaking up my RCM&E. 🙂3 points
-
Well don Iqon, Chris and Tony. Got pole right and winner right everything else went downhill fast. John2 points
-
Had a bit of a break to try and get some flying in. The weather hasn't been helpful though. A bit more work on the fuselage and the wings started. At this size it really does need operating retracts.2 points
-
As Richard has mentioned I have been tinkering with other 'bits' other than the scale wheels. Richard some time ago mentioned that a company used to produce wrap around plastic legs for their models. So I suggested that we could try the idea. Well it expanded some what, and these are the result of that chat. Fishtail exhausts, fuel filler cap (saves on pens being cut up 😉) wheel caps for the original light foam wheels supplied in the kit, trim covers for the rudder and elevator, wrap around legs, U/C doors and cockpit panel. The holes in the door is for cable ties which I originally used for my model with oleos, you can glue the doors directly onto the legs should you choose. All printed from PET-G so being in the sun is no issue and can be easily super glued together. The doors would need to be lengthened to go over the coil if using the piano wire legs. 'Triggers Broom' was used as a demo platform to give you the idea. If you want to know more about 'Triggers Broom' It's an old model of Richards which only Richard knows the count of how many wings and fuselages it's had!! Also there was no room in the boot when he moved.... As currently fitted to mine for the new wheel trials..2 points
-
Try this, I’ve used it and it does me ok....1 point
-
When I look at deliveries by the likes of Amazon, then you see what a good business model looks like. No cards pushed through the front door, no post man saying it was not him , it must have been Royal Mail Parcel Post.1 point
-
Erf, this is your post. Why inflict that uncertainty on yourself. Unless it’s not available in your free trade/customs zone. Do mail order if it suits. Back in the day I knew shipping agents. One I knew rented an 8 by 6 office above a Chinese takeaway, and a garage. The takeaway was 25 meters from the dock gates. The garage housed a new top of shop Mercedes, same model as used by the chancellor of West Germany. Rewards of knowing how to avoid interesting times.1 point
-
I have a Gloster Gladiator from a club member who has passed away and I would like to identify the kit if anybody recognises it. I have tried searching on Google but have not unearthed anything. Some pertinent details are Wingspan 167cm = 66in which puts it at about 1:6 scale Power 2 stroke 90 Wings built as 2 full span wings Fuselage Fully moulded fuselage, rear section has balsa stringers glued to the outside of the fibreglass with fabric type covering over. U/C Heavy duty piano wire soldered construction A couple of other details are the wing retaining bolts have nylon bolts which sit inside machined inserts which sit in cups in the wings. It needs some TLC, especially new cabane struts but it appears to be structurally sound. Does anyone have any idea about the manufacturer.1 point
-
Definately a Phil Ramsey Gladiator although with a few non kit specified mods, like to stringers on the o/s of the fus. Flew mine with a Zenoah 20 and no ballast. Rigging / de rigging is a pain unless you have a car that takes it one piece1 point
-
It looks like the Phil Ramsey kit to my eyes. But I never had one so I may well be wrong!1 point
-
You’re not wrong there Ron as including the former and fixings it’s about 5oz. My plan and parts came with the full set of Sierra retracts so seems a shame not to use the tail unit. That said the wheel doesn’t fully retract on the FW 190 and just sits up higher, so if I was really worried about the extra weight I could go for a fixed steerable wheel as per the plan. My Sea Fury has a similarly weighted tail retract and I still managed to achieve a sensible auw, so having spent the effort thus far I shall push on with it and do my best to keep the back end as light as possible to compensate.1 point
-
I have been working on the installation of the Sierra tailwheel retract. It’s been a proper shoehorn job and a lot of material had to be fettled away for it to be able to lift up without fouling. To compensate I have added some carbon reinforcement on the outside which will be sandwiched when the balsa skins are added. Former 9 as supplied and shown on the plan had been positioned for a fixed tailwheel so a new one had to be made and positioned much further forward, also at a slight angle. With the amount of vertical movement at the steering horn this meant finding a suitable run for the pull pull cables was going to be tricky. I have opted for some long slots that providing the cables are spring loaded at the servo end and the cables leading towards the slots have exited guide tubes at a mid point of travel they should not over tighten in either the up or down position. I will however require a separate servo for the wheel steering that is programmed to switch off when retracted.1 point
-
Don't get disheartened, Steve, we're all learning from the replies you're getting. Have you looked at the range of FlyFly models sold by Gliders at Newark? They are much cheaper than the Eastern European imports and consequently lower quality but might be a place to start without spending a fortune.1 point
-
https://tmfc.bmfa.club/1 point
-
Thank you, I’ll dig it out and have another go.1 point
-
She's a real beauty Colin. 😎1 point
-
I have tried subscriptions for electronic versions of magazines, but as with work documents, I don’t like reading long subjects on screen and tend to not bother, or print them off to read, which isn’t cheap and offsets the savings. At the moment, all of my mag subscriptions, aviation and motorcycling, are for hard copy. I’m not arguing about the way things are heading, but I still get more out of the printed version. Probably and mostly, a generational thing, I expect. I’ve subscribed to Aeroplane ever since it re-appeared in 1973 and have every edition since then, mostly bound. Fabulous source of information that can’t age because it’s historical, but I expect it will finish up in a skip somewhere when I pop my clogs. It does take up a lot of space.1 point
-
Many thanks Jesus! I think you are right, I have just ordered it. I hope it arrives soon.1 point
-
It's my opinion that the required standards for photos have been relaxed a little these days, which I think is a good thing. I, for one, no longer maintain a home studio for static shots. Nowadays I'm more than happy to take shots on the work bench, with the main subject surrounded by the clutter of the building process. Far more accessible for the contributor, and relatable to the everyday reader. It's also my opinion that the standard of printing also been relaxed, as has the quality of the paper used, maybe for economic reasons. But that's out of my control. Tim1 point
-
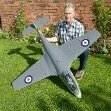
Thanks for all of your kind words chaps . The main point though . to be taken from these pictures , is that a well proven kit (obviously doesnt have to be mine ) can be taken to a much higher level with very little artistic skill . When you know that the end result will fly nicely , and you have seen other people succeed with it , there is a wealth of information available on this site to help you make a real winner . Paul Johnson is very kindly making lots of little details to help everyone along and I personally get a big kick out of seeing people progress to lighter and better finished models . I also don't think that building the same model twice is such a bad thing . I defy anyone to say that they built the very best version the first time , even if it is their pride and joy . Plus , with WW2 , there are so many different variants of each design ,that they can appear totally differently . Good example being the Spitfire . A Spitfire IX has a very different look to am early Spitfire and it isnt really about the nose length . The reality is that the blunt spinner and stumpy exhaust stacks give the nose a much shorter look rather than the actual few inches . The late variant paint job , particularly with invasion stripes , makes the IX look more sleek and shark like as do the smaller fuselage roundels that make the body look longer . In the same vein , the P51B like Princess Elizabeth , looks very racy compared to the regular D variant . BTW ,I do believe that the P51 kit could be built a pound lighter quite easily as it is over engineered to make it a "click together kit " . Having said that , everyone is delighted with its benign behaviour .1 point
-
If Sarik, or someone else, were to supply all the plans featured in the digital version this problem would be solved. At present the 'free' plans are limited to a size that will fold into the magazine, going down the Sarik route would remove this limitation making larger models possible. I wonder. Steve1 point
-
No pics of build, but this is from May 2020: @Timo Starkloff's Yak-9. I took a liberty with the canopy which I fashioned from a Lidl washing up bottle, hardly scale, but never mind, it could easily enough be replaced if I so wished! Finished AUW including 2200mah 3S is 811g. I hope to test fly tomorrow. Oh I added a rudder so it has one extra control surface compared to the plan, and I used two servo's for the aileron, but then it's leccy, so one less as no throttle servo needed.1 point
-
Now, I know I’m more than a little late to this party but having seen Harry’s Alpha Jet in action on the Orme I fancied building one for myself. Having read through the build logs on here and with much guidance from Phil and Harry along the way I now finally have one ready to fly. I won’t go through my entire build as it’s obviously very similar to what’s gone before but here are a few photos anyway… The weight of the original glider was 72g. I used flat carbon strip where I could and rod where space was at a premium. I used 190 micron mylar hinge for the elevators and ailerons but found the width as shown in this photo was way too much, making the hinges too stiff so I subsequently cut them down to something in the region of 4mm wide. I used a carbon rod to locate the front of the canopy and magnets for the rear. I found the elevator linkage hoop required a good width to ensure the two brass levers didn’t foul at their full extent of travel. (The gap between the two brass levers varies through their travel due to the effect of introducing anhedral to the tailplane). AUW with all the radio gear but prior to any paint was now 97g. I sprayed the plane initially with a clear plastic primer, followed by a few thin coats of white acrylic primer before applying Tamiya matt white acrylic which then brought the weight up to 101g. Now I was ready for some colour and of course I needed to find a different colour scheme to what’s gone before. As seems to be my way of late I ended up choosing something difficult! The Portuguese Air Force ASAS colours. I lightly sketched the shapes onto the primed surface using a soft 6B pencil until the proportions all looked about right and then masked up, spraying red first, followed by the green and then black. I used Tamiya matt acrylics and my new spray gun and compressor (Thanks for the recommendation Harry). There was much touching up of paintwork along the way, partly due to a little paint lift and bleeding under the tape in places but also due to the translucency of the white and red colours in particular. I also found the matt white finish difficult to keep clean during the whole process. Another first for me was making my own waterslide decals although this did require much assistance from our daughter in the Photoshop department. I have to say they went remarkably well and I’m particularly pleased with the chequerboard finish around the nose, something I had previously thought I would have to do by hand using either paint or a Sharpie. Once the decals had dried I then gave everything a couple of light coats of clear satin sealer which should hopefully give it a little more durability against any knocks or scrapes, time will tell. Weight at this point now 114g Prior to any paint I thought I had the C of G something close to the 78mm from L.E. figure but subsequently found I needed to add a couple of small masonry nails up front to bring it right meaning my AUW finally is 118g. Not the lightest but not too shabby given the amount of paint! In hindsight maybe I should have tried to install the elevator servo further forwards as Harry did with his and thus negate the need for the nails. All I need to do now is get out and fly it, I hope to be able to maiden it in the coming week or two in readiness for the next PSSA event on the Orme. Phil 🙂1 point
-
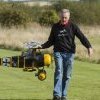
I took a couple of photos of others Gyroo's a few weeks a go, these guys have added little mods as you can see like the extra wires on the UC etc, all fly extremely well. The Gyroo with the modified tail has 900w of power and climbs vertical, it does a great rolling climb! to deal with the extra power the head, boom and mast are aluminium. This version also features an elevator which is coupled to the pitch of the rotor, it does the tightest of loops very much like a fun fly type model. Anyone else up and going with theirs?1 point
-
Connect a couple of flying leads - or use a pair of connectors of your choice on the battery end - onto an old car headlight or stop/indicator lamp and use that to completely flatten the pack - should be OK up to 3S and for more, put 2 lamps in series. For lamps, you might prefer to use the word bulbs but years of storemen trumpeting "bulbs is wot you plant in your garden" have scarred me for life and I can't bring myself to use the word in this context!1 point