Leaderboard


Popular Content
Showing content with the highest reputation on 23/05/23 in all areas
-
A old mate of mine needed to clear some of his models as he is still building at 84 and has help in flying the aircraft so they are lasting longer. I got his Flair Magnatilla that had not flown for nearly 20 years as the float flying club lost the use of the dam. I replaced the Irvine 53 with an electric set up as I fly from a dam close to the house and do not take a recovery boat with. I fly when the conditions are good.15 points
-
It is well flown. I'm not sure if the original had a pulse jet or another kind of prototype jet engine:4 points
-
It really is about time that I updated this. I had a lousy winter building season, the fracture in my back 'moved' in November and bending over a bench was a very short lived affair. It didn't help that my SD card in my phone died and I have lost a number of photos (about 3000). <sigh> However, the Robin has progressed slowly. The wings finished, covered and painted and markings applied (sorry lost photo). Then started work on the interior. Instrument panel was 3D printed than the dials were from the freebie that came with RCM&E a few years ago. (Hint - it would be nice if that could be done again, I cant print as fine as your printers). The seats were a bit of a challenge. They were cut from 9mm foam (B&Q) but sorting out that distinctive pattern was a challenge. The best I could do was copy a part of the pattern from least distorted seat base, stretch it in GIMP then join the stretched parts in a chain. Printed using a cheapo inkjet printer. The velour is felt from Hobbycraft. So, two singles and a bench seat, fabricated and fitted. I am really quite pleased with this. The cockpit rear wall is 1.5mm balsa with vinyl film, still attached to its backing, glued in place using 3M spray adhesive. This will hopefully stop it from going wrinkly. The floor and walls are covered in thin foam sheet (£1 A4 sheet) also from Hobbycraft. Another shot. The gap between the front and back seats is too large.. I used the windows as reference but of course the window positions aren't quite to scale. The pilot was 3D printed from a commercial file. Its not the best print I have ever done, its actually a glider pilot but I dont care about that too much He looks a bit moth eaten but only because I overdid keeping the wall thickness as thin as possible to try and save weight. The seat belt clamps are a bit big - so probably are the seat belts as well. A couple of dry assembly shots while waiting to fit the canopy.. and Getting it balanced was a bit of a worry. I needed to keep the weight under 5kg to qualify for BMFA light scale comps and it was already very close to that at this stage. I fitted an onboard glow and fitted the C cell and the Rx battery in front of the crankcase. I still needed about 40g of weight to get the CG in the place marked on the plan. A strip of lead was screwed above the crankcase but the model would still tip backward on its wheels. I couldn't do anything with the the undercarriage as the spats would prevent that from happening. I was also a bit nervous about the amount of travel needed for the all flying tailplane. I definitely didn't want a twitchy model. Another 40g of lead was added... 😞 The canopy was completed with litho strips with obligatory pva rivet spots (got to keep Danny happy) and a final assemble photo. and The wing walkways have been subsequently added. The spinner needs to be red with a white spiral but that can wait. Time for the grand weigh-in.. Suspended from a tree in the garden, it weighed this much.. Drat and double drat Mutley, foiled again. So its now a candidate for BMFA Flying only.. Two failed attempts at a Maiden. The first, the engine started and ran beautifully but the nose leg linkage was flexing too much (offset noseleg) so back to get that fixed. I tried again on Sunday at the NW Area Scale Fly-in but a leaking fuel tank put paid to that effort. Now waiting for a replacement tank. One of the joys of using NIB 25 year old hardware.4 points
-
Talking of Darwin awards. We used to have a sign in our Coast Guard station that said " HM Coast Guard working against the laws of natural selection since 1822" A new generation of young noob leaders made us take it down.4 points
-
Nigel, I built a Cambrian 'Electrified' Bf109 and to my surprise it flies really really well..I have hand launched it myself, but it requires a really good throw if theres no wind - best to get a club mate to do this bit. Construction is simple and agree with the comments above about the Ply fuselage doublers they could easily be replaced with something lighter or with big hoiles drilled in them. I also lightened all formers where I thought I could. Its got a 3S3300 which gives me long enough flights (8-10mins) - and balances with no additonal weight. The construction guide could do with updating as the electric conversion bit is a bit adhoc! ... Tailwheel mentioned but not supplied. So far broken props have not been an issue with the brake off.4 points
-
Haven’t been on here for a long while due to a house move, workshop build, garden renovation etc.. Anyway, I have one retract plate glued in now and it’s been a pig. the only way a scale wheel can fit in here is if you have slight twist and turn retracts. I’ve had to adapt for this and will reduce wheel thickness and diameter. Retract plate was reduced in size from my original choice to reduce weight. more updates to come. cheers3 points
-
The nose section is planked as a half shell over the plan When lifted from th eplan the othe half of the formers are added. When all the planking is completed the nose section is simply glued on. The nose cone is printed. It feels remarkably light.3 points
-
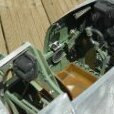
Been on holiday so not much happening but made a start on the final cockpit installation before final canopy fix......once this is done i can do some minor things before making a C of G check......the paint won't add much..... Sprayed the wheel wells with interior green as well having found out this is what's on the full size......finished the seat belt stay behind the seat former....and glued the rear canopy with clear canopy glue....door tomorrow..... Also wasn't happy with the spinner where the center section met the base, somehow in the printing it's opened up slightly on the diameter so had to add 1mm all around the base diameter with ply.....seems to have worked ok..3 points
-
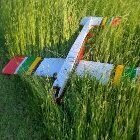
Finally managed to get the prototype Bulldog maidened today. Then noticed it had my old id number on it from over 2 years ago ! Next job is to get the mower repaired !3 points
-
I bought my daughter one of those when she was around ten. Very easy to fly by a complete beginner🙂2 points
-
Centre section glued. LE bottom sheet pulled up and held in place by old ailerons. Which looked good so more glue. Those last two could be used for a spot the difference competition. Next will be the LE when I find some suitable balsa from my stock. Steve2 points
-
Back in 1954 I was a member of the Regents Park model flying club for a time. We use to fly on Hampstead Heath. One Winter afternoon one of the lads got his Mercury Mentor rubber powered model stuck right at the top of a tree. We were all standing round wondering just how to get it down as the tree was tall but not very climbable. A well dressed Indian gentleman walked up, stared up at the model and then, without a word, he took his shoes of and went straight up the the tree, retrieved the model, came down, handed the model to the owner, put his shoes on to a chorus of thanks and he then walked off without a word.2 points
-
Not only super scale but flown perfectly in this relatively small sports hall...2 points
-
Lidl gliders back in stock, £9.99 on price ticket but £7.50 at the tills, but hang fire, they may be half price on the 25th ?1 point
-
well .... tonight I decided in order to get some stick time to take my Horizon Hobby Sport Cub S 2 over to the local field. it falls under the CAA weights 250g to allow you to fly unaided. What a blast ........ absolutely great fun. I had 3 charged batteries which can .... depending how you fly .... give you, easily , 15 mins ( and more ) sky time. I paired this with my NX8 ..... very easily done, then took to the field armed with three fully charged batteries. No nerves whatso ever as I had just watched how easy it was on a Utube video ... and their advice did not let me down. Battery connected, throttle set to about 1/3 power ....... hand launch ..... and away it goes. phenominal !!!!!!! I stayed up in the air doing figure 8's .... regular rectangular circuits and practicing gaining and losing altitude etc ... in a controlled and, dare I say it , visually pleasing manner. I landed a couple of times just to try it out and although the grass was reasonably short, maybe not short enough for a rolling landing, more a little abrupt. this thing can take all you can throw at it as there was about 2 slightly less than perfect landings which Imput down to the length of the grass but a sturdy little beggar it is. I had a brilliant time. I went to change the battery ...... and noticed that it was not liking the second battery I set up. So ..... I tried the third ...... same thing. Mmmmmm. On closer inspection, it looks like on the on board plug that the battery plugs into had somehow lost one of its pins ..... or at least, thats the way it looks. devastated. Unfortunately that brought about a premature end to my impromtu nights flying. I need to look at this plug and determine if I am right and one of the connection pins has come off or not. ..... thats the way it looks. A bit disappointing so early in the proceedings to have a potential repair. Surely these connectors should be more robust than that. Anyway ...... an absolute hoot of a time. Can't wait to find out how to resolve the above issue and get it air bourne again. Absolutely limitless time added to my stick time whilst I await my official training slots. toto1 point
-
True, but it hasn't. I think the CAA wanted to cover drones particularly, even nano drones which could be used in criminal activities. I'm talking about the general hobby/toy stuff freely available. In any case, the CAA missed the mark with the legislation, all they have done is penalised responsible operators like clubs - as was widely predicted.1 point
-
But, if your sub 250g model has a camera in them it falls under the regulations......1 point
-
Where to hide the switch etc. is always a challenge! But if there’s a convenient hatch why no use it? This hides the switch and the remote glow. My home made hinges proved not to be up to the job at this small size i.e. only 3 section to each hinge so had to be replaced. The easiest way was to use thin rubber strip. The engine compartment is rather more crowded then I’d first envisaged, the nose section is tapered in plan, side and front elevations. The standard silencer just wouldn’t fit so I decided to just use a flexy pipe, about 6" long, attached to the scale outlet. Having talked to other Laser owners we thought that this would give sufficient silencing. The bent pipe is for the crankcase breather, saves having an extra hole in the under pan and blasts the oily mess away from the fuselage. This system worked well, up to a point! Laser engines normally sound very realistic and although it wasn’t excessively noisy, to me it sounded a lot more like a single cylinder. Without any expansion chamber the exhaust is hotter, I’m sure we’ve all suffered from “frozen finger” when operating spray cans for a prolonged time, as gasses expand they lose heat. The hot exhaust mixed with the breather output may explain the paint problems as it is directed onto the undercarriage. I’ve now made a remote silencer from brass sheet. I used silicone tube to join to the flexible pipe. (Turned out not to be a good idea!). The engine with this, is certainly a lot quieter, I think more so than with the standard silencer, I just hope that it cools the exhaust sufficiently and that the engine noise is back to it’s original realistic self!1 point
-
So he needs a 6000 3s pack. That is a pack for a days flying. Tell him he also needs a deckchair, and a corkscrew in his box.1 point
-
The weight limit below which you do not need to display an operator number is 250g, not 750g.1 point
-
Gents, before you go flying again, I suggest you refresh yourself on the key aspects of flying legally, as doing so remains your personal responsibility no matter what advise you have received from others. All of the key info is in the Drone Code publication from the CAA (and elsewhere on their website as well): https://register-drones.caa.co.uk/drone-code/the_drone_code.pdf Key points There is no legal requirement to be a member of a national association, be insured or have a national association qualification or achievement to fly solo, though the first two are highly sensible. Most clubs will require national association membership, and many will also add an A cert as a requirement to fly solo, but that is their decision, not the law. However, if you are flying under one of the Article 16 operational exemptions granted to the BMFA or other national association you will need to read, understand and meet all the requirements listed within them to fly legally. Read this BMFA site for more on their article 16 auth.... https://rcc.bmfa.uk/article-16 ...and the LMA equivalent... https://www.largemodelassociation.com/resources/article16/1 point
-
https://bmfa.org/insurance/insurance-faq1 point
-
They used to call the F104 Starfighter a missile with a man in it, that's a missile without a man in it.1 point
-
Yeah, I saw the shape of the pulse jet and guessed it was a V-1. Then I noticed the cockpit and thought Reichenberg, then I noticed the tail and thought Salamander. Now I don't know what to think, lol! Nice model though, and a good glide power off.1 point
-
1 point
-
I was given a sheath knife at the age of 6. Never hurt myself or anyone else.1 point
-
Not at the moment, but maybe when I get the design finalised.1 point
-
As a beginner, I'm always up for new info. I had heard of Eagletree before, I haven't closely read the article you posted as I'm not up for trying it myself yet (though I might in the future). I promise you I am not trying to be argumentative, I'm trying to learn about new things (two months ago I couldn't even programme a radio). I was struck by this 'con' in the article though (below),which is the point I am trying to make, perhaps unconvincingly. As @toto said about the video of the novice pilot crashing, he didn't seem very confident even before take off. He couldn't even taxi straight, first he swung right and aborted, then he swung left and lifted off before hitting the grass. He had all kinds of gizmos and telemetry, but they didn't seem to help before an unexpected change in the plane's attitude worried him, and the next change turned into a loss of control. Someone used learning to drive a car as an analogy, to use it again: should you learn to drive on a Tesla with driver-assist and self-drive capability, or on an older car with a manual gearbox? In my own case I'm trying to overcome my fear of flying inverted ('fear' is a funny word to use, but there seems to be something blocking me from keeping the plane inverted, I instinctively keep rolling it back). If there was a switch I could flick to invert the plane, I don't think I would have a sense of achievement when I finally crack it. And I have a feeling that if the plane was also trying to right itself,I'd never get there. Anyway, that's just my thoughts now, I may change my mind later. It certainly isn't the case I want to be unhelpful to newcomers, I'll stop posting if that is felt to be the case. CONS • 2D mode seemed to fight radio stick inputs1 point
-
1 point
-
Toto, you note that because it weighs less than 250g the FAQ allows you to fly unaided. You are allowed to fly heavier models "unaided", the only relaxation on the <250g limit is that it doesn't require an operator ID.1 point
-
Hi Nigel, I built a CambriaN spitfire a year or so back. I can confirm that the construction is very much IC with adaptions for electric power. It's a decent model, but there are some points to note: It is in my opinion heavy. It uses lightply fuselage sides and lots of carved balsa. It means the rear half is a few ounces heavier than necessary, and this then requires lead to balance The electric conversion is pretty much a ply box fitted to F1. Don't worry about the weight; you need all you can get up front! There is very little room for ballast up front, and I needed 3+ ounces. Mine ate props like a starving man at an all you can eat buffet. You can get decent performance on a 3536 1000kv motor, but don't expect long flights. However, you can make it look quite realistic with nice big loops and slow rolls You can use a folding prop. I carved up a standard spinner to retain the appearance. Performance and battery duration did suffer a bit, but it saved me a fortune! It flies well, despite the weight. As with any 'bird; if you take liberties with the elevator, it will stall... Tricky to hand launch solo as it needs a good bit of welly, and has a pronounced torque swing. I set up a flight mode to catch this for me, and held my breath. It would probably be great with a 25 glow motor... I sold mine and then built my own version at the same scale. That was a load lighter and flew really well. However, I did enjoy the Cambrian and would do another. I'd probably replace the fuselage sides, and deviate from the plan a little to make space up front, and save weight behind the CofG. Graham1 point
-
Self harming had a different meaning those days.1 point
-
http://www.doyletics.com/tidbits/militaryadvice.pdf1 point
-
No colours yet, but I'm counting flights. Actually it's around 35 and already there were two special ones. A nice Sunday morning formation with two great Fw 190s from friends with whom I have flown aircombat contests before (no dogfight in that case). Another formation with the Me 110 from another friend was flown on a Saturday eveneing with great clouds as background and a warm light, unfortunately no pictures of the models in flight. The Whirlwind is doing fine. I'm getting used to it, started training some basic aerobatic maneuvers and try to improve start and landing. There's plenty of power so I have to adjust the start procedure for not lifting up after 20 meters... But a friend took some great pictures of the flying Whirlwind. One is remarkably similar to an RAF one from the 1940s, although at a different angle 🙂 https://www.worldwarphotos.info/gallery/uk/raf/whirlwind/whirlwind-6/ Timo1 point
-
The quad motor, printed mount and 3x4.5 three blade prop extracted from the small Skyray. Glued onto the end of the bigger Depron Skyray duct. The duct is the same diameter on both the Skyrays but on the bigger one the inlet and exhausts are scale size. The top skin is also complete as far as possible to allow access to run the motor and elevon wires. Once the motor is tested in situ (always test at every stage!) the next task is to build the nose/cockpit section.1 point
-
Cheers guys, if it flies half as good as the canard version I will be happy. The wing has now been shaped and a suitable slot cut out in each side of the fuselage. I had to take out a slice of the central upper former so will probably tab this for the delta version. Couldn't resist putting it together and comparing it to its canard version. It's a shade under 200g as it stands which isn't too bad. Next job is to cut out and hinge the elevons, print a pilot out and make a better canopy. Rich1 point
-
Well Stuart I am sorry if my info on this seller caused you to buy a copy with missing plan and article. It certainly said ( and still does ) "Plan included" so you should be able to complain and get a refund. But of course you want the plan and article. I have the mag but I won't sell it as I keep a collection of many RCME& RM. But I would scan the article and let you have it by e-mail. If that helps end me a Private Message with your e-mail address. But hopefully someone will have a copy of the mag they don't want.......... One thing that might help is the knowledge that the smaller ( Breeze) version does not have individual ribs shown just tip and root template. So you might just as well have the larger ( Wind ) version printed at a reduced size rather than buy a Breeze plan. Actually I did the reverse and prepared a larger plan by printing the Breeze main items at an increased size to make a Chilli Wind. There is a very slight difference I think but not much. Considering the advice about visibility of the small model this may influence your decision.1 point


(2020_03_2622_00_27UTC).thumb.gif.375a6ebc5cd681eb724c62879a10ef8d.gif)