Leaderboard


Popular Content
Showing content with the highest reputation on 05/06/23 in all areas
-
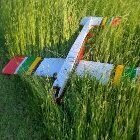
Just back from the field after an early dart from work. Remaidened the Mozzy(don't ask about the first time🙄). Flew great, apart from the retracts I'd installed out of my old Vampire were only functioning on one side again. Got it sorted in the end, was a bad radio mix. Flew about 8 packs, but it was getting hot and gusty so quit while the going was good. Pictures are video stills taken from my phone stuck in a pole in the middle of the field.9 points
-
Enjoy! Another part of the learning curve - everyone has to make repairs at some point. The ratio of good flights : flights leading to repairs will improve. There is no 'right direction' - whatever works for you. We can give you some benefit of our greater experience, but only you know what's right for you - don't let any of us put you off. Nothing wrong with the Beaver, it's not like it's a heavy, fast warbird with retracts, flaps etc. etc.. in my experience, they fly nicely, sedately and are quite stable. Just approach it like any other trainer - assume it's disposable as it's going to get bent! Very mainstream - significantly in the majority at my club. But, similarly, very few use more than the basic functions. (That's probably true for all systems - I've had OpenTX/EdgeTX for a few years no and am only scratching the surface of what it can do...). In my view, telemetry is useful, but secondary - the most important thing is that when you move the two sticks, the aeroplane does what you want it to do. Not a bad idea. Once you're past the solo stage, you may still want the occasional session on the buddy box (e.g. first low-winger), and it's good to have a spare. Nope. no rules at all! Again, it's what works for you. Advice is only given to stop people wasting money (when you're competent with your first model, you may decide to go in a different aviation direction and find they're unsuitable, or you may lose interest), and to try and minimise the temptation to leap from something sedate to something that'll be a real handful. On a public forum, even when all members have a common interest, you'll find people that take offence, like to decry, or even mick. Sadly, it's a fact of life. You'll soon learn who to listen to/believe, and whose comments can just wash over you. As said previously, keep doing what's right for you - if that's looking ahead, asking questions, lr wanting to understand things in whatever level of detail - go ahead! We're all different. No, you haven't "...got it wrong..." GG4 points
-
SAS Thing now ready for maiden4 points
-
Paul, Dont feel obliged to bow out as you say. You regularly contribute on other posts as well and I appreciate that. At the end of the day it's just opinions that are all with best intentions. I dont think you will cause any controversy. Posting on forums always brings the widest possible catchment of comments / answers, I understand that as much if not more than most as I own my own model railway related forum. Our motto is " everyone welcome " we encourage everyones views. Sometimes they dont match mine but I wouldn't dream of trying to silence anyone. I may just choose not to take their advice. No offence taken by me. I appreciate I have a different approach from others. It's a great forum and I like to see cross fire in the comments, nothing wrong with a bit of healthy debate. Cheers Toto3 points
-
It depends on your goals. I learnt on a r/e model (the DB Rookie) with similar handling characteristics to the Radian, but this was well before the days of viable electric flight, so all my flying was done off the slope. This was fine as slope soaring was cheap and accessible to me at the time, and I wanted to get into fast aerobatic slopers. There was no club, but all my instruction came from my Dad so that was not an issue. We also didn't have a buddy box setup at the time, so got by just handing the TX back and forth. The result was I became a competent pilot not worried about the wind pretty quickly (9 year olds generally shrug off the first crashes and get on with it, mostly cos I knew I could angle Dad to completing the repair! 😉). However, going this route meant there was no A test to shoot for (I don't believe there were no BMFA gliding tests at that point, and even if there were examiners would have been like rocking horse dung). It also meant that, whilst I had a good understanding of the dynamics of flight, I knew nothing about the safety requirements, airmanship or etiquette of power flying on a flat field site. Had my goals been to fly powered aircraft I would definitely have been better off starting with the standard IC (or electric nowadays) trainer + buddy box + club instructor that Toto is following. Even if I only wanted to fly e-gliders and was starting today, assuming I was starting in a club environment I would still suggest starting with a wheeled powered trainer, as that will be easier to get instruction on and will be flyable in a wider range of conditions. This might seem harsh, but I suggest that (as a self-confessed beginner) you step back for now from advising fellow beginners who at the same stage (or who may even be further along). This is a complex hobby and it's hard for a beginner to appreciate the things that they don't know and need to learn at the start, and what is important vs. less so. There are many ways into this hobby, and not everyone will choose/use/be successful via the same one. Advising people on the "best" route to achieve their goals can really only come if a) you've chatted to them about their goals, and b) you have enough practical experience of different methods of starting in the hobby to be able to advise them based on those goals. This is why I suggest you concentrate on your own journey for now - focus on soaking up as much info as possible from your instructor(s) and the experienced posters here, and learn not just when you are on the sticks and online, but also by watching other pilots (beginner and experienced) at the field so you can learn from their successes and mistakes. I'm sure if you do that you will be succesful whichever route you choose - best of luck.3 points
-
@toto From what I've seen you had a small issue with binding the receivers which with some practice you should be able to crack. In my first few months last year I was finding learning to fly RC models a steep learning curve and did question on numerous occasions if I had done the right thing and would I ever be able to fly on my own. I got there eventually, all I can advise is stick at it as the rewards are well worth it. I am a slow learner my late 50's, if I can do it anyone can and it has been the most fulfilling thing I have done in a very long time.3 points
-
As long as you are learning to fly, with people who know what they are doing and with the appropriate model, everything else is just stuff. I jumped in both feet spent a lot bought stuff which i never flew and eventually sold on, at a loss, but hey ho it is my time and money. I enjoy my flying and have a couple of regular in use models. I have stuff to maidan, stuff to repair stuff to wish for, its called life, this hobby just happens to be a part of mine. Like all on here despite its hiccups I enjoy, when that stops so will I. Toto I trust you will do the same3 points
-
Probably not enough room for three drawings Steve, I will stick with the two for now. I've finally got round to throwing some covering on, I am impressed with the 4max stuff as it sticks and shrinks well very much like HK's offering. A few finishing touches to add before final assembly, then I will move on to fitting her out with the electronics . Rich2 points
-
toto No buddy option it just relied on the indestructability of the RTF. No club, I was flying alone but as a life long plane flyer and builder, but not RC, I judged that I understood what the plane was doing, most of the time! Crashing and repairing was certainly expected and it did! I knew I was not 'future proofing' but I felt the decision on which 'next' transmitter was best left to later when I would better understand what the differences might mean to me. I would certainly agree with MattyB that if you are being taught to fly at a club follow what they advise but also try to keep an open mind on what is likely to be an 'opinion' and what is a 'hard and fast' rule.2 points
-
Hi Simon, Were you able to buddy your TX with others for training? I agree that simpler the better but I had been speaking with a couple of clubs before either joining them or having bought anything and they all sort of said the same thing .... Futaba and Spektrum as well as a couple of others. They also recommended " future proofing " by buying something suitable enough to use whilst training, capable of linking to other members for buddying and of course being able to see me through the passage of time with my first few likely models. A 6 channel minimum .... hence the NX6. Once I decided to provide the whole buddy system myself to save any comparability issues, I bought the NX8 as I had by then looked at so many potential future models, I could see the wisdom of having a couple of extra channels .... thinking, eventually retracts and the like. The advice available is huge and as just one question of a hundred people .... and guess what ..... you get 100 answers . I can absolutely see where you are coming from so ..... thanks for your response as it is very relevant. Toto2 points
-
Just to finish off this story, I flew the Anthem in competition for the first time last Saturday. The aircraft performed very well and it was just a shame the pilot wasn't up to doing it credit. The other Anthem pilot did much better coming 3rd in only his first season in FAI(P) while I brought up the rear! There are a couple of tweaks I might carry out, one being to have a windy day setup with a faster datum speed to try to reduce the difference in ground speed going into wind and down wind. This will mean re-binding the Rx for the Windy or Calm day as the case may be. The combination of the Anthem and the TMCR has definitely provided a slightly better performance than the Element with the CRS contra and it's now up to me to up my performance to do it justice.2 points
-
10 of us had a great time on Saturday despite a 45 deg cross wind of 15 gusting 18 at times. Even the guys flying in the entry class managed very well to keep their schedules from being blown in.2 points
-
Agree 100% with what Ron and John say above. Beyond that he is receiving training from one of his clubs instructors so leave the model and equipment selection to the trainer, too many back seat pilots could seriously upset the poor guy who is after all doing it all voluntarily, if the plane was unsuitable then clearly the instructor would have said so.2 points
-
It may not be to Toto Switchable It's a high wing with low wing loading, has excellent slow flying capabilities and doesn't bite like a Cub. Just because it's a scale (ish) model doesn't mean it isn't a good trainer. True but Toto has accepted that.2 points
-
Hi Paul, I didn't think the Beaver was considered a complex plane to be honest. I thought it would be in a more basic category. I watched the video and enjoyed it thoroughly but I dont see the pilot of the powered glider being a novice somehow. Again, excuse my ignorance and lack of experience but what makes you think that me learning to fly in that would be any easier. I'm genuinely interested to know. I actually gave a max thrust aggressor 1.8m pkane that looks pretty similar to that in your video. The main difference being I noted a considerable curve to the wing on the video. Mines is a bit flatter. Just as a last minute thought ...... would you be allowed to sit an a test or bronze test with one of these ??????? I'm open to anything that fosters progress. Many thanks for your input , it is genuinely very much appreciated. Toto2 points
-
Still quite a bit still to do and the final fiddly bits take time but the wings are now on . As a 'single piece' plane it looks like a lot of Depron. Battery compartment next which hopefully will end up somewhere under the cockpit canopy!2 points
-
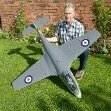
Debut for this recent swapmeet bargain today - I'm on a bit of a Corsair spree at the moment and prepped for the maiden flight of this 1450mm FMS Corsair with some flights with my trusty EFlight 1200mm Corsair F4-U4. The FMS flies a lot "heavier" and anything below 3/4 throttle just feels like it's ready to drop out of the sky. Lost a wheel on landing and tipped up, but no damage beyond a torn foam hinge on the rudder. The Eflite has very effective flaps and I think the FMS would also benefit from them. Picture credits Derek Robertson.2 points
-
Thanks Bas.....:-) The wing paint masks i made myself as with all my models, i have a vinyl cutter. My current 1:5 scale spitfire.....2 points
-
Flair Hannibal slightly modified.....Roto 35fs....just awaiting maiden....:-)2 points
-
Toto, I too applaud your enthusiasm to our hobby / sport. As I have said before and as Cuban8 has expressed - we are concerned about you burning out too quickly which would be a real shame. I am an instructor at our club and do devote a lot of time to helping new flyers. I use another modellers ex-crash damaged cast off which is repaired as a club trainer and my own buddy box set up that is tried, tested and reliable. Each and every pupil is different, in their approach, experience and learning abilities so therefore I have to adapt how I teach to them. This weekend, 2 pupils on Sunday flying with them back to back for about 3 hours or so. Both of similar age, one practising on simulator the other not. Their progress dictated by the amount of stick time and learning abilities. One copes with full rates, the other on 50% on elevator. Both are progressing steadily. One has his own machine which he has tried to fly at another club with another instructor, not too successfully sadly which has dented his confidence. The other contemplating his model and radio purchase when he is at the stage of doing take offs which is not too far away. So keep going. Don't get too involved in technicalities. Listen to YOUR instructor as he will have your best interests at heart. Don't be tempted to try and shorten your training by trying to fly something else as this will only add confusion as the machines will handle differently. Keep everything consistent and you will progress quicker. Best of luck1 point
-
Yes, I've been every Friday since they made the event 3 days. It has improved year on year & is pretty much now complete on opening on Friday. Much less crowded than the weekend which is a big plus for me. No full size but a complete model display program. The exhibitors & display pilots start rolling in on Thursday. Trade list here: https://www.airshowinternational.co.uk/index.php/what-s-on/trade-list-20231 point
-
Rubbish phone zoom x4 a broken down Rafale being towed by a Bronco over my place this afternoon.😅1 point
-
Hi Graham, Thanks for the link. I watched a quick utube video on installation. Looks quite straightforward. I have ordered the tool as I think this will come in handy not only on my foamie repair but the Dancing Wings balsa kits that will eventually be taken out of the stash for building. Engine Doctor, I did think about these pin type hinges but the section of the elevator ks a bit on the thin wide. ( I will post up a picture for you to see when I do the repair ). As it was so thin, I thought the thicker pin hinge might actually weaken the elevator surfaces at the hinge points if it was to take a hard knock. ......... by the way ....... I might be typically overly cautious with my thoughts here ..... but the flatter hinge type may not take as much of the thinner sections foam away ....... if that makes sense. I think these pin hinges will come into their own when you have a nice big thick section of balsa to drill them into ( rather than thin foam ). But ........ absolutely thanke for adding to the suggestions and options ..... never does any harm. Thanks to all. Toto1 point
-
Flew both Saturday and Sunday this weekend. More practice dealing with the turbulence a NE brings to our site on landing approach, got some advice from an experienced pilot and my stall turns have greatly improved and lots of practice with rolls which due to my lack of ability and flying a trainer are not pretty but are getting better. Tried fitting a silicon exhaust extender to keep the airframe cleaner but noticed a loss of top end, once removed the engine was back performing at it's best. Had a deadstick, plenty of height but the wind strength caught me out a little loosing penetration as the model came down so I was a bit steep on approach avoiding a crow cage bending the noseleg a bit. Filled up the tank forgetting to remove the tube from the exhaust to the fuel tank, as a result I got a hydraulic lock but with some assistance got it sorted. All in all a great weekend and learnt loads. 👍1 point
-
Good point, we used "Pilot Link" to simplify the process by not having to have a matching model and settings on the slave.👍1 point
-
Fact of life now........cheap days at big events are history. We all became used to getting into major model shows for a tenner or less back in the day, but it'd be impossible to charge so little now and make the show viable, to say nothing of turning a profit., I've seen the best of the best at most of the national big shows from Sandown, Wings and Wheels, and many others - for me what's on offer now is not what I want to see and often hear (Wings and Wheels). Just my preference, of course. TBH, the only ones I'd bother with now would be LMA shows, but they are a tad thin on the ground within a reasonable journey from East Anglia. Hopefully the hiatus with Cosford is only temporary. The last show there that we attended a few years back was superb - no screaming commentator, no huge biplanes being prop hung (hanged?) etc etc. Sadly I rather fear that the Nats as we knew and loved them at Barkston will be no more - very happy to be proved wrong of course. BTW, I'm not a tight wad....if I want to do something, within reason, I'll go for it. Cost me £150 for two Sunday Grandstand seats at the upcoming World Superbikes round at Donington in a few weeks time.1 point
-
Indeed - that's why I referred to a Standard A FW test, which I guessed was what Toto was referring to.1 point
-
Just for the sake of completeness as there have been a couple of references to electric soarers and the 'A' test. The BMFA Achievements scheme offers 'Silent Flight Electric' Certificates at both 'A' and 'B' level. Any Examiner can examine for the 'A' Test and there is no minimum model weight limit. More details here: https://achievements.bmfa.uk/wp-content/uploads/2023/03/Silent-Flight-Electric-Mar-2023.pdf1 point
-
Toto, you've achieved a lot in a short period of time and have begun to familiarise yourself with the vast range of different ways to become involved with this hobby. Much of that stuff simply didn't exist when I started, fifty years ago, but we still had the same basic problems to overcome although we weren't distracted anywhere near the same degree by the plethora of different gizmos and methods that add to the confusion of the 2023 beginner. You are clearly very ethusiastic, but it worries me that you might begin to fall foul of 'burn out' - obviously, I don't know you personally, but I have seen this problem before where some people get very excited in the early stages (good), but because their efforts become shifted away from the primary objective of mastering the basics, they're tempted by all the other 'good stuff' around these days and begin to feel a bit overwhelmed. We're only human, and you can get too much of a good thing by trying to do too much at once. Just something I'd thought I'd mention based on past experience - Good luck, I'm sure it'll all work out.1 point
-
Summer doesn't start till June 21st, so for now we're stuck with this pleasant Spring weather/thread. 😎1 point
-
toto Perhaps this might explain the emphasis that is put on the "keep it simple" advice for RC learners. This my first Tx in the modern era although it was seriously 'old fashioned' even when I bought it new in 2008 with an associated RTF high wing pusher trainer. Forget the switches in the red circles they were later DIY additions. The basic controls are simple indeed as apart from the 4 servo reversing switches there is nothing else you can set up. The RTF plane was about as crash proof as is possible so you just got on with it, learning from your mistakes. You can tell from its rather pristine condition I did not use it for that long, about 18 months, before moving on to more complex Futaba & Spektrum Txs. This way I kept the "learning to fly RC" and "Understanding a Tx" periods separate. 15 years later I still fly the trainer although it is now heavily modified to give a flight performance and duration well beyond that of the original.1 point
-
Very good last point there Toto. Electric soarers are all well and good, but you wouldn't be able to take a "standard A FW test" with one of those, since the model must be capable of taking off from the ground. The model must also weigh more than 1Kg. I'm not sure about the SAA Bronze,but, given the type of models that you have, there would be no advantage starting off your learning curve with a hand launched electric glider, since you are going to want to learn to take off and land sooner, rather than later. When the time comes you'll easily be able to fly your Max Thrust Aggressor and if you have any local slopes, it makes a superb slope soaring glider as an extra part of the hobby. Hard luck with hitting the fence - as Cuban 8 says, if there is anything remotely resembling an obstruction in your field someone is almost guaranteed to hit it, no matter where it is situated. Hope that the repair is a minor one and that your Beaver is ready to take to the air once you are back from your holidays.1 point
-
Yep, but page 20 of the manual allows you to set up the master tx to either Programable Instructor or Pilot Link, if using the former then the model settings need to be installed on the student tx, the later needs no settings on the student tx.1 point
-
Ah, Peter, you missed the main flying event of the day! Our pop up awning certainly lived up to its name and executed a low roll onto the roof of our hut! It was a freak ‘thermal wind gust’ that caused it to shed its mooring ties.1 point
-
Hi Rich, Yes it will. Assuming that the crystals are genuine Futaba ones, they should be marked Tx and Rx. You can’t swap them around. Dual conversion Rx crystals are marked as such but won’t be of any use in this case. Crystals are fragile so it’s possible that one of them is damaged inside its metal case. They don’t like being dropped or handled roughly. You can’t test them except by trying other ones. Good luck. Brian.1 point
-
From what I've read so far, I'm pretty confident Toto will get where he's wanting to be, just a matter of stick time. Rest is just stuff, we all have our ways and personalities isn't that all part of the journey.1 point
-
The Spektrum trainer system allows 2 different methods for configuring the slave transmitter. In "Programmable Instructor" mode, both transmitters need to be fully configured for the model. In "Pilot Link Instructor" mode, the master transmitter is configured for the model and the slave transmitter must be configured with no settings, servo travel set to 100% and no servo reversing. Both of these options are available to be chosen when initially setting up the master transmitter for training. I've found the latter to be better in practice and simply selected a blank, unused model memory in the slave transmitter, bound it to the master as described in the manual and it all just worked. I also found that it was only the 4 main channels that were transferred to the slave with the master maintaining control of any other channels/settings such as flaps and the throttle "safe" for the motor. Keep at it, Toto, it will all come together soon.1 point
-
I've said this before, and I may be in a minority, but I think you are making things very complicated for a learner. I would suggest you put the complex planes aside and just learn to fly on a simple plane like this:1 point
-
Full size plane flying backwards to the pilots amusement:1 point
-
Flying for the past three days, Friday at the local club field, less than ten minutes away, Saturday at my old club field - a couple of hours away - then this morning at the local club field. Flew ten different models over the three days and no serious breakages, just a few minor repairs. Judging by the shirt sleeves, sun creme, sunglasses and floppy hats I think it might be appropriate to reconvene at the Summer Is Here Again - Who's been Flying thread. 😎1 point
-
Went flying this morning. Forecast was for 7mph slightly crosswind. However nobody told our field ! Seemed to be nearer 20mph. I do need to practice though and particularly when the weather is a bit difficult. Mini Robot no problems. Almost hovering into wind and ballistic downwind. Great fun !!! Chapter One though was a different matter. Combination of weather and rubbish piloting = more rebuilding practice.1 point
-
Boundary fences, trees, bushes, power lines, the only single concrete post in the whole field (don't ask).......if you've got 'em, you'll hit 'em. Fact of the model flying life, I'm afraid. Presumably, your battery gave its last breath of charge just on finals and hence sunk into said fence rather than just skipping over it? Been very windy again today so battery usage does tend to go up to counter things- might have caught you out timing wise? Well done though.1 point
-
Surely you don't need the Beaver setup on the trainee TX as all the model specific configuration is done on the trainer TX, all the trainee one does is transmit stick inputs to the trainer TX? Mind you I've never flown Spekky gear so what do I know!1 point
-
Every day of my working life as an airline pilot. I was always amazed that if the met office said 5kt or 50kt at some point, youd bet your wages it was. If they said id arrive in 3 hours 4 minutes...yep. The forecasts they SELL are excellent. But i do take your point. My phone has two weather apps, both usually utterly opposed.1 point
-
Bought this Parkzone Mosquito 49" last year, built by the previous owner but never flown, joins its stable mate that has seen plenty of action converted to 3 blade props. On the floor is the Parkzone micro mossie bought a couple of weeks ago. Also just fully rebuilt Robbe Concorde1 point
-
Always wanted a Mosquito, and managed to find one new in its box(PZ), though a good few years in storage. Not flown it yet, but should be good by all accounts.1 point
-
In slope soaring there is the maxim: There is no such thing as too much wind just the wrong model. I would caveat that slightly as it does get difficult to stand up at about 60 mph.1 point
-
Progress has slowed a little what with one thing and another, not least of which being our recent Orme excursion for the Dambusters 80th but I've now managed to move things on a bit again. After sourcing some 1.5mm fibreglass sheet I made an aileron control horn and glued it to one of the ribs with a little balsa web for extra support. The next job was to fill the void around the carbon wing tube in order to support it and spread the wing loading more evenly. I did this with a mix of epoxy resin and sawdust mixed in a ratio of 25% resin / 25% hardener / 50% sawdust which seemed to do the trick. I supported the wing in my workmate and pushed the filler in to the voids either side of the carbon tube until it was flush/slightly overflush with the two wing spars. Once that was dry I sanded it flush where necessary and then added the remaining balsa shear panels. Finally I was in a position to sheet the lower surface of the wing and aileron. I am using 1/8" sheet for this rather than the 1/16" (1.5mm) suggested in the build guide. I glued some sheets together and then cut the wing and aileron surfaces out slightly oversize. I also cut the hole for the aileron servo opening, again I left a little extra material on here too for final dressing once assembled. I sanded a taper along the trailing edges of both wing and aileron using my Permagrit sanding block and a piece of wood as a guide. This taper, along with a similar one on the upper skin in due course will allow the two skins to come together and form a neater trailing edge. Another thank you here to Harry Twist for recommending the Permagrit sanding block to me, I don't know how I ever managed without it! 👍 I used anything heavy to hand to ensure the ribs and skin were kept in close contact until the glue had set. The lower skin of the stub wing required a small cut-out to clear the stage 1 rib which is larger due to it being within the faired section where the wing meets the fuselage. At this point I realised I had made a slight error in that the lower skin of the stub wing should have actually extended out and on to the lower surfaces of the fuselage formers as can just about be seen on the build guide images below. I don't think this will be too much of a problem though, time will tell I guess. I glued a balsa block between the upper and lower wing spars for support and to blank off the end of the carbon tube. Also just noticeable in this photo is that I wasn't very happy with the strength of the smaller carbon tube so wrapped a layer of glass fibre matting around it. I neatened the servo hatch opening by adding a border of 0.8mm ply after which I then added a further layer, this time in 1.5mm ply and set underflush with the wing surface by 0.8mm to accommodate my 0.8mm ply servo cover. Four little webs in the corners for the self tappers to screw in to and it was done. Inexplicably after all that I have somehow ended up with the servo and aileron horns being slightly out of alignment but not too much to be an issue thankfully. 😕 One day, should I ever get myself a 3D printer then it would be neater to have a cover with an integral fairing to hide the servo arm altogether. I then installed the servo lead, gluing the MPX plug in place slightly overflush with the rib surface, as with the carbon tube, to allow for a finishing ply facing. Once the glue had set I then poured hot-melt glue over the rear of the plug to make everything good and secure. The next steps would be to add the upper sheeting, leading edge and wing tip and then go on to hinging the aileron but I think at this point I may try to make a matching right hand wing so it may be a little while before my next update. 🙂1 point
-
Just had a lovely flypast my house - really low and slow1 point