Leaderboard


Popular Content
Showing content with the highest reputation on 17/03/24 in all areas
-
The closure of Laser engines was inevitable. It is sad for me as I formed the company in 1983 with Reg Gross, Geoff’s father. I have not been involved for over 10 years. Geoff is now 70 and there is no one to take over the Company. The good news for Laser owners is that they were manufactured from very high quality materials, will run for many hours and will survive quite serious crashes. With modern fuels there is very little maintenance or wear. Spares or repairs are rarely required. Bearings are standard, easily and cheaply bought from suppliers. Engines made from 1996 are the best made and I am sure will be powering models for many years. Aeromodelling has declined, we have lost most model shops, magazines and the membership of the BMFA has dropped from36,000 in 2004 to 2,6000 now. Skills have been lost, it is far easier to buy a ready made foamie complete to fly. CAA legislation does not help. Thank you to everyone who has made Laser Engines a British success. Best wishes to Jon for a bright future and being part of the Laser legacy.11 points
-
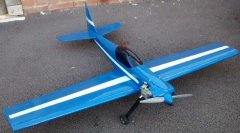
News update, 2 more flights off the dolly, and it seems to drop the left wing (my fault for rushing the lift off and gunning the throttle!) but aileron authority is great so easily corrected! Getting her dialled in and over the next few weeks will try a little lead reduction and perhaps a 14 inch prop (currently 13x10 so thought a 14x8 would be good). Disaster with the attempt of camouflage so will have another go in the week. The red chin does really stand out in a really grey sky so happy with that on mine. John is shifting the battery further forward and then sorting his C of G, then it will be ready for a maiden! James is to too far behind7 points
-
At this point I think we have enough parts completed to mock up a final look and see if she's in the ball park . Always wise to get a second opinion at about this point . Luckily I know a couple of experts .4 points
-
Hi All...from the land down under..heres my Lanc from the plan..enjoy regards Artie4 points
-
I realise that some of the chaps might be put off by the hand launch / Dolly Launch thing . However the whole idea with this one and the Tempest , is to remove the barriers of getting into balsa bashed scale models . The lack of weight this decision endows on the models also means they are extremely forgiving . Having said all that , I am aware that people may want to upgrade later so I have instigated (with Paul Johnson doing most of the work ) some laser cut retracts packs for the 190 and Tempest . I cant really sort them out till the Tempest is kitted and out of the door but I wont leave you to sort it out . They will be complete sets with wheels /retract units/ wheel doors and ply dummy ribs and mount plate assembly . All of the angles will be pre ordained . Like I say , I dont want to detract from the simplicity of the kits but equally I dont want to put people off them if they dont like launching and belly flopping .3 points
-
Most clubs have entirely sensible rules that are their for everyones benefit and safety and almost always the rules have been voted on and accepted by the membership.3 points
-
The plan view looks good too . Overall I'm pleased with the shape and the lads seemed happy with it too. You can't say fairer than that .2 points
-
The two top skins are made from 3/32 balsa and your kit there will be a template or the pieces will come precut . I wetted the inside of the skins to make them curve before fitting them . They are oversize so its a case of getting the top glued in the right place , then trimming round the bottom . The curved little former on the trailing edge is wide enough to support the front and the rear skin. I built the second fairing straight onto the model and it was quicker and came out better . You can see where I marked the crosses that you can trim off some of the overhang , but dont take off too much at a time . The skins do need to ovehand by about 3-4mm to look good from above .2 points
-
Not me Paul, I don't do indoor flying and I can't flap my arms quick enough to get out of the seat.2 points
-
No reluctance in fact found a nice friendly club not far from me I am going to join but would still like an area to fly outside club. Put a shout out to farming site and had a response from a land owner that may be fruitful.2 points
-
Here are the panels from Thingiverse: fw190_cockpit_ver_2_LOWER_SECTION_v6.stl2 points
-
I came across these on a website. May be useful for those who wants to add cockpit details.2 points
-
Enquisitor .Flying in open spaces is fraught with danger these days. If anyone approaches they are unlikely to obey a request to stand still. Far more likely to respond with a string of four letter expletive adjectives . Then there are the dog walkers , not all of them , but many think open space equates to "lets let doggy off the lead". The dog is unlikely to understand your request either. Controlling a model while being jumped st by a muddy mog is a bit tricky. Children now days are taught not to listen strangers and a strange man in a field shouting stand still will be ignored while the child runs in gay abbandon or kicks a ball across your intended landing area. I am a member of a club that flies on open land with large signs all around the flying area. Often a dog walker will purposely stroll across the patch and defy you to fly near them. They they then want an argument when you have to land ! On balance a club sight with no public rights of way and no animals is far better although farm animals behave far better than the two legged variety. Dont forget taking off is optional while landing is mandatory. What ever the reasoning if a person is accidentally injured or in todays snowflake society "feel thry have been put in danger " its the pilot who will be at fault. Very few individuals if any will take responsibility for their own actions. Its ALWAYS someone elses fault.2 points
-
I've just measured the CG and it is now at 100mm back from F2.2 points
-
Well, If you have fantastic moto reactions, your first solo flight might last 20 secs instead of the 10 for us mere mortals ernie2 points
-
I think my advice (offered even though not asked for) would be to postpone your first flight until you have a way to turn the gyro off in flight. It is a very easy setting to get wrong, too low and it wont help in stabilising the model and too high and it will introduce an uncontrollable porpoise that will end in tears. /2p.2 points
-
Thinking about the scale long nose I decided totry and 3d print it in LW-PLA. More a technical exercise than a practical solution but this how it came out. A CAD image of the 8 sections. It is just over 800 mm long. Each section is "lofted" between a 'start' and 'end' shape. Just to see how it might work I actually printed it out although the first two are so small I printed then out as one. The remaining 6 section have 3mm formers to support the joints. Quite tedious to do but it significantly improved the strength of what it still a very weak structure. The printed "test" nose in position alongside the Depron X-3. . I fear that if such a nose is ever fitted It would definitely be a "one flight" structure!2 points
-
Cause of death was dog bites and bee stings?2 points
-
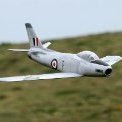
Enjoyed some unusually calm and mild weather this morning in Bucks with my new Warbird Replicas FW190. Still getting to know her, but very impressed so far. I’m a fairly inexperienced pilot but as a first warbird it’s nowhere near as intimidating as I’d feared. Love it!2 points
-
Its my own decision (fault) for picking a lower KV motor and as Dave B1 is using 14x8.5 I recon that will work with mine better than the pitchy 13x10. I can't really go less pitch on the 13 dia as it just won' produce enough thrust. If that does not work then I'll just put a higher KV motor in NP. It didn't drop a wing on the first 2 flights so I still think is a case of me firewalling it and pulling it off before its ready or on Saturday the wind was gusty and turbulent across the runway so perhaps that. Plus more of my own doing is the lack of finger holes for a self hand launch as I prefer the under arm technique, but didn't appreciate the diameter of the fuselage. If all else fails I do have a RX with "safe/gyro" but having had a self-inflicted afternoon spent explaining to the CAA and BMFA that I had lost my model, I limit its application to the models that actually need them (hand launching my 2.7kg SU47 that has a tipping point between stall and climb out!) The other thing to mention...it was no drama at all. it dropped its wing tip by a few inches and a spot of aileron had it back on the straight and level. Personally I don't think I'll fit retracts to either, because it will just add weight that they don't need in flight. I have touched wood just in case, but I haven't broken that many props on belly landers and probably as many with nose overs anyway. Its easy to fly and if I stop messing around it would probably launch itself without any drama!1 point
-
Looks good, richard can u add me to the list when you make the batch?1 point
-
Did you stand on the table to get enough height over the Temp to get it all in frame? Or were your shoes just drying in the sun following an early morning romp through the wet grass. Now Elf and Safety this end have (has - you know who it is) pointed out that a man of your calibre should have known that you could have placed the model on the ground to get the same effect. However I did add that you were probably also practicing for the 'plunge of faith into the small round tin' Guinness World Record attempt.1 point
-
Read the contents cant see PVA, im attempting to make both a little more flexible/sticky. The rolls happen if filler is still damp under a dry crust, paper pulls the crust off the wet layer and causes the roll. I work in the construction industry, see it all the time when people rush or apply in thick layers rather than a couple of thin ones. These lite fillers tend to dry hard and powdery and easy to sand1 point
-
1 point
-
A comparison between DIY fillers and model specific fillers would be useful. I have noticed DIY lightweight fillers are often too soft to sand nicely until they have dried over several days, they tend to go into rolls under the sandpaper.1 point
-
Thanks for the great engines over the years Jon and co.1 point
-
A couple of practical notes if flying outside a club environment. A public space not used by a flying club has no landing strip. I find hand launch and belly landing the best under these circumstances. The limiting factor on the durability of landing gear is how strongly the undercarriage is attached to the fuselage. Fat tyres do not change that. If anyone is coming my way as I turn into my final approach I shout "stand still please"! An attempt to control the situation during landing. It makes me self conscious but when standing in a public place holding an RC transmitter you are the 'wacko'. Everybody else are the 'normal' people. If they keep walking towards the 'plane, abort the landing. Flying in public is not an easy option. (Assuming you can find anywhere local where it is legal).1 point
-
Lancaster looks great! Keep watching for the next multi-engine models, from the scrap box, in this series. We expect to test fly the next one in about a month, weather permitting!1 point
-
Lovely sunny spring morning with very light winds, skylarks having a grand old time and got some good flights in with Sea Fury, Seafire and a couple of Spitfires before the wind started to get up, as forecast, immediately after lunch, so it was time to pack up and head homewards calling in for some flying on the slope. A group of three paragliders mostly kept out of the way and the lift was excellent. My Easyglider was climbing out with ease and reaching great heights, but the highlight for me was flying a true classic glider the Veron Cobra, which we worked out that I'd had the model donated half a dozen years ago and I hadn't flown it since. Really nice smooth flyer and very happy even in light lift, it was great fun today.1 point
-
No attitude ...... you never mentioned that you were considering joining a club in your post. The only reference to Clubs that you made were that they were restrictive and run by committees who were full of ridiculous rules. It sounded like a direct attack based on no given evidence or example. I'll look forward to hearing about your club experience. I'm sure that with an open mind .... and a bit of mutual effort .... you will have a positive experience from which to base a fair decision. .... you may still decide against it but at least by then ...... you've gave it a fair chance. I hope you enjoy. Toto1 point
-
Thats pretty much what we all want to do and regularly do it at club sites across the country.1 point
-
Mike is great & highly recommended but has this banner on his website:- Regrettably due to the lack of spares I am unable to repair these products, please contact LogicRC on 01992 558226 for repairs.1 point
-
Watch the Solarfilm Video! Made many years ago by Derek Hardman the manufacturer of Solarfilm and released as a VHS tape, it is just as relevant today with Oracover. Some kind soul has uploaded it to YouTube for the benefit of later generations. It will give you a really good foundation knowledge. Part 1 shows how to apply Solarfilm and how to cover a wing tip with one piece. Part 2 shows how to do a special effects including chequered effects, roundels etc. Part 1 finishes at approx 33 mins and Part 2 starts just after 40 mins.1 point
-
Ok , so both wing panels have the correct dihedral and are firmly reunited as single entities . My joints are good enough not to need filler . The brown paper covers most minor blemishes so that's fine for me . A word of caution here . If you are going to get "particular " about the joints , then add some lightweight filler and only rub down the filler . I say that , because our braces and Gorrila glue have "tricked " the panels into thinking they are as before , a continuous member , we do not want to thin the veneer in the position and create a new weak spot . Remember that a foam veneer wing has no ribs or webbing so effectively the skin is one big (but thin ) flat spar . Don't sand it away to get a perfect look . It wont look perfect after you don't come out of a loop 😬 Next we join the wing . The two inner panels need to be flat on the desk , so weight is a good idea . I have also used the old pin and elastic band method of keeping tension on . You will notice that the two panels are not exactly the same plan view . One is maybe 2mm longer at the route . That is something that does happen with foam veneer . The sections are very accurate but the outer size can vary . Its a little bit of Kit cutter (sorry Phil , but when you do 50 its easy to not fuss too much ) The other factor is that as the glue dries out there can be some shrinkage . Never bothers me anyway , so I will simply sand right across the two trailing edges . How we doing out there ? Still keeping up ?1 point
-
While having to wait for decent painting weather for two other projects, I thought it therapeutic to progress the cabin interior. With Beryl looking a bit more life-like with some colour in her cheeks and with a new completed control column to grasp and straps to keep her in position, it was time to prove that she and the tanks could all be fitted through the doorway. Major surgery was required on her feet (her ankles had to be removed) to clear the obstruction of the radio tray, even so as the butchery is low down below the instrument panel, I don't think it will be very visible. Beryl didn't say a word. I doubt a four-point harness would have been fitted originally but to my mind its in keeping with a perilous record attempt and its all that holds her in the seat.1 point
-
I skinned both bays on the model then sawed carefully through the spine at the back of the hatch to release that section . Doing it all on the model meant that it all looks continuous from the outset .The removeable battery hatch wasn't a feature of the full sized Tempest 😁 This method of creating top decks in the lightest , strongest way is a feature of many of my designs . The Spitfire and Mustang both use it . Once you have built a couple of Warbirds Replicas models you will find these techniques become easier each time . I couldn't help propping the canopy on . We all do that don't we ? Anyway , I think you'll agree she is starting to look like a Tempest .1 point
-
Video of the build1 point
-
Hi all, Well here I go again. Another big scale build. I must be addicted to cyano fumes or something or maybe I'm just certifiable.. This will be the build of all builds for me and when you see the kit contents I think you will understand why. First of all here is a photo and the video that will be my inspiration.. The photo and video is of a model that has been throught the hands of a couple of the Dawn Patrol. It was built in 1992 by modelling supremo Peter Neate. When I first saw it I fell in love and spent a bit of time trying to buy one, but despite seing a few Practical Scale ones, I couldnt see anything that matched the quality of the Classic Scale one. I had all but given up, but one day whilst sitting idly on another forum - actually reading the posts about the Moth above, someone posted the following "I have a Classic Scale kit for sale"....A KIT - A COMPLETE AND UNSTARTED KIT!!! - These are rarer than rocking horse droppings! Without hesitation I bought it - £700 for a 20 year old kit...Had I gone mad??... Well that was March 2013 - the kit has been staring at me for almost 2 years - The 1/3rd scale Mick Reeves Pup is finished, the 1/4 Scale Fokker Dviii is in the stages of the last bit of weathering, so there is no reason to put it off any longer... Jez Edited By Jez Harris 1 on 08/12/2014 04:57:481 point