Leaderboard


Popular Content
Showing content with the highest reputation on 23/03/24 in all areas
-
A Hound Dog seems appropriate. 🤣 Steve7 points
-
Tail feathers on nice and straight , plus provisional canopy fitted (yours and mine will be clear )6 points
-
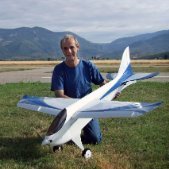
My new model is awaiting inspection, but the lure of a cardboard box is too much for Willow to resist. When she gets hungry I will unbox it 🤪5 points
-
And today I stood up under my own power and can now transfer between bed and chair without the hoist on a natty trolley-like contraption they call the re-turn https://www.directhealthcaregroup.com/app/uploads/return_product_brochure_uk_12pages_1505_low-10.pdf4 points
-
The flight of the B17 Flying Fortress. This iconic bomber from the second world war flew many missions over Europe and was instrumental in helping to shorten the war.4 points
-
This is very topical for me at the moment. I have a 10 year old DX8 Gen 1, which although still working perfectly, is full (i.e. 29 of the 30 model memories are in use). So two weeks ago I gave in to temptation and bought an NX10. So far I can opine as follows, in no particular order: The colour LCD is nice, although not particularly high definition, nor any bigger than the old one in the DX8. I don’t think the display is as fast to react to the scroll wheel as the old DX8 with conventional LCD, which has caused me to overshoot and choose the wrong menu item several times. In fact overall I’d say the old DX8 scroll wheel & menu are a bit nicer to use. The programmable audio events (voice messages) seem a useful addition, particularly the spoken count down times. I particularly like the configurable switches, which allow you to assign functions to any switch of your choosing - which as far as I know I couldn’t do with the DX8. The ability to bind to a receiver from within the menu without having to cycle the power while holding down the Bind button is useful. The pre flight setup checklist seems a bit limited, and as far as I can tell can’t be sorted alphabetically, which makes it hard to find things. Several things I’ve wanted are not there, and I’m not aware that there’s any way of adding your own items (I stand to be corrected on this). The Bind/Engine Kill button although larger, seems more of a reach for my little hands than the old one. I like the addition of the centre tone facility, which I’ve enabled for the throttle control. A useful indication of when you’re at half throttle, without having to look down at the box while you’re flying. The manual is rubbish. I guess with 10 years of development you get more bells & whistles. Could I have just carried on with the old Tx? Yes. Am I glad I bought the new one? At the moment, also yes.4 points
-
The rear underside of the fuselage is sheeted with 3/32 balsa . Next job is to sand the bottom as round as I can without going too far and through the corners. You can see that the wing fairings are in the way of the sanding block . As I said above it would be better to round the underside before fitting the wing fairings .3 points
-
GC Piston Rings - Custom Piston Rings, Model Engines & Steam Engines3 points
-
A good source for bearings is "Simply Bearings" . Excellent service , prices and postage included .2 points
-
I agree, Just the wind noise of the glider going up the line. There's something magical about it as the energy it is using is your own, as it was your muscles that stretched the bungee, unless of course you have a 'fetchermite' to do that for you! 😁 The bit I really like, is that in a decent wind, even though you think you've stretched the bungee as far as it will go, often when you release the glider, the wind stretches the bungee even further, so the glider goes back from the launchpoint as the full length of the bungee lifts the ground.2 points
-
Bill Snap! No magnets yet (they are on order) but top and bottom pegs. Not a problem for the bluff nose but the same will be used for the long one. For the maiden I simply held the bluff nose in place with little bits of Blenderm tape. Yes I have flown it, sort of, twice! It actually has sufficient thrust but proved to be tail heavy. The result is it went into a climb immediately after the launch. With no forced airflow the eelvator has virtually no effect so it stalled. First time little damage, second time even with full down elevator trim it still stalled with rather more damage. As you can see it rather took out all the "sticky out" bits on the right hand side! I later discovered when the RH wing was ripped off the aileron link stripped a gear in the servo too. You can tell how muddy the grass actually was. It will mend no problem. I will move the battery forward and a bit to the left to counter the weight of the ESC. As the thrust appears adequate I will reset the drooped ailerons to neutral as well which should reduce the nose up pitch. My fear is the huge fuselage area compared to the flying surface areas will require the CofG to be remarkably far forward for stable flight. My late Bachem Natter was a bit less aerodynamically extreme and it was a pusher so had adequate thrust. But it still needed the CoG to be at just 16%. Until I set it that far forward every flight ended in an uncontrollable stall. I nearly gave up after 4 rebuilds but once right it flew remarkably well. https://www.youtube.com/watch?v=cq6MzWCXn60&t=30s I can only hope the X-3 gets "sorted" before it gets completely wrecked.2 points
-
Jaydeez an genulmen, I give you... ...Dusty Crophopper. My 2 year old Grandson has taken a huge liking to the Planes movie. If you haven't seen it, it's really rather good and the aircraft are well represented. To stoke his interest, I've built a flying version that if we ever get some decent weather, he'll be able to see in the air. My usual B&Q laminate flooring insulation depron construction. Glass cloth/ B&Q water based varnish covered and painted with sprayed emulsion. The orange in Valspar matchpot, and a story in itself. I had a picture on my phone, but of course you can't match to a phone image, so I grabbed a B&Q bucket. This was too translucnt, so the match was dark, so we scanned the B&Q apron of the young lady operating the machine! Span is 47", 3536 1200 motor and will use 3S 1500 packs. Weight is just a touch over 2 pounds ready to go. I think it might qualify as a scale model... Graham2 points
-
So I’ve finally gotten around to starting the build…. Tony Nijhuis Bristol Beaufighter. I’ve used the part kit and additional wood pack from Belair, ribs/formers etc all nicely cut and go together well!1 point
-
1 point
-
Super new test flight for my Mini Lidl Biplane! Amazing what you can do with a couple of £5 foamies and some cheap rc parts. Build blog is linked at the end.1 point
-
Sorry Martin missed that .1 point
-
looking very good..............1 point
-
As mentioned before , I've covered the tail feathers and so decided to mount the tailplane using golden Gorrila glue . To make things easier to align , I drilled two 5mm holes on the centre line of the tailplane, then pushed a 20mm length of the 5mm dowel wood into the hole as location pegs. This means that I can test and check alignment without glue then add the glue without having to clamp it . Seems like a good idea .1 point
-
Back to the inside again to mount the elevator and rudder servos . Because the pushrods come through a window in F3 , they end up a bit higher than the central crutch . No problem though as we can quickly knock up a little mount from scraps left in the box. In the first picture you can see I have cut two ply servo bearers from off cut in the kit . Plus , I made two spacers 20mmx60mm (roughly ) from scrap , to bring the servo bearers up a bit .1 point
-
Oops! Well spotted! 😄1 point
-
Attached Sketches (or programs for us oldies) gps_1s.ino gps_1s_serial.ino gps_var_rate.ino gps_var_rate--serial.ino1 point
-
“Max speed and altitude o meter” Whilst talking to a fellow model aircraft flyer about GPS’s etc, his view was that he cant be bothered to faf about with computers and just wanted a max speed and altitude indicator “so I don’t have to put my phone inside my funjet”. I figured this wouldn’t be hard as it is similar to my max altitude recorder (my first tinkering with Arduinos) and adding a GPS would get the speed data. This is the same circuit less the SD card reader and with an 0.91inch SSD1306 128 x 64 OLED module (address 0x3C) connected to the same connections as the BMP280. Ive written the software based on a once per second GPS data rate. As with the full-blown logger, the software also has a “serial version”, which is more for interest/testing/setting up purposes with its typical output as shown below (sat on my bench going nowhere!). Only a few satellites picked up so not full accuracy at this point! After power up, the display shows Max speed 0mph and Max alt 0ft. These values increase as the data does and is only updated if the values are higher until the reset is pressed. Max speed and height circuit. Library files for the display https://github.com/adafruit/Adafruit_SSD1306/archive/refs/heads/master.zip https://github.com/adafruit/Adafruit_Sensor/archive/refs/heads/master.zip1 point
-
Hi. Yes i will post the codes, just havent got that far yet! ------------------- The map wont display it until you tick the data file you imported in “Temporary Places” on the left hand panel (below). You can now zoom in and see the height and speed data on the map. Move mouse with LH button pressed to pan about. Middle button / roller pressed to rotate the view (as if looking out of a plane window!). RH button zooms in / out. Below is test data from me driving. You can click on any data point to see the info. Colour is speed and line markers are the height. The fastest speed is in red! Slowest is blue. You can open any new dataset and apply the .kst file to format it. Note – there is a bug in Google Earth that fails to show the height when recalling a style template .kst file. Simple Fix - When you apply the style template .kst file that you previously saved, also tick the “edit selected template” box. You don’t have to save it again but this tick makes the height display correctly for some reason! If you want to change the “style template” settings either create a new .kst file or tick the “edit selected template” when you select an existing template (.kst file). Make your changes to display the data with revised ‘style’ (you can choose to save it or not). You can open more than one GPS file and select which one to view with a tick in the data (LH “Places” panel). Google earth is not particularly easy to use but the above will get you started!1 point
-
Why do that when a proper bearing is available . Many use imperial front and metric rear. bearing . Just measure and order from or speak to Simply Bearings , Only a few engines use "Special manufacturer only sizes" Ive only come across this once on a OS 120 Gemini twin . If Simply Bearings cant get your bearing size then you have an issue .1 point
-
Absolutely! A great exhibition of skill. 😄1 point
-
This was for unobtainable sizes John - sorry, I should have made that clearer.1 point
-
Yes Aidan, you are no novice, perfect flying of this multimotor warbird, with attention to keep it on the move at all times, right down to landing. The types can bite you, but your ability to maintain smooth level wing flying made this a joy to watch.1 point
-
Nice bit of flying , the landing was superb like a butterfly with bad feet, A good one. Thanks1 point
-
Ive made up the pushrods as I did in the Fw190 . These 5mm dowels are light . So its the best thing we can do with a short nosed model . They are friction free too . Note the use of heatshrink (supplied ) to retain the metal rods in the dowels grooved ends . I will mark the pushrod exits on the plan. I left the bottom of the fuselage open so that you and I could see how the pushrods fit inside the model . You wont need to do that . Its easier to seal up the bottom of the fuselage earlier on (before fitting the wing fairings ) . At that time , its much easier to shape and sand the lower fuselage .1 point
-
I haven't glued the battery tray in yet as I wanted you to see this bit . The Tempest shares similar dimensions with the Fw190 . But because there is more wood behind the Cof G (thanks to the big tail and wooden trailing edges) , we will need some ballast in the nose . I wanted to keep the side profile close to scale so the adding a little ballast to a light airframe is fine if the goal is to stay at the scale nose length . The battery tray can be slid around a bit . So Ideally, get the largest battery you are likely to use in this model and slide the battery pack down and forward till the end of the tray meets the inside of the cowl chin. This will get you ballast as far forward as possible . You can see in the two pictures below , there is a better ballast advantage in the first picture .1 point
-
Good news Matty, the physio and support where you are sounds to be excellent - very much a post code lottery as to what's available and when, is usually the case. Lucky where I am in N.Essex, can't fault the treatment or aftercare when my old pump decided to play up a while back and needed a refurb. A big problem is getting one's head around what's happened, especially if like myself one rarely ever went down with even a cold for years on end or in your case being young for such an ailment.1 point
-
Great news that Matty, keep pedalling!1 point
-
Very nice job.1 point
-
The plan view looks good too . Overall I'm pleased with the shape and the lads seemed happy with it too. You can't say fairer than that .1 point
-
Enquisitor .Flying in open spaces is fraught with danger these days. If anyone approaches they are unlikely to obey a request to stand still. Far more likely to respond with a string of four letter expletive adjectives . Then there are the dog walkers , not all of them , but many think open space equates to "lets let doggy off the lead". The dog is unlikely to understand your request either. Controlling a model while being jumped st by a muddy mog is a bit tricky. Children now days are taught not to listen strangers and a strange man in a field shouting stand still will be ignored while the child runs in gay abbandon or kicks a ball across your intended landing area. I am a member of a club that flies on open land with large signs all around the flying area. Often a dog walker will purposely stroll across the patch and defy you to fly near them. They they then want an argument when you have to land ! On balance a club sight with no public rights of way and no animals is far better although farm animals behave far better than the two legged variety. Dont forget taking off is optional while landing is mandatory. What ever the reasoning if a person is accidentally injured or in todays snowflake society "feel thry have been put in danger " its the pilot who will be at fault. Very few individuals if any will take responsibility for their own actions. Its ALWAYS someone elses fault.1 point
-
My contribution is a "silly" light Douglas Skyray EDF. 36" span all in 2 & 3mm Depron with no spar as such. 160W (1300mAh 4s) is available. It weighs 554g (20oz) giving a wing loading just over 5oz/sqft. It is most definitely not fast but it does make it a "doddle" to hand launch. Actually it is not a conventional EDF as it uses an Emax 2205 done motor driving a 3x4.5 3 blade drone prop in a home designed 3d printed housing. The motor is right at the back so complete duct is inlet and it is printed in LW-PLA. It also forms the "spine" of the fuselage. All the loads are carried by the Depron skin. The completed wings are simply glued on to to the fuselage, Plastic kit style! Using Technicqll polyvinyl adhesive a well fitted butt joint is as strong as the foam so if the 2mm foam skin is strong enough then so is the glue joint. The plane was sized so scale inlets gave a 1.2 FSA duct. As a result the exhaust nozzle at 90% FSA is slightly under scale size. Just 2 x 3.7g servos as elevons. No rudder. It was built in the autumn of 23 but the appalling weather meant it just "hung on the wall" but I have managed to fly it on each of the truly calm dry days so far this year. This is the video of its rather "interesting" maiden 2 weeks ago. https://www.youtube.com/watch?v=fNv_YloJanY Just as well it posses a substantial endurance for an EDF!1 point
-
Wanted to try something different, so I built this plan from Depron sheet. It is based on plans and videos you find on the Internet ( Buschtrottel Agro). The model features a Fogleman airfoil, flaperons an leading edge slats which are fixed with Velcro as well as the landing gear. Flies great. Karl1 point
-
For anyone interested in referring to original prototypes for scale modelling - or even just for general interest - I recently found this website for the National Naval Aviation museum at Pensacola, Florida: **LINK** Of especial interest is the virtual tour that lets you wander around the museum and zoom in on exhibits (click the virtual tour link at the top of their home page, or here for convenience: **LINK**) Of very especial interest are the cockpit 360 degree views that sit you in the pilot or gunner's seat and let you have a really good look around! You can sit in a ME262 or SBD Dauntless pilot's seat and many more... fantastic stuff. Look for the "Cockpits" button at the bottom left of the virtual tour. Enjoy, I did1 point
-
The Vintage Aviator is a replica aircraft manufacturer that has created many WW1 aircraft to exacting standards as I am sure many of you already know, I recently contacted them asking for some specific details and they sent me a link to the photo collection of their official photographer James Fahey There are some fabulously detailed photos of all sorts of mouth watering subjects here.... **LINK** The Vintage Aviators web site is here **LINK** If you are into WW1 string bags its well worth a look!!!!1 point
-
Really awesome pics there Dave - but that Photobucket POS has to die! I have seen all those planes in person and they are indeed mouth watering. They really look like scaled up RC models with the push rods replaced by cables and the servos replaced with the pilots arms and legs. One of my favourite pics.1 point
-
Posted by Donald Fry on 11/07/2013 12:56:17: Tony, as you say, wonderful workmanship, but can you see what I mean about colour blinding up in the rib lines. Donald, I understand your issue but is it really a problem? The full size aircraft were painted by hand after covering so the underlying structure and the rib tapes would have probably "caught" more paint from the brush. This picture illustrating the process may be of interest. For more on this topic I quote respected researcher Dan San Abbott (unfortunately now deceased), "The dark olive dope was thinned to a wash and applied with 80 to 100mm wide brushes in one continuous stroke. It was applied in one coat over the clear doped linen fabric. The dark streaks are where the brush had a full load, and each succeeding brush stoke the covering of the thinned dope got lighter. After the camouflage finish was applied, using matt black dope, the crosses were painted on the clear doped linen fabric on the upper wing top surface, the lower wing under surface, both sides of the fuselage and the rudder. After the crosses had dried, the cross fields were painted with flat white oil based paint on the top wing , fuselage and rudder crosses. The lower wing crosses were left as is, clear doped. One coat coat of sky blue dope was applied to the under suface of the wings , axle wing, fuselage, and tailplane. The sky blue dope overlapped to the bottom side of the fuselage 20mm and to the top surface of the tailplane, forming a border 20mm wide. After all the painting had dried, the fabric surfaces were given one waterproofing coat of copal varnish which had a yellowish cast, this causes a yellow shift, changing the sky blue to a turquoise. This is all supported with Fabric Samples from Ltn. Stapenhorst's Fok. DR.I 144/17 held in the Imperial War Museum. These are substantiated facts, not my opinion". I hope this is of some use.1 point