Leaderboard


Popular Content
Showing content with the highest reputation on 18/03/24 in all areas
-
The closure of Laser engines was inevitable. It is sad for me as I formed the company in 1983 with Reg Gross, Geoff’s father. I have not been involved for over 10 years. Geoff is now 70 and there is no one to take over the Company. The good news for Laser owners is that they were manufactured from very high quality materials, will run for many hours and will survive quite serious crashes. With modern fuels there is very little maintenance or wear. Spares or repairs are rarely required. Bearings are standard, easily and cheaply bought from suppliers. Engines made from 1996 are the best made and I am sure will be powering models for many years. Aeromodelling has declined, we have lost most model shops, magazines and the membership of the BMFA has dropped from36,000 in 2004 to 2,6000 now. Skills have been lost, it is far easier to buy a ready made foamie complete to fly. CAA legislation does not help. Thank you to everyone who has made Laser Engines a British success. Best wishes to Jon for a bright future and being part of the Laser legacy.8 points
-
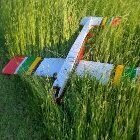
My latest, back from my repair shop, a donated airframe of a VMC Hurricane -a rubber powered model, 16" span, about 60g in weight, converted to full house and electric flight with the innards from a Volantex Super Cub by my pal Bob. Unfortunately the Hurricane met with a more rigid object in the form of the windsock a few weeks ago and Bob passed the badly damaged, but repairable, airframe on to me, as I'd been wanting a Hurricane to add to the fleet of wee fellers. I built a replacement wing, covered it with 38um laminating film and after paining made some new replacement laser waterslide decals. All done now and waiting for a remaiden.6 points
-
Four servicemen were undergoing a psych evaluation. They were all asked "What would you do if you found a scorpion in your tent?" Sailor: "I'd stamp on it" Soldier: "I'd crush it with my boot" Marine: "I'd rip off its sting and then eat it" Airman "I'd call room service and ask them what a tent is doing in my room..."5 points
-
Just an update on spares. The O rings we use are all available as standard sizes. The codes are listed below but will be passed on to model shop leeds. Getting more is as simple as calling the O ring supplier and asking for a bag. BS004 - Slow run needle BS005 - Main needle BS008 - Pushrod tube and rocker shaft 0045-10 - Main needle jet assy BS011 - Small carb/exhaust stub BS012 - Large Carb/exhaust stub BS029 - Front bearing housing. The same is true of valve springs. The spec is going to be held by the company we buy them from. Getting more is as simple as phoning up and ordering them so there is no worry there. For reference again, bearings. 608-2rs - 45, 50, 61, 62, 70, 75 and 80 front bearing. Remove rear rubber seal 608 - Pinion drive bearing, all engines. 6001-2rs - 90, 100, 120, 150, 155, 120v, 150v, 160(all), 180v, 200(all), 240v, 300v*, FT310 front bearing. remove rear seal 6001 - 45, 50, 62 and 70 rear bearing 6002 - 61, 75, 80, 90, 100, 120, 150, 155, 120v, 150v, 160(all), 180v, 200(all), 240v, 300v*, FT310 rear bearing. 6201-2rs - 180, 300v, 360v front bearing. remove rear seal. 6202 - 180, 300v, 360v rear bearing. 61902 - Middle crank bearing for inline's. * newer engines use the smaller bearing. Old 300v's use the larger 62XX bearings. I mentioned there might be a few oddballs for sale. I have a small number of petrol engines available, but most are incomplete. One is complete, has been test run but thats it. It will run fine, but as already mentioned they are not fully supported for spares (theres another thread here somewhere). I then have 4 incomplete engines which will be available. The core engine is complete, but they are missing their fuel pumps and carbs. I plan to fit them with a standard backplate, and then sell them in one of two configurations. As the engine with exhaust and cdi unit but no carb. you can do what you want for a carb, experiment with whatever you like and basically use it as a platform for your own tinkering. Alternatively, i can fit them with a glow carb and sell them as a normal 'glow' 180 but with CDI ignition. If these are of interest to anyone please contact me directly.5 points
-
Satisfied that the cabin interior parts would go through a doorway with sufficient margin, attention was paid to making the doors. With multiple curves, the challenge was how to make them to hold the correct shape, yet be light and strong. I first considered making a mould and laying them up in fibreglass, removing all but the frame afterwards. I’m sure this could have worked but I wanted a way of building in a rebate for the glazing. There may be other suitable methods but I settled on making them out of laminates of ply having first proven that the ply would bend sufficiently and then hold its shape and that the corners could be made strong. The frames couldn’t be more than ¼” wide otherwise the result would look clumsy. A couple of test pieces were made up as in the pictures 0.9mm ply once wetted and allowed to soak for 10 minutes then laid up in 3 strips over a suitable former, will hold its shape. By overlapping alternate corners, the strength is as high as it needs to be. No attempt has been made to force the joint to destruction, but in pulling at it as if it were a wishbone, satisfied me that this type of joint is more than adequate. The doorway former was made form scrap bits, covered in parcel tape or Sellotape and clamped into position. Each side has a curve to some degree. It was then a case of adding the ply strips and slowly building up the layers. There are 6 pieces to each layer with 6 layers required to get to the desired thickness. With each strip being wetted the drying time takes longer so is quite a slow process...but we're getting there.4 points
-
For those who live in an area where all the thieves are grossly overweight. .3 points
-
No mate. They are hewn by hand, from seasioned oak, by the coach, using worn out sandpaper, only lubricated by his tears of sorrow.3 points
-
Here is the best one I have seen so far. I was looking at ornithopters a bit just before this topic came up. Very few commercial kits available and lots of impressive solo development that does become available. I would consider building one of these if plans were available. https://m.youtube.com/watch?v=fBADJ7-elHQ https://m.youtube.com/watch?v=SDOsZTtSMjE3 points
-
The plan view looks good too . Overall I'm pleased with the shape and the lads seemed happy with it too. You can't say fairer than that .3 points
-
In for a knee operation a friend wrote on his good knee with permanent marker-NOT THIS ONE2 points
-
And when it does, while you are picking up the pieces your ears buzz with the whispering of 'pilot error',,,🤢2 points
-
Steve, As you're using Koverall, which is heat shrinkable, you do not need to use a shrinking dope. A shrinking dope will carry on shrinking long after its dried - possibly for months, albeit at a much reduced rate, however it can cause warps to materialise which weren't there when first covered. Non-shrinking dope will still cause the fabric to shrink but not by very much. Having already tautened the fabric with heat, the dope is there to fill the weave and make the fabric air-proof. Koverall has quite a loose weave compared to other polyesters so may need a few coats of thinned dope to completely fill the weave, The thinning doesn't reduce the effectiveness of the dope, only the viscosity. Your model is quite large and you're going to need more than normal modelling size cans, I'd say at least 1 litre of dope. I suggest you contact one of the full size restoration companies in NZ, of which there are a few, and ask where they get their supplies from. You could also ask where they source fabric cement from, this is purpose made for the job of covering.2 points
-
I realise that some of the chaps might be put off by the hand launch / Dolly Launch thing . However the whole idea with this one and the Tempest , is to remove the barriers of getting into balsa bashed scale models . The lack of weight this decision endows on the models also means they are extremely forgiving . Having said all that , I am aware that people may want to upgrade later so I have instigated (with Paul Johnson doing most of the work ) some laser cut retracts packs for the 190 and Tempest . I cant really sort them out till the Tempest is kitted and out of the door but I wont leave you to sort it out . They will be complete sets with wheels /retract units/ wheel doors and ply dummy ribs and mount plate assembly . All of the angles will be pre ordained . Like I say , I dont want to detract from the simplicity of the kits but equally I dont want to put people off them if they dont like launching and belly flopping .2 points
-
At this point I think we have enough parts completed to mock up a final look and see if she's in the ball park . Always wise to get a second opinion at about this point . Luckily I know a couple of experts .2 points
-
The two top skins are made from 3/32 balsa and your kit there will be a template or the pieces will come precut . I wetted the inside of the skins to make them curve before fitting them . They are oversize so its a case of getting the top glued in the right place , then trimming round the bottom . The curved little former on the trailing edge is wide enough to support the front and the rear skin. I built the second fairing straight onto the model and it was quicker and came out better . You can see where I marked the crosses that you can trim off some of the overhang , but dont take off too much at a time . The skins do need to ovehand by about 3-4mm to look good from above .2 points
-
Hi Neil and welcome to the forum. I’m sure I’m speaking for many members here (and probably most of the longer term ones) in recording my thanks and appreciation of your superb design and vision in bringing Laser engines to the market. I hope my Lasers will last me out!2 points
-
My contribution is a "silly" light Douglas Skyray EDF. 36" span all in 2 & 3mm Depron with no spar as such. 160W (1300mAh 4s) is available. It weighs 554g (20oz) giving a wing loading just over 5oz/sqft. It is most definitely not fast but it does make it a "doddle" to hand launch. Actually it is not a conventional EDF as it uses an Emax 2205 done motor driving a 3x4.5 3 blade drone prop in a home designed 3d printed housing. The motor is right at the back so complete duct is inlet and it is printed in LW-PLA. It also forms the "spine" of the fuselage. All the loads are carried by the Depron skin. The completed wings are simply glued on to to the fuselage, Plastic kit style! Using Technicqll polyvinyl adhesive a well fitted butt joint is as strong as the foam so if the 2mm foam skin is strong enough then so is the glue joint. The plane was sized so scale inlets gave a 1.2 FSA duct. As a result the exhaust nozzle at 90% FSA is slightly under scale size. Just 2 x 3.7g servos as elevons. No rudder. It was built in the autumn of 23 but the appalling weather meant it just "hung on the wall" but I have managed to fly it on each of the truly calm dry days so far this year. This is the video of its rather "interesting" maiden 2 weeks ago. https://www.youtube.com/watch?v=fNv_YloJanY Just as well it posses a substantial endurance for an EDF!2 points
-
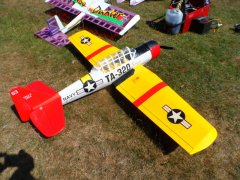
I had that Spitfire in the 1980's, a bit under powered with an OS.61 four stroke. The Beaufighter is a great flyer ( unlike the Mosquito), mine with twin Saito .45s,,2 points
-
Now showing on the Buckminster calendar for next year, 27th, 28th and 29th September. Details to come, but book it in your diaries as an event not to be missed as it should be great fun.1 point
-
Thanks Richard. I am going to do that as I had a look at it again this morning and it is really a bit of a mess on one wing only. 😀 Away for a couple of weeks so it will have to wait a bit.1 point
-
Another (potentially easier?) solution. I made a spacer from an old credit card to sit between the motor and the X mount. The slight increase in spacing was enough for me to get pan head screws into the X mount before then fastening the mount to the motor.1 point
-
Very nice job.1 point
-
MSL will hold springs in stock and can just order up more if they ever run out. Not sure what the MOQ is, likely around 250 springs.1 point
-
Hi Toto, SWMBOs can be a wee problem. As you're sort of new to all this, a few tips You, as a surveyor must know that thing that tradesmen do when asked to give an estimate. They sort of shake their heads, and inhale through their teeth; 'Its going to be difficult' they say, and take ages. You must learn this. SWMBOs don't understand how long things take, so you can vanish into your cave for many hours to sort things out. Tell her that your cleaning brushes, sharpening tools, making bits that are essential to the work. This keeps mine happy for hours on end. Also make up an audio file with drilling, hammering, sanding and general DIY sounds. You can play this while you fettle your latest toy; and enjoy a wee dram. We all do this stuff, and mostly SWIMBO's can be kept well under control ernie1 point
-
Further small update. Almost all of the engines i have here are now sold. I think only 70's are left although frankly i have lost track its been so busy. No more engines are going to be completed before i leave at the end of the week so now all sales will be through model shop leeds. MSL are accepting orders through their website for engines that are out of stock. Just be aware that its first come first served and the number of orders may exceed the number of engines available. Be aware too that lead times will be long as the remaining engines are to be assembled after i leave.1 point
-
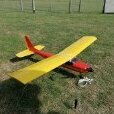
As I said in my last post I wud report how the test flights went with my newly acquired Ruckus, It has now been airborne ,, Before flying however I did remove the original 3mm approx undercarriage hex bolts & replace them with more suitable 5mm bolts washers & nylock nuts as I really didn't feel the original bolts wud be sufficient enough to hold the undercarriage..... So to the test flight,, Our field is still a little soft in places but a lot drier than it has been recently and the grass in the pits & on the patch is rather lets say clumpy in places and not yet dry enough for a cut.... But on Saturday I decided to send her up and see how she does for her Maiden Flights and I gotta say the Ruckus out flew my expectations and how I was expecting it to fly and handle what I know I can put it through and yes the undercarriage is still intact, firmly attached to the model & complete with wheel spats,, In fact I was rather pleased with how gentle it touched down on landing.... The Undercarriage was more than strong enough to cope with the condition our patch is in at the moment including a faster taxi than normal... So yes I'm very happy with the Ruckus ,, I'm not saying I'm a newly converted believer or follower of the Ruckus and its creaters but I will atleast say it's a passable & enjoyable plane to fly... One of my fellow club members managed to get a bit of video of the Ruckus's maiden flight 263523525_RUCKUSTEST.mp41 point
-
September 27th at Buckminster will give us a chance to celebrate the 'Laser Years', book it in your diaries.1 point
-
I was thinking....If you can't get at something you will need to.1 point
-
Oh dear, now you know what’s going to happen don’t you? 🥴1 point
-
Most defo Chris and before there is any sniggering, at that phrase, at the back of the class I should explain that I had exactly the same thing with my earlier Mk1 Dolly launches as it just hadn't got up to flying speed. Now with Mk2 Dolly it is straight and level each time. another thing to check, where is your CG? Moving it back certainly helps with dolly take offs.1 point
-
I have experimented a bit further with the Gorilla PVA. I thinned it very sparingly with only a couple of drops of water and applied it very liberally to the BP. I did not leave it long before applying to the veneer. This has worked much better with no bubbles. I also have done one wing with applying a thin coat of Balsaloc to the veneer and letting that dry before applying the BP/PVA. That has worked well too. I think as Stu has said there are several variations of the method which can be used. In my case, with no previous experience, I am getting used to the process and the finer details which guarantee success. Having expert advice from those on the Forum is a great help to progress quickly up the learning curve. Thanks.1 point
-
Fix with countersunk screws, then film over ?1 point
-
Wing fairings next . All British aircraft seem to have bigger wing fairings so we might as well embrace the technique , ready for a Spitfire ! Its actually easy once you know the drill . Four pieces are employed . A ply base , a triangular former and two thin balsa top skins . On this model I also use a 70mm long piece of 10mm triangular section balsa to reinforce the joint . I would recommend covering the wing with the clear wrap that the canopy came in . If not , some cling film . The first thing to do is lightly score the underside of the ply base plate and then gently "crack " it upward . To more clearly show you , I have built the assembly off the model . However it is better to do it on the model . The first step is to glue the base to the fuselage side using super glue . Keep it all in place with pins till it dries . Next step is to glue in the triangular reinforcement and the curved former .1 point
-
Nicely said Neil.1 point
-
Wow , excellent pictures Murat . I can see a "round two " later on in the year with fully detailed Fw190s with retracts and three blade props . I think we may miss the simplicity and forgiving nature of the original though .1 point
-
I think my advice (offered even though not asked for) would be to postpone your first flight until you have a way to turn the gyro off in flight. It is a very easy setting to get wrong, too low and it wont help in stabilising the model and too high and it will introduce an uncontrollable porpoise that will end in tears. /2p.1 point
-
Yes Flyin Flynn I really like this type. It has it all going on Good looks and could have been good competition against the German fighters if it hadn't been withdrawn because of structural issues which lead to several deaths with the wing folding in flight. The pilots that did get an opportunity to fly it liked it. I think to it was over looked by the British by poor documentation from Haigs staff. Haig stated in notation he didn't want it. It is thought that he mistook it for another variation that was a trainer ??. After the wars end several came into private hands and actually set a world record for consecutive loops by one pilot!. Another one was involved in air racing and that currently resides in France. I love the colour scheme for it. Cheers Steve1 point
-
Using a suitable size darning needle save a lot of time for the N/V. I have recently finished a 5cc version of the 2.5cc Nalon Viper and the photos show the lapping tools used, The cylinder one has the adjusting thread cut with a taper tap so that screwing it in expands the outer diameter. It is a good idea to put the screw in the chuck and file a slight taper on the leading threads. Slits are hand sawn.This one is held in the chuck and the cylinder is held in a gloved hand for lapping. The piston one is hand held,ditto and the piston on a stub mandrel is in the chuck.1 point
-
Friend of mine got a job at Martin Baker, he started at the bottom but rose rapidly.1 point
-
Quite a scene i find in my inbox this morning. I will get the whinge out of the way first. Please stop trying to order spares. Its not covid times any more and i am not selling loo roll, relax, its all in hand. As already mentioned model shop leeds will be managing spares support and even after the factory closes spares are still going to be in plentiful supply as long as people do not hoard things they do not need. Things like valve springs are dead easy as someone need only phone up the company who make them for us and order a bag. 500 springs will set you back about 2 grand, but you will have your springs and can sell them to all. With that out of the way i would like to say a big thank you to everyone for their messages of support. A number of you have asked what i will be doing with myself and i am quite proud of the fact that i have been offered a position by the Martin Baker Aircraft Company and will be assisting with the assembly of their various aviation safety systems. This is going to be a big change but i am looking forward to this new position.1 point
-
After a second attempt the carbon laminated tailwheel cover did finally cure. Following a chat with a chap at Easy Composites I am going to start using a 50:50 mix of the fast and slow EL2 hardener in future, to achieve a better balance of pot-life and curing time. Another tip from Easy Composites is that they now sell structural thixotropic epoxy adhesive similar to the very expensive Hysol. 1/3 the price so I shall be trying some out for the various in cowl fixings and will report back. Here the cover is in place. Here in the deployed position the brass mounting parts can be seem. These are epoxied to the cover and 3mm bolts fix them to the retract chassis in tapped holes. Lightweight but definitely long grass resistant. Next I need to remove the wheel yoke and reshape it from its Corsair looking iform to something resembling a F6F fork.1 point
-
Nothing to do with planes as such but I was printing a lightweight structural part. Intended to be a single 0.3 mm wall with a 5% "gyroid" infill. The only problem was I had accidentally set the "wall flow" to zero. 😟 An interesting result. A free standing infill. I can think of no use for such a thing!1 point
-
Years of reading model mags and huge amounts of balsa dust, Glue fumes and paint fumes have had a negative impact on my resistance levels and ability to think clearly at times. I have just paid for a new airframe that I will only get in a months time when My son is on holiday in Durban. It was built by a very well known and respected South African modeller so I could not help myself as it has been on my must build list for 20 years!1 point
-
Printing the parts for an entire model plane sounds attractive but it does not solve the problem of using the same material through out the entire structure coupled with the fact that a printed part has a significant 'grain'. It is stronger and stiffer along the line of the print than across it. In PLA this effect is pretty significant Put all this in the mix and you are bound to end up with a less than ideal plane from a structural point of view. Even a classic balsa built up plane uses different materials where appropriate like different grades of balsa, hardwoods, carbon and aluminium tube as well as glass cloth or a heat shrink polymer.. My own view is to use printed parts including using different print materials where the benefits of the printing process outweigh any structural issues. My own example of this process is in my simple 52" (1320 mm) span "Big Dragon" pusher. Actually built as a follow on to an slightly larger all Depron powered glider to explore and test my 3d printing design skills as well as to hopefully create a more practical plane. The fuselage which includes the wing pylon that has a built in cooling duct for the ESC within it, the motor mount and the battery compartment are all printed in PLA as are the wing ribs. The wings are skinned in 3mm Depron which has a hard balsa spar. The tail boom is a glass fibre tube. The tail surfaces are balsa reinforced sheet foam. It weighs 743g (26oz) with a 2800 mAh 3s on board. Full power is rarely used unless you want to go straight up! The printed components added about 50g compared to the earlier Depron fuselage built up from 6mm thick foam but the PLA is stronger and probably gives better aerodynamics. If you want to build an RC model airliner printed fuselage formers represents a really economic way to make lots of identical fuselage formers. The clever bit is how to use them!1 point
-
I have printed and flown a number of 3d printed edf's and gliders most of which were successful. Models printed from PLA can be a bit fragile but I think some of that is due to the way they are designed. I have found that models printed with pre foamed PLA or LW-PLA are more durable as those materials have some flex in them whereas standard PLA is very rigid. Applying 25g/sqm glass cloth applied with WBPU varnish adds greatly to the strength of the models with very low weight increase. I have one very fast edf flying wing which would land quite fast and used to break the fuselage every few flights. Since applying the glass cloth it has flown a number of flights with no problems. Two of the models are shown below. The Fanblade is the model which has had glass cloth applied to the fuselage, the photo was taken before it was done. The Pika was mainly printed from standard PLA but the tail section from the wing aft was printed from pre foamed PLA which saved about 50g of nose weight over a Pika printed purely from standard PLA.1 point
-
Can you not replace the plastic screw/captive nut with a magnet?1 point


.thumb.JPG.76d75238b980680cf080513c0401be84.JPG)