Leaderboard


Popular Content
Showing content with the highest reputation on 19/03/24 in all areas
-
A forum member suggested that I put my video on covering using brown paper under a separate topic as he couldn’t find it on my YouTube channel, so here it is. This would also be a great place to submit all of your tips when using this covering material. Plus here are the ones specifically related to the WR FW1906 points
-
Maybe, but there is nothing to stop anyone else starting a company making engines. In part this is why the selling the company chat is a moot point. If it was such a great and profitable idea everyone would already have done it. If anyone does decide to start a new company making engines do let me know. I can become a consultant and charge an exorbitant fee 😄6 points
-
All good engineering practice Chris . My personal preference is simply self tappers . One , they are easy to fit . Two you can add more wood to the back of the former to give them more to bite into . Three , in the event of an "incident " they usually rip out and sometimes you can just fit the next size up . When you think about it , retracts into a ply mount plate , dont have captive nuts . They would never pull out if you had a really bad landing and if so, they may take a chunk of the wing . We no longer have the vibration of an I/C motor so my philosophy is "look how feeble the Chinese mounts and screws /servos are, then come back a tad ". Ive got models that have done 500+ flights following this procedure . Seems to work . Oh , and I can build quicker . Also , you can get a massive box of self tappers form B and Q for a few quid !5 points
-
Some start up company are likely to get a Government grant/contract ( paid with our tax money) to explore and develop this dream. When it all fades into forgotten memories somebody will be very well off with our money. If anyone in power questions the outcome an inquiry will likely be launched probably headed by lord A.Somthingorother and they will be paid more £1000s again from our tax money to find out what went wrong. This will be dragged out over some years and largely forgotten about...again. If it takes off and works then watch in dissbelief as it sold off to a foriegn bidder and we the tax payer cant even get our potholes fixed. More pie in the sky from the Circus DeUK , but only the rest of the world is laughing!3 points
-
Brilliant as always Bonzo. Oddly enough I have been doing similar thrust tests, using a digital set of fishing scales. Hook of scales attached to tail of model, and other end to kitchen table leg. Worked a treat!.2 points
-
Quite agree re the challenges in getting certification but if the operating costs of say the volocopter are significantly lower than your average small heli then that may be enough to swing the argument. As you are very probably aware small helicopters are ferociously expensive to run and maintain with so many parts needing replacement or complex servicing after quite low hours in comparison with fixed wing. I have only ever been lucky enough to experience a couple of short hops in a Jet Ranger, but even in a turbine powered helicopter I was quite taken aback by the noise and vibration in the cockpit. I see only 18 moving parts in the Volocopter and probably three maybe even four times the redundancy over a single rotor helicopter. I think I would feel safer in the Volocopter than in a piston powered R22. It is going to be really interesting to see how this all pans out… idd2 points
-
JD8. when I had my knee replaced the hospital did actually write on my knee with an arrow on the knee to b replaced. John2 points
-
2 points
-
Probably the reason everyone I dealt with when I had my cataract operation a few months ago asked what my birthday was - however, I was disappointed that I got no extra cards on my birthday in January.2 points
-
Cellulose thinners dissolves most acrylics apart from cured 2K acrylic.2 points
-
I think these MPs need reminding who it was that invented drone technology. It wasn't British Aerospace, Airbus or Boeing. It was modellers, tinkering away in garden sheds, and boy, have we come to regret it!2 points
-
Another (potentially easier?) solution. I made a spacer from an old credit card to sit between the motor and the X mount. The slight increase in spacing was enough for me to get pan head screws into the X mount before then fastening the mount to the motor.2 points
-
My latest, back from my repair shop, a donated airframe of a VMC Hurricane -a rubber powered model, 16" span, about 60g in weight, converted to full house and electric flight with the innards from a Volantex Super Cub by my pal Bob. Unfortunately the Hurricane met with a more rigid object in the form of the windsock a few weeks ago and Bob passed the badly damaged, but repairable, airframe on to me, as I'd been wanting a Hurricane to add to the fleet of wee fellers. I built a replacement wing, covered it with 38um laminating film and after paining made some new replacement laser waterslide decals. All done now and waiting for a remaiden.2 points
-
In for a knee operation a friend wrote on his good knee with permanent marker-NOT THIS ONE2 points
-
The closure of Laser engines was inevitable. It is sad for me as I formed the company in 1983 with Reg Gross, Geoff’s father. I have not been involved for over 10 years. Geoff is now 70 and there is no one to take over the Company. The good news for Laser owners is that they were manufactured from very high quality materials, will run for many hours and will survive quite serious crashes. With modern fuels there is very little maintenance or wear. Spares or repairs are rarely required. Bearings are standard, easily and cheaply bought from suppliers. Engines made from 1996 are the best made and I am sure will be powering models for many years. Aeromodelling has declined, we have lost most model shops, magazines and the membership of the BMFA has dropped from36,000 in 2004 to 2,6000 now. Skills have been lost, it is far easier to buy a ready made foamie complete to fly. CAA legislation does not help. Thank you to everyone who has made Laser Engines a British success. Best wishes to Jon for a bright future and being part of the Laser legacy.2 points
-
https://www.gov.uk/government/news/the-age-of-the-flying-taxi-draws-closer-with-the-future-of-flight-action-plan They cant even get the EV infrastructure right, who dreams up this stuff!1 point
-
A little idea I came up with on a wet afternoon. Might be useful? It kind of follows on from my '3 maidens 2 fails' video where I had an issue where a small 1s lipo had insufficient power to drive 2 small brushed motors in an experimental model. It's called C rating. 'The capacity of energy the battery can safely discharge, represented as a multiple of its overall capacity.' I hadn't considered it with small 1s lipos I use in small models. I'm sure it could be improved, eg I just cut a small V in the front of the trolley to take the fusi! Suggestions welcome (polite preferably please. 😉) You never stop learning in this hobby!1 point
-
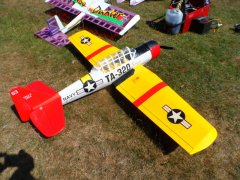
The Hangar 9 P51 flying at the Seven Towers Model Flying Club .1 point
-
@Paul De TourtoulonNobody is saying that it's new Paul but a lot of people haven't seen it before so that is why I created this topic hoping that members would add useful comments! To the rest - keep the tips coming through guys, it's turning into a useful 'Wiki' type thread.1 point
-
Bit of a wet field there Aidan! 😉 Nice flight though and one of Hanger 9's finest. ✈️👍1 point
-
You may also use acetone. I always use this for all the dried paints in jars and airbrushes.1 point
-
Will do when I can John. Cheers1 point
-
My last two Lancasters were covered with brown parcel paper applied onto the veneer with slightly watered down Pva .Then a thin coating to the paper and slowly laid onto the airframe,gently pressing out any air bubbles.Very strong when dry and any overlaps can be lightly sanded. The paint was applied thinly for the first coat and then thicker for the second and third coats. I found it was a good cheap way for covering large models.1 point
-
Thanks to all, I have some old brake fluid to start, then cellulose, then oven cleaner, but maybe just good old wire wool and ajax ?.1 point
-
Hi Ron . The last model I covered in brown paper was a DB Hurticane I built for a friend. I found that the brown parcel paper sold at the Post office that had a sort grain along it was very good . I used to paste it with slightly dilute PVA and let it soak like wall paper. It would then take a compound curve very well . Balsa sheet was given a couple of coats of thinned dope to A raise the grain and B seal it slightly. It dried very strong . One thing I found was NOT to use cheap PVA like n* n***ense type home brands. Its good to keep these skills and tips alive . Well done Ron.1 point
-
Having an open mind on the whole subject of drones and personal flight vehicles clearly puts me in the minority on here! Lots of naysayers and general hatred to ANYTHING 'drone' related from most people involved in other aspects of the hobby of RC Flight...perhaps they feel they are to blame for the increase in regulation etc1 point
-
Plan coming to RCM&E soon...1 point
-
Yes thanks Ron. Bas1 point
-
Cellulose thinners should work.1 point
-
Thank you for posting these videos Ron, its a topic in which I am very interested.1 point
-
You could try soaking them in neat Dettol, though I've also read that oven cleaners and even brake fluid can work. I think Deluxe Materials also have a paint stripper in their range. Cheers Idd1 point
-
....or more street cleaners needed to clean up the autonomous air taxis after 'delivering' someone from 500 feet after meeting a pigeon en route to some 'important meeting' that they 'couldn't' take a limousine to.1 point
-
Nothing wrong with Drone Technology in itself, it's simply that the expectations for that tech have run wild and unchecked into certain areas that are just not feasible, or will not become feasible, if at all, for many decades until/or after a total restructuring of day to day living as we know it now. Let's not be disingenuous.......film making, sports and news coverage has been revolutionised by drones.......survey work, security and sadly military uses, are just a few areas where drones have shown great advantages over traditional tech. Other areas such as widespread delivery of consumer goods by drone, or the drone/flying taxi idea can be demonstrated to work in tests and trials, but fall falt on their face in the real world. I don't see a shred of hard evidence of that changing any time soon IMHO.1 point
-
Obviously someone who watches too many sci fi films has somehow worked their way into a gov office with all the other clowns .1 point
-
The IT team responsible have been looking into the problem. There may be an update to follow.1 point
-
Goose , you have explained it fine . The X mount provided with some motors simply dont have enough "span " to clear the motor "Can". You can attach the mount to back of the motor so that bit is easy. You will note that the holes for that are countersunk . So what I did is countersink the other the outer holes on the other side . That gives you a little wiggle room . But what gives you even more wiggle room is to simply drill the outer holes a bit bigger . That means you can push the screw holes out a bit further . Eric a achieved the same thing with a needle file and he elongated the holes outward . If you have wrecked your X mount , would you like me to send you another that is modified as prescribed ? For every one else I would say this . The X mounts seems vital and the motor mount holes are all different so we get hung up on them . But here is a thought . If you just get a 50mm square of 3mm ply or even thick plastic sheet , you could easily mark and drill the holes that go into the back of the motor then just screw the plate to bulk head with self tappers . X mounts appear to be more important than they really are !1 point
-
For those who live in an area where all the thieves are grossly overweight. .1 point
-
Just an update on spares. The O rings we use are all available as standard sizes. The codes are listed below but will be passed on to model shop leeds. Getting more is as simple as calling the O ring supplier and asking for a bag. BS004 - Slow run needle BS005 - Main needle BS008 - Pushrod tube and rocker shaft 0045-10 - Main needle jet assy BS011 - Small carb/exhaust stub BS012 - Large Carb/exhaust stub BS029 - Front bearing housing. The same is true of valve springs. The spec is going to be held by the company we buy them from. Getting more is as simple as phoning up and ordering them so there is no worry there. For reference again, bearings. 608-2rs - 45, 50, 61, 62, 70, 75 and 80 front bearing. Remove rear rubber seal 608 - Pinion drive bearing, all engines. 6001-2rs - 90, 100, 120, 150, 155, 120v, 150v, 160(all), 180v, 200(all), 240v, 300v*, FT310 front bearing. remove rear seal 6001 - 45, 50, 62 and 70 rear bearing 6002 - 61, 75, 80, 90, 100, 120, 150, 155, 120v, 150v, 160(all), 180v, 200(all), 240v, 300v*, FT310 rear bearing. 6201-2rs - 180, 300v, 360v front bearing. remove rear seal. 6202 - 180, 300v, 360v rear bearing. 61902 - Middle crank bearing for inline's. * newer engines use the smaller bearing. Old 300v's use the larger 62XX bearings. I mentioned there might be a few oddballs for sale. I have a small number of petrol engines available, but most are incomplete. One is complete, has been test run but thats it. It will run fine, but as already mentioned they are not fully supported for spares (theres another thread here somewhere). I then have 4 incomplete engines which will be available. The core engine is complete, but they are missing their fuel pumps and carbs. I plan to fit them with a standard backplate, and then sell them in one of two configurations. As the engine with exhaust and cdi unit but no carb. you can do what you want for a carb, experiment with whatever you like and basically use it as a platform for your own tinkering. Alternatively, i can fit them with a glow carb and sell them as a normal 'glow' 180 but with CDI ignition. If these are of interest to anyone please contact me directly.1 point
-
Satisfied that the cabin interior parts would go through a doorway with sufficient margin, attention was paid to making the doors. With multiple curves, the challenge was how to make them to hold the correct shape, yet be light and strong. I first considered making a mould and laying them up in fibreglass, removing all but the frame afterwards. I’m sure this could have worked but I wanted a way of building in a rebate for the glazing. There may be other suitable methods but I settled on making them out of laminates of ply having first proven that the ply would bend sufficiently and then hold its shape and that the corners could be made strong. The frames couldn’t be more than ¼” wide otherwise the result would look clumsy. A couple of test pieces were made up as in the pictures 0.9mm ply once wetted and allowed to soak for 10 minutes then laid up in 3 strips over a suitable former, will hold its shape. By overlapping alternate corners, the strength is as high as it needs to be. No attempt has been made to force the joint to destruction, but in pulling at it as if it were a wishbone, satisfied me that this type of joint is more than adequate. The doorway former was made form scrap bits, covered in parcel tape or Sellotape and clamped into position. Each side has a curve to some degree. It was then a case of adding the ply strips and slowly building up the layers. There are 6 pieces to each layer with 6 layers required to get to the desired thickness. With each strip being wetted the drying time takes longer so is quite a slow process...but we're getting there.1 point
-
Just a timely reminder to book these days into your diary. More details to follow but basically the 3 days are 'fly for fun' days with Friday being dedicated to the memory of Laser Engines. Saturday and Sunday are 'Best of British' so any models that were designed and / or manufactured in GB will be eligible. I'm hoping to have slots for the likes of Flair, Chris Foss, Warbirds Replicas, Mick Reeves, Galaxy Models etc etc and if there are enough there may even be chance to have dedicated model type slots such as WOT4. The emphasis is going to be on FUN!1 point
-
The plan view looks good too . Overall I'm pleased with the shape and the lads seemed happy with it too. You can't say fairer than that .1 point
-
At this point I think we have enough parts completed to mock up a final look and see if she's in the ball park . Always wise to get a second opinion at about this point . Luckily I know a couple of experts .1 point
-
So I am going to tip toe away from the Sea Fury conversion gang . Not sure if I answered Keith's enquiry . He may have accidently locked himself in the toilet . I did that in Sainsbury's . Very awkward . Getting back to the Tempest , you can see that I have now fitted the wing , complete with front dowel and rear bolt . I am going to make the blind nut mounting plate bigger and bring the bolt and blind nut about 15mm forward on the kit version . After fitting the dowel , I pushed a small thin screw driver through the blind nut to mark where to drill the wing . There is easy access through the inside of the cockpit . The last shot shows the two main components joined . You can see that we will need wing fairings to make them appear as per the full size aircraft .1 point
-
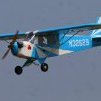
I got this from a friend as part-built.. I think it is old. It is very light and looks fragile. I called it CAP20 as I was not sure what model is this and who produced it. It is maidened today. It flies great..1 point