
Leaderboard


Popular Content
Showing content with the highest reputation on 21/08/23 in all areas
-
i stopped to pick up a hiker who jumped in the car and said...."wouldn't it be funny if you had just stopped and picked up a psycho,serial killer"? ...... i replied "the chances of two of us in same car are remote" like...☠️ ken anderson....ne...1......... hiking department.6 points
-
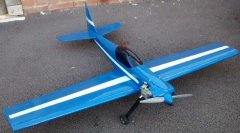
Progress is happening and despite the fact I've been working on it for a few hours every day, it seems dreadfully slow progress. This hasn't been help be the strong winds every time I want to spray a coat of primer or paint. This week, however, I called a stop to rubbing down on the wing and finished it in a coat of grey primer all over. Only to remember that the yellow underside will need white primer. First job this week, trip to the car spares shop for white primer. On the subject of the yellow, I've been in two mind about matt or gloss. The pre /post ww2 all yellow A/C are gloss yellow, and the camo was only added for the war years with little regard for any standard layout. So I think I'm going with gloss on the underside. One small embellishment to the wing, I've added wing joiner capping strips, made from card. One way to recycle the cornflakes box. I will use card to simulate the cockpit & storage box doors, as when you look at them, none are flush with the skin. The same idea will be used for the refuelling panels on the wings as well at some point. The rudder has been refurbished. The covering, which wasn't done as nice as it could have been, was removed and replaced with new Solertex from an old roll I've had for years, originally brought to cover parts of the MB5. The fabric hinge is now replaced with 3 pin hinges, and it's been given a coat of matt yellow for now. Hopefully by the end of this week we will start to add some colour to the rest of her.5 points
-
Well, whatever next! Yesterday I started a little diesel engine for the first time all by myself 😀 A Boddo Mills .75 in dad's 36" Tomboy (rudder elevator). The tank had a 2-min run time, the model climbed slowly then floated down with a few suggestions from the Tx. I have to say it was great fun and I was a bit smitten....5 points
-
Good questions John . I can help do the sums , but basically we should aim for the props to be turning at around 11000revs with no load . That means we can use 6" pitch props which are readily available . For example i have lots of 3300 4s packs , so with a 700kv motor that you can buy for £20 I would expect 14.8v x 700= 10500 roughly . So I could either go up to a 12x7 or use an 800kv motor . At say 4.5lb and realistic performance i would expect 7mins on the above set up . 3s packs can also be used as people have a lot of 2200 packs . Two of those will make a 4400mah battery and you simply choose a higher KV motor like a 1100 or 1200. Also cheap as in the "drone zone" . Flight time similar . Not loads of current used so minimum of 40A , 60 is ample . I recorded an FMS P51 with coarse pitch 4 blade prop drawing 63amps , but that weighed over 5lb and went from take off to a 70 degree climb to the clouds . Flat out in level flight it topped out at 32 amps . Most people go over board on ESCs . A good precaution But experience has taught me that with normal warbirds manoeuvres, you dont draw much .4 points
-
ken anderson.....ne...1...gardening dept.4 points
-
One of these ?.4 points
-
My foamboard and depron Sunderland is just over 1800mm weight about 5.5lb ready to fly, it would fly on two motors as it is way over scale speed at full throttle. The outer motors are 2212 1000kv with 9x6 props not sure on the inner, they came from a Hobbyking B25 and have 9x4 props battery power is 3s 3000 x2 one for the outers and one for the inners. 7 minutes flight leaves about 20 to 30% despite being different motors and props consumption is similar.4 points
-
Back on this at last ! Fuselage has been a bit fiddly but almost there 👍4 points
-
Here is a short video I took of my Gyroo flying off the Cliffs whilst on my Hols. Could of done with more wind to maintain lift without using power and more ballast weight to penetrate. Nice relaxing flying. Rich2 points
-
Denis, Futaba switches have pins inline with the body and are offset to one side. Some modification of the circuit board would be necessary to fit one of the above types.2 points
-
I think 190's need 74 degrees for scale, but electron (a good place to look for retracts) only do 85's so you might have to look at the wing and its mounts or live with a slightly no scale stance on the ground. Sierra offer this set http://www.sierragiant.com/prod45.html for the ESM/YT 190 and they are going to suit any 70 inch 190 pretty well. They aint cheap though, and i have no clue how to get them in UK2 points
-
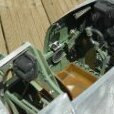
Completed the small blend area on both sides of the wing root today.....getting to that stage where i need to glass the center section or make the blanks for the undercart doors.2 points
-
I use the pritt stick method, the other option i use regularly is to print/copy the plan/part required with a laser printer. Then iron the part (toner side down) onto your balsa(etc) witn a hit iron and a bit of force. Toner is cured by heat, so the ironing process will transfer toner from the plan to your balsa, leaving a clearly visible "reverse print" directly on the wood ready to cut. In terms of cutting, i cant live without my bandsaw, and also my 12" mitre saw. Is perhaps overkill, but i didnt buy it for modelling. Loaded with a fine kerf 120 tooth blade, it makes short work of roughing ply items down to size, cutting spars, 1/2" balsa etc.2 points
-
Wound up? More like I'm in 'Training' at the moment... But on the back burner just to tease...🤫 So till a lot lot later, choo choo for now..🚂2 points
-
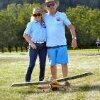
I went to the Cocklebarrow Farm Vintage Model Fly-In yesterday. It was fairly breezy but I managed a flight with the Big Guff, pictured above, which Mark Robinson filmed. A few showers arrived later in the day so most of us left early. Nevertheless about thirty of us actually flew. I've attached a few pictures of the event.2 points
-
Round 1 Tempest and FW2 points
-
The bigger Venom is now complete. The tip tanks will have to wait until after the maiden. An EDF test on 3s and a control test. https://www.youtube.com/watch?v=-jW4JktEZwk A bit heavier than I expected at 450g but it 'moves' even on a 3s.2 points
-
Mitsi Zero/Wildcat, much better colour options than most of the other suggestions, i know this is where we get divisive but Tempest/Fw190 don`t float my boat, if the kit was cheap and to support Richard i would probably put my hand in my pocket but it would go in the kit queue way down the line unfortunately.2 points
-
Maybe, but personally I am going to wait until the BMFA provides their guidance before deciding how to respond. Hopefully that will be available early next week to give people plenty of time to do so…2 points
-
My latest project2 points
-
Just finished the trim. An Ian Peacock Bootlace (AKA Miss Tangerine) built one in the '70's from a foam wing that Ian sent me and I cut a foam turtle deck myself. Always thought a slightly bigger one might be nice so enlarged my plan to 125% to give a wingspan of 65". Weighs in at 5lb 8oz. This one is all built up though - no foam.2 points
-
Generally speaking i trace the shape, tape to wood, cut outside and sand. Then i invariably wipe off the blood, cyano my wound and give it ten minutes. I would not win builders awards.2 points
-
For a change I wanted a nice simple glider for some relaxing flying. I also wanted it because I have a huge wheat field right in front of the house and a quick flight once in a while in one of those rare gaps we get would be nice. I chose the Orion-E from The Vintage Model Company.Quick and simple to build and it flies like a dream2 points
-
Hi guys, Manny at the BMFA has offered a free stand to demonstrate the art of building models with foamboard and depron. I have said i will man it both days and have my 109, Skystreak and Carvair models for people to look at and to give demos/explain how they are put together, where the materials are sourced from and how you can produce cheap light scale looking airframes using these materials. I would appreciate any help from some of you guys who are masters of the art! Are any of you available to co man the stand/ demonstrate using the materials and bring a few models along? It would be great to meet some of you as well and i`m sure we can all learn something from each other as to the different methods used to achieve the same end.1 point
-
Fantastic Michael. As Martin said, some details and tips on glassing these would be great, Maybe another thread? Graham1 point
-
I can make it on the Sunday Martin. I can bring the Regianne and Pitts, assuming they survive! I could bring the fatty Me109 for giggles too. Graham1 point
-
No. My own plan. Electric, in fibreglass covered Depron. Should be ready to fly in a couple of weeks.1 point
-
... indeed a lovely craft, John... 😃 ... but what about stopping drooling... and get that DP plan printed at 110%... !!! ... 🙄 Chris1 point
-
Only get the Original Futaba ones, if you break one open you will see why they are so expensive.1 point
-
Ripmax are still trading under a new entity, they have been bought out of Administration by Amrang Ltd who now trade as Ripmax - see the front page of Ripmax.com. or the extensive thread on the subject on this site. They state that Futaba servicing is still operating: http://ripmax.com/AR_Contact.aspx That said +1 from me for Mike Ridley1 point
-
Hi Martin, Great news. If I can, I will. I'll need to check the diaries and see if I'm spared. Graham1 point
-
I acknowledge you'd pdefer the Dora, but as an option Tony Nijhuis will scale his plans to any size. I have his 60" FW190A plan printed at 82.5". Pretty easy build.1 point
-
I would advise selecting the 'Neither yes nor no' option and putting something in the comment box. I suspect that email comments will end up in the round file.1 point
-
Yea no bother John. The D9 is easier for c/g as well due to the longer nose so it works out well as a model. If you go for the bigger FRC version that would be a great model, and if you arent too far away i have the right size Spitfire to chase it 😉1 point
-
Following. I was considering converting one of these some years back. Steve.1 point
-
Can we say Dolly ? Is even "Attractive lady " acceptable ?1 point
-
Always look for interesting pilots for new projects and came across these two fine chaps at a car boot - perfect done quite a bit of work on the wing now and ready for covering heat shrink fabric to the open structure and glass cloth and acrylic resin everywhere else, hopefully just a few weeks before ready for test flights should be interesting. Linds1 point
-
1 point
-
It’s a white paper and request for comment, so there aren’t any formal proposals. If you read the set of posts I made on page 1 of this thread plus the summary of my concerns about half way down that page you should get the main gist. Having said that, one important point… Part of how the authorities get potentially unpopular policies like this through without too much dissent is by making the docs long winded and needlessly hard to understand so people are put off reading them. If you don’t read all of it that is up to you, but so often the devil is in the details, so it it’s to read them. This particular one isn’t actually that long (~30 pages of actual content) compared to past docs on the topic from UK Gov and the CAA.1 point
-
UHU revival, now with RC:1 point
-
Hi just on with drop tank. Before I start the second one thought it worthwhile to confirm dimensions. Is the G&M drop tank (flat top foam version) 38cm long? Hope i haven’t screwed up. Checked the sclale a bottom of drawing and it was 10cm end 2 end. cheers mike1 point
-
Like this? WR Yak3. My favourite 'Bird...1 point
-
Hello All, My Weston Park 2023 article is in the September issue of RCM&E, out today. I hope you enjoy it!! Al and I had a great time in amongst all the fabulous models and talented pilots and took over 4000 photos over the two days we were there. We managed to whittle them down to around 90 which we sent in with the article. Kevin and the RCM&E team used 34 of them and I thought I would share a few of the others that we are proud of here..... Luke Oliver’s Hanger 9 MB-339 performing a lovely knife edge up the strip. One of the CARF Models Havard duo on a fly by. Gary Oliver's Yak110 on a traditional Farnborough Pass. Piloted by Gary's son; Luke. The CARF Models GeeBee on a fast flypast. The CARF FlyBaby about to touch down after a lovely display. George Shone's 19ft wing span Boing B50 beats up the strip. Dave Franks’ 1:5 scale F-16 gets away for another super display. A Dawn Patroller’s Sopwith Pup makes a safe return. The colour scheme of Steve Kilbon’s FlyEagle 1:4.5 scale F-16’s looked fabulous against the dark trees that surround the strip at Weston. The AZAerosports F-86 Sabre duo pair looked fabulous in the Saturday evening sunset slot. Finally, a small correction to the "On the cover" caption on the contents page of the September issue.... I am part credited for the photo but the photo is All Al's work, I had nothing to do with it!! He's dead chuffed to have one of his photos on the front cover!! Cheers Mike1 point
-
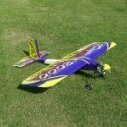
A clubmate gave me two rolls of Proficover - it's a bit like Oratex or Solartex, a very good material to work with. So I had to build something with it. The result was a control line stunter (Jamison Special) and the rc plane you see in the pictures. It's my own design and it had its maiden flight yesterday. To my surprise it flew very well despite the not too powerful old open-rockers Saito 30. Karl1 point
-
Flair D7 restoration ready for maiden1 point
-
Little progress as weather been good for going up the hill and am back at work. Sadly broke fus of the model I have been flying continuously for the last year so this will need some attention. But got the new MEKP catalyst, mixed up, painted on to half size bit of 3D print, and still sticky after 2 days! Turns out there are two types of polyester duh! 🙄 . One cures with MEKP and one cures with BPO paste, ISOPON laminating polyester is the latter 🙄 Now waiting for the other stuff. In meantime printed off a full size section of nose: You can see the 3d print layers: But light sanding and two layers of polyester should do it 🙂 And yes my 3D design skills are primitive! But will do for up the hill. I plan to use 3D print for top half of front fus. Still needs modified for battery box, ballast tubes and some longitudinal carbon rod re-inforcement (otherwise I suspect it will be vulnerable to breaking along the print laminations). Will post models for anyone who is interested later after i'm happier with design.1 point


.thumb.jpg.87af0aed4f2b73d7bee9e66539aa0d51.jpg)

