Leaderboard


Popular Content
Showing content with the highest reputation on 18/04/24 in all areas
-
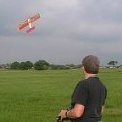
It's taken quite a while but finally I was able to maiden my Sea Hawk at last weekend's PSSA meet at the Great Orme. The launch went well (thanks to Harry Twist) and she was soon climbing away, in fact I had to feed in a considerable amount of down trim in order to maintain level flight but much of that may have been attributable to the strong winds we had over the course of the weekend. I did find it to be quite sensitive in both pitch and roll for my liking but managed to limit that with my rate switches. I didn't get to attempt a proper landing because I had a moment of complete disorientation and ended up making an enforced belly flop landing into some gorse. Amazingly no damage was incurred other than a broken pitot tube! I was VERY lucky! Since returning home I revisited my CG calcs and found an error meaning my CG was further back than I thought at around 7% static margin so I have now added another 50g in the nose to bring it forward by 10mm and giving a 10% margin. Hopefully that will make it a little less twitchy in pitch for next time. I have also upped the expo on the ailerons and elevator too for good measure. Hopefully we'll have favourable conditions for our return to the Orme next month and I'll get to fly her again Here's a couple of photos for the record: Launch photo courtesy of Phil Cooke:- In-flight photo courtesy of Dave Gilder8 points
-
Finally got the maiden flight done on my Flair 1/4 scale DR1, i have been waiting for the wind and rain to ease and the grass at the strip i do my maiden flights on to have dried out and been cut, the track across to this strip has been unpassable due to the standing water for several months. A bit of a hurried session as the full size gliders here were getting ready for a day of thermal hunting so only the one flight but it was enough to tell me i need to add a bit more weight to the tail end to counter balance the Zenoah 26 mag engine up the front. Full up elevator trim was needed which didn`t quite give hands off level flight, 36g more lead has now gone on the tail end, i think more will be needed but i will try it like this first to see how much up the up trim i can remove. Thoroughly enjoyed the flight once i had sorted the trim out (needed a bit of right aileron as well) and to cap off a good first flight i managed a greaser of a landing, not always easy on these Trip up Tripes i`ve been told, left with a smile on my face. Next job is to work on the silencer to try and get down to the noise limit at my other club, i have some ideas and if they work out i will post on here to help others overcome the problem.6 points
-
So I turned some scrap aluminium from a skip and bits and bobs lying about into…..4 points
-
I eventually removed the bubbled covering on one wing and replaced it. What seems to work is using Balsaloc on the wing skin veneer prior to applying the PVA coated, brown paper. I am also convinced that the Gorilla PVA is not the best for this job and next time I will buy some cheaper PVA from the builders merchants. I have got to the painting stage now and will final fit the flying control surfaces prior to the finishing paint coat. I have used Halfords white primer on the lower surfaces and grey primer on the upper surfaces.3 points
-
Yep a bit chilly today and the wind strengthened as the day progressed. Took the Giant Revolver to blow some dust off it (hasn't been flown for about 6 months), Laser FT310 took a while to get started as I couldn't get fuel though but pumped some through the vent which did the trick. Superb performance and had a great flight, started it up for a second flight and a stone was thrown up into the prop and as I didn't have a spare with me that was the end of its flying for the day. Still, the WR FW190 had a few flights and was excellent even in the very strong winds and I also flew my Depron 'cartoon' Butch Bird and Mossie, great fun.3 points
-
Here we go again ..... flying could be back on at our second site in Penicuik. to be confirmed tomorrow. Could be on battery duty after all. this is a grass site but the cubs big wheels will handle it with no issues. first time I'll have used this site as well so could be interesting. Toto3 points
-
Lovely flying day today if you don't mind the cold and a 10mph+ NNW crosswind blowing across the strip. Just look at those clouds! Today was the day I found out how good my use of the rudder is. Landings were quite tricky bearing in mind the pitch\diameter of the prop are no help in slowing her down (23x12). Adding to the landing speed was the only help the wind was in the cross leg and not on finals, hence she came in like a racing car. It doesn't help that the throttle needs to be kept on a bit otherwise one can see the stalling wing waggle beginning to develop. That said I managed to get it right by the third landing . Lovely day never the less.3 points
-
It may be a little while as sourcing is currently ongoing but watch this space.3 points
-
I just got back from my trip to Wiltshire today, after leaving home at 7am. It's been a long but enjoyable day. I met up with a friend who moved out of the London area over a decade ago, and I also met a few of his clubmates at the Wessex MFC. We flew out of their Poulshot field. My friend built one of my Top Quark designs from a draft plan I sent him last October. Despite it weighing in at over 1kg (the design weight is 700g) it flew really well and faster than mine. For the maiden he did the hand launch and wanted me on the tx. He describes his F111 inspired choice of colour scheme as military and mine as Disney. I kind of see his point. He's camera shy, so it's me posing with his model.2 points
-
IMG_2113.mov2 points
-
I tried the more powerful servos today and was pleasantly pleased by the improved liveliness. I still have 2 oz of weight in the nose but I really don't think it needs to be there in future. That's the next job coupled with increasing the aileron EPAs slightly.2 points
-
So here are some of the bits that I used to add some original detail to the rear cockpit. The hand pump is used to pump fuel from the spare tank located over the front passengers feet in the forward cockpit. Apparently putting the handle at 90° it opens the valve and fuel can then be pumped into the upper tank, all of which sounds fantastic until you realise this is all done in flight! The grey board on the second photo is just a guide or mockup of the cockpit to ensure everything fitted in without having to remake the rear seat and to line everything up with the models pillars which are slightly off scale but this has helped, plumbing it all in place. The transponder was a fiddle to build but the information on the internet regarding the size and shape and workings are all still available. One thing that I do need to finish off though is the decals. All the writing is white and tiny wee. I have reproduced them all in Autocad but I can’t print ‘white’ on my printer. Any suggestions? The radio in the central has similar issues (on the black surfaces) but the writing on the green surfaces are in black so I am hoping to try my luck at making some decal transfers but that is an area of exploration and yet to be resolved.2 points
-
It is closer to home...... but not for my mentor. That's why we usually fly at East Fortune. It also has the choice of grass or tarmac. I'm not fussed either way but it just opens up another opportunity to fly when the bikes are racing. Happy chappy. Toto1 point
-
Thanks for the insight guys as I said not to familiar with RCV so always good to get direct feedback. I will bench run before I use on the model anyway just to check set up etc but sounds like all should be ok. Its not exactly my first model of this type so very familiar with radial cowls and cooling issues etc. Hopefully we'll get a dummy engine in place to assist and possibly help with balance as obviously most of the radio and electrics are all shoved up the front end, bit of a squeeze at this scale, so much easier on a 1/4 or 1/3rd scale job! I do intend to complete as BEB intended, a good friend, colleague and much missed. Linds1 point
-
Unless it's painted like this1 point
-
I have a NGH 38. Test ran fine upright on the bench, later installed inverted on a locally made copy of H9 giant stik and ran fine. Not a power house by any means. But was adequate and will be adequate for a quartet TM. On the Stik I chose that engine as I needed all the nose weight so used the metal mount and the engine. Must have had 30/40 flights without any issues till I managed to get a DLE 40cc twin and more power. On the TM, if you look from the front the cowl cheeks bulge outwards and they have sufficient gap between them and the fuselage sides. The cheeks being bulged create a low pressure inside the cowl and help extract all the hot air. All you need to ensure is that all the air going in is directed over the fins as closely as possible and it will work fine1 point
-
that is pig ugly .1 point
-
Two options, put the tank in the right position or put the engine in the right position. Failure to adhere to either option 1 or 2 will result in sub optimal running and possibly a dead stick at the most at the most inconvenient time. Result..loss of model or injury, is that negligence as you knew it was not correct? Looks ok to me! Laser appreciation society view1 point
-
Could you not mount engine on its side ? Picture of model would help .1 point
-
And to think I get nervous hand launching over a flat field! Chucking your new pride and joy off a cliff over the sea must be an additional level of scary! Beautiful looking model - congrats!1 point
-
I maidened my Impala at the Orme last weekend too! Despite her hefty 1.8kg AUW she flew brilliantly from the off with virtually no trimming. With how windy it was I did have some reservations that the air intakes or tip tanks might have blown off in flight but they were unfounded. Both intakes did detach on landing though but that was the idea. I'll be looking forward to flying her again soon. Last minute checks - Photo courtesy of Dave Gilder:- And away! - Photo courtesy of Phil Cooke.1 point
-
A bit chilly and breezy here today but very flyable. As well as my new Warbird Replicas FW190 (quickly becoming my default first plane in the car) I was experimenting with my homemade EDF - the “Flat Gnat”. Slowly shifting the CG rearward and it’s getting better. Only remaining thing to address is the wierd reaction to rudder input. I’m going to drop the throw way down to see if that helps.1 point
-
Does the instrument light have a working LED bulb inside? (I half expect to hear a "yes")😃 Regarding the NGH, if you use it please ensure perfect baffle. The TM cowl opening is as such is not very conducive for model engine rotation direction and on top of that the petrol engines run hotter than glow.1 point
-
The weather has effectively stopped any more testing until a) the field has dried out a bit and b) the wind is less than 5knots! Going through the plans I noted that my long printed nose is about 50 mm to short and even worse the front part of the fuselage is not quite the right shape. 😟 Given that the next flight(s?) will always use the short nose cone I will leave the current fuselage nose shape as is for the moment, particularly as there is a fair chance it will have to be rebuilt anyway. I did however print the new longer nose and it also matches the correct fuselage nose profile, as and when it gets done. Not noticeable but at the base it is also a bit taller and wider than the original nose. Of course it is still impossibly fragile so unlikely to ever actually fly more than once!1 point
-
Before I start a new build, there is, in my minds eye, a perfect model. Not a good one, but a truly perfect one. BUT, as soon as I start the build, those wee imperfections begin to creep in. A pin splits a bit of wood, Too much cyano spoils a joint, and, inevitably that perfect model begins to be less perfect. So, that nasty thought begins to creep in...If I started a brand new one, then it would be the beautiful one that I really crave ernie1 point
-
Monmouth S Wales1 point
-
While he has popped to the loo , Ive been painting his adversary . My little fella is in a home defence squadron and as they were quite worried about being mistaken for an allied flyer in the event of a bail out , they wore a lot of arm bands etc stating clearly what they were. He looks more like a Cylon than a 1940s pilot . They may have been the baddies , but they definitely looked cool . I suppose having your tanks designed by Porsche and your outfits by Hugo Boss helped .1 point
-
Having lived with a farmer (my father) for 25 years , the reason they can be so variable is the weather, price of produce etc. , and often working on there own a lot. Glad I went into engineering , it took the Weather element out the equation. Don't forget suicide in the farming community is high, in the circle of my fathers contacts two committed suicide. When they want to talk, spend time listening and express sympathy, is the best policy.1 point
-
The mounting plate is 're-assembled' and a further cut made to allow for the body of the retract unit. A Mock up retract unit with the U/C wire is then placed in position to ensure fit. On top of this a drawing is made to create a cut out template to make your lives easier to cut out the wheel well. the unit is designed to be fitted up to the top skin and up to the leading edge.1 point
-
I'm so far sticking to the "don't start building another one until the last one is finished. I find it difficult, but I am strict with myself!1 point
-
As Martin said, the 58 and other CD designs spin standard size props. The engine will develop power roughly equivalent to a conventional 52 four stroke, and run hotter and provide some useful nose weight. Baffled correctly it will run fine and carry out it's business1 point
-
Sadly missed - I never met him but had quite a few conversations by PM as well as interacting with him on various forum threads and felt like I knew him. Lindsay, I think you’re confusing the 58CD with the “walnut whip” RCV 60 - 120 SP engines, which drove their propellers from the rotating cylinder at half engine speed. The 58 and 91 versions had a conventional layout (although with a horizontally split crankcase) driving the propeller from the crankshaft but the cylinder rotated internally to provide the sleeve valves.1 point
-
Evening all, You've probably all seen today's email reminder from fantasygp, pointing out the changed format of Sprint weekends this season. But in case anyone hasn't seen it yet, here are the relevant details; The F1 season continues this weekend and it's time to get ready for the Fantasy GP of China - it's also the first SPRINT weekend of the season. Note that the Sprint weekend format has changed a bit for 2024 - Friday has the practice session and then qualifying for the Sprint. Saturday is the Sprint Race and then the qualifying for the Grand Prix. Sunday is of course, the Grand Prix itself. The game will lock when Sprint Qualifying begins on Friday, see timings below. Make sure you're happy with your team and predictions before the game closes at the start of qualifying! Here are all the important timings for the weekend, all timings in BST (GMT+1). - Friday: 4:30am Free Practice & 8.30am SPRINT Qualifying (GAME LOCKS) - Saturday: 4am SPRINT race, 8am Grand Prix Qualifying - Sunday: 8am Race Start Get your team ready before FRIDAY 8:30am BST (GMT+1) So - my summary - don't wait until Friday to do your predictions - as after 8:30am you'll be too late! I've done mine already, and there's a slim chance I might get a quick look at the P1 results (Friday 4:30am!) and amend the predictions before heading off to work. (I did say, a "slim chance"!)1 point
-
Some photos just edited from our first PSSA event of 2024 this weekend (13/14th April) upon The Great Orme, Llandudno. High strength SW winds resulted in a lot of good flying over the two days and a big attendance as always after the Winter break. Link embedded in the image.1 point
-
If the clus rules are NO FLYING while karting is going on then thats the club rules and members should adhere to the rules at all times and they cannot or shud I say should not feel they have the right to ignore them as they see fit,,, Nor can they over rule the committee..... What they can do is ask for the rules to be chaged either at the AGM at the end of the club year or ask for an EGM to be called which it will then be put to a club vote which if the club as a whole decide to keep the rules as they are including any/all no flying at stated times then the rebelious members basicly have 2 choices,,,, Accept the club rules as they are and follow them or go find another club or failing that face the the consiquences of breaking the rules and being kicked out the club specially when it comes to the safety of others A blunt answer im sure but a correct one i feel1 point
-
Its all about creating a model that looks far more detailed than it really is . That suits these two entry level kits because they are supposed to be quick build, no fuss models , but that doesn't mean they have to look ordinary . Im still waiting for exhaust stacks before I call it a day . Also got to give the rudder an impression of fabric covering .1 point
-
The existing rules and regs regarding model flying and public gatherings, sporting events etc are readily available so the need for lawyers etc shouldn't be needed. Likewise, dealing with club members who don't follow the directions of their committee can be dealt with under that club's existing rules. Equally, if a committee is felt by members to be exceeding its authority, then club democracy can be called upon to put the matter right.1 point
-
If you read totos other thread (First taste of the sky), you'll see he has received lots and lots of advice - often incorrect, misleading, or contradictory. None of it resulted in a satisfactory ic experience........... any advice or comment I give is based on his past experience, and trying to minimise the risk of further disappointment. I'll make no further comment on this topic.1 point
-
As I had a few days to my kick heels in the work shop due to bad weather I decided to do a job on the Capiche I have been promising myself for a while. Partly due to my wanting to save costs I put a set of HV Macgregor digital servos with a stalling reading of 21kg/cms at 8.4v in the Capiche. In my defence I was guided by the manual which was written for another time which featured a similar recommendation for most of the servos around this sort of level. Well after a few flights I thought a move to more powerful HV 31kg/cms at 8.4v servos was more appropriate as per the rest of my 50-60cc squadron. Well in my musings in the W/S I notice my SkyWing 71' Edge 540 sporting an equivalent 35cc Dualsky motor on the front has these more powerful servos installed. A bit of an overkill possibly. Anyway the current servos in the Capiche would be just fine in the SkyWing Edge. Therefore for I set about swapping them out both planes this morning. It was a fiddly job mainly because of the elevators wires going through the fuselage, but in the event it didn't take too long to do the job. I am looking forward to the next outing for both and I will report back here.1 point
-
Hi Lol, how come you can put a good bit of effort in and apparently make very little visible progress 😂. Anyway, servos all mounted and AMT working. Going with pull pull on rudder. Fuselage all closed up and wing belly pan finished and model sanded down. Just the tail pipe, gun ports and tail, wing fairings to sort. Will probably glass fuselage and fun/rudder separately before assembling and finishing up fairings all round. mike1 point
-
Back after a holiday to find the weather hadn't improved greatly, still, there's always the hill and I had plenty of company yesterday.1 point
-
Try climbing out quite steeply then put in a bootful of left rudder and the SE5a will do a remarkable tucked under turn around into a tight spin, all on her own - it would be a brilliant evasive manoeuvre in combat - it's great fun though if you stop it after half a turn and come back towards yourself.1 point
-
Yes , but what scale is the Orange ?1 point
-
Or use one of my new self powered and flight controller / GPS equipped ones that automatically returns to base! Having said that, if you're flying on your own take off at a slight angle so that the dolly runs off to the side leaving enough room to land, if you're with flying buddies get one of them to retrieve it for you!1 point
-
I came across these on a website. May be useful for those who wants to add cockpit details.1 point
-
I went down a real rabbit hole with the 3D modelling. But I now have a full solid model of the tail section and feathers - took ages - there's not a single curvature or even bi-linear surface anywhere on a spitfire 😞 So all of the lofting etc takes ages. Result is a quite scale body with NACA 0010 fin and tailplane sections: Would I do it again --- hmmmm... maybe not! But one of my goals was to come up the learning curve in the modeller.1 point