Leaderboard


Popular Content
Showing content with the highest reputation on 19/04/24 in all areas
-
Down in London, went to Gordon Ramsey's for lunch, picked the cheapest item on the menu....Boneless chicken...£48.00!...waiter brought it to the table....a fried egg!! ken anderson...ne....1...... egg dept.5 points
-
Batteries ready. One or two were sitting in the high 90% range from the last charge so did not bother trying to charge them again. Eight batteries in all so plenty scope for a good few flights. Hopefully tomorrow it will be a quick practice flight just to get my hand back in and get used to the orientation of the new site. Then .... back onto the main event. A flight with take off's landing and circuits.... then a couple with a mixture of figure eights, procedural turns and a couple of aborted landings and touch and goes ...... that's the plan. Fingers crossed. Clean flights and no mishaps. Toto4 points
-
I'm going to be posting the order forms out to those who have confirmed their desire for a Tempest on Monday . This system worked well on the 190 logistics , so keep an eye on the post next week . There will be a stamped addressed envelope included so you just have to tick a few boxes and sent it back .3 points
-
Another useful tool here . The sanding drum . Makes lightwork of the edges and tidies up nicely . Just fits in a standard drill chuck . That is pretty much it . Apologies for mine looking rough , but I'm sure you appreciate I dont really have time for hanging about . I reckon you could do the whole lot in an hour if pushed . But to be fair .......Ive done a few . Any questions?3 points
-
I am guessing you mean Tayna batteries and auto correct has changed it. They have a very good reputation.3 points
-
My local field is still like a swamp but flying is now possible at another club. It's great to blow some dust off some old favourite models.3 points
-
I eventually removed the bubbled covering on one wing and replaced it. What seems to work is using Balsaloc on the wing skin veneer prior to applying the PVA coated, brown paper. I am also convinced that the Gorilla PVA is not the best for this job and next time I will buy some cheaper PVA from the builders merchants. I have got to the painting stage now and will final fit the flying control surfaces prior to the finishing paint coat. I have used Halfords white primer on the lower surfaces and grey primer on the upper surfaces.3 points
-
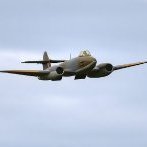
It's taken quite a while but finally I was able to maiden my Sea Hawk at last weekend's PSSA meet at the Great Orme. The launch went well (thanks to Harry Twist) and she was soon climbing away, in fact I had to feed in a considerable amount of down trim in order to maintain level flight but much of that may have been attributable to the strong winds we had over the course of the weekend. I did find it to be quite sensitive in both pitch and roll for my liking but managed to limit that with my rate switches. I didn't get to attempt a proper landing because I had a moment of complete disorientation and ended up making an enforced belly flop landing into some gorse. Amazingly no damage was incurred other than a broken pitot tube! I was VERY lucky! Since returning home I revisited my CG calcs and found an error meaning my CG was further back than I thought at around 7% static margin so I have now added another 50g in the nose to bring it forward by 10mm and giving a 10% margin. Hopefully that will make it a little less twitchy in pitch for next time. I have also upped the expo on the ailerons and elevator too for good measure. Hopefully we'll have favourable conditions for our return to the Orme next month and I'll get to fly her again Here's a couple of photos for the record: Launch photo courtesy of Phil Cooke:- In-flight photo courtesy of Dave Gilder3 points
-
This is what sometimes happen to me!!!!2 points
-
I thought the issue with the battery in my 2017 Skoda Fabia might be of interest. One evening, a few weeks ago, the alarm in the car suddenly went off as it was parked on our drive. I tried cancelling it with the remote, but it continued for five minutes or so, then stopped, at which point the car went dead. Nothing worked. No central locking. No engine management lights. The following day, however, I found that the battery voltage had dropped so low that my smart charger wouldn't kick in as a temporary fix and neither I or a neighbour had jump leads. Obviously, I needed a new battery. Manufacturers recommend you change them every five years or so. Mine was clearly living on borrowed time. So, having shopped around online, I found Halfords and EuroCarParts had the Exide 027 battery I needed for around £145, with Halfords wanting £27 to fit it. But then I found a battery specialist in North Wales called Taymar who were selling it for £89.99 including next day delivery. I was initially suspicious about the price difference, but I went ahead and ordered it anyway. I have to say their service, packaging and communication was excellent. In less than ten minutesI had fitted the new battery and I was back in business. Now, here's the bit that caused me some head scratching, my car has stop start capability and there seems to be some misinformation on line about battery coding when it comes to cars with this feature. I don't pretend to fully understand it but some cars with stop start, need to be told that a new battery has been fitted via a code and an OBD-II reader. However, as I subsequently found out, this only applies to cars with an AGM ( absorbent glass mat) type battery, not as in my case, an EFB battery. In fact EFB batteries don't have a code on them because it's not needed. You live and learn.2 points
-
Just waiting for the new set of castings to arrive for the next two2 points
-
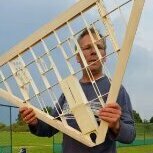
The ribs need to be flush or nearly flush with the bottom wing skin . When you are entirely satisfied with the fit . , brush some water into the cuts and then add the laser cut mount with golden gorilla glue . It will expand to make a really good grip on the foam . You can sand off nay slightly proud bits later . The kits will also include some strips of ply to line the wheel wells . I have a stock of plastic wheel wells , but never found them easy to fit or convenient . They work better on built up wings , but even then they have snags . Wood is easy as it glues well and is quick to fit . Later you will see that I lined the bottom of the wheel well with a cardboard disc.2 points
-
Reminds me of the story my father told me many years ago, of how he was behind an open top sports car in heavy traffic one day. In the passenger seat was what appeared to be a long haired blonde woman. ‘She looks a bit of alright!’, thought my father to himself, so he made an effort to pull up on the near side for a look at the next traffic lights. It was an Afghan hound.2 points
-
IMHO add weight that you can take out of later and get the C of G to max 80mm. Maiden time is normally high workload so and until you have its measure and trimmed in you don't want something too lively! A 3 way switch with elevator rates is a real benefit as if needed you can calm it down or not, but I think you will find the FW190 a very pleasant model to fly with no vices I have found. PS When it comes to landing you should be able to slow it right up!2 points
-
Drawing quotes 70mm, but its very tolerant and to save adding lead only to then remove it I maiden mine at 78mm and it was fine (might remove some more when I get around to finishing the model! Ron has mentioned hos is as far back as 100mm (did say its very tolerant !) and the point there IMO is the elevator becomes progressively more effective as the C of G goes back so don't fly with massive elevator throws if the C of G is a long way back from 70mm conversely don't have little travel and C of G at 70mm. I put a little up on my elevator...that I then had to remove, IMO set flat. PS one of the advantages of a more rearward C of G is it will take off and land slower, handy for the dolly launch.2 points
-
I sourced a 3d printed pilot roughly the right size off of Ebau once painted an obligatory ‘in the office’ photo was needed! Tbh I enjoyed the painting process and he’s not too shabby looking for a first effort. started on the wing centre section - seems ok apart from ribs 1 to 5 needed the rear spar slots either put in, or re positioned - not sure if there’s a fault in the file at the cutters but in all honesty it’s a minor issue that’s easily solved. Unfortunately I’m back at work for a few days so nothing more will be done until next week now.. hopefully get the top sheeting sorted on the centre section.2 points
-
It is closer to home...... but not for my mentor. That's why we usually fly at East Fortune. It also has the choice of grass or tarmac. I'm not fussed either way but it just opens up another opportunity to fly when the bikes are racing. Happy chappy. Toto2 points
-
And to think I get nervous hand launching over a flat field! Chucking your new pride and joy off a cliff over the sea must be an additional level of scary! Beautiful looking model - congrats!2 points
-
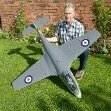
I really like the idea of something Japanese. The German, US and UK WW2 planes are constantly modelled, but there aren't many kits for the Zero or the Nakajima. Maybe instead of the Mosquito a Betty Bomber would be a better subject? I'd like the model to be a belly lander and of similar scale to the FW190. The Japanese had some interesting stuff with fixed undercarriage too. Torpedo bombers and dive bombers. There were also a wide range of colour schemes. KB1 point
-
The way our post is it will probably come the week after!1 point
-
I was so excited at the thought of actual real life RETRACTABLE wheels I totally forgot there’s a wheel at the back. Honestly I’d be happy with a little stick, but I’m new to all this.1 point
-
A barrel roll, looking at the undercarriage....1 point
-
They came off in a roll?1 point
-
Strewth! What happened to the wings???1 point
-
Not sure if anyone's ever mentioned a very important safety related issue.....................Never, ever, say "I'll just have one more flight" - you might just about get away with........ "I'll have another" "but keep absolutely schtum about uttering "one more flight"!!!!1 point
-
I grafted two stainless steel boat silencers on one of my Dle Ra's, and it was really quiet, like an old properly silenced methanol .60,,,1 point
-
Dependingon what car you have the ECU usually doesnt regulate the charging. Its the BCM (Battery Control Module) that needs resetting . Some cars can be reset by pressing certain buttons but other need a OBD reset tool often combined within a code reader. Not a lot of money these days and after a couple of uses for code reading etc they pay for themselves as garages often charge an hours labour to plug it in and read any codes. The engine light or mill light is often refered to as an idiot lighf by some mechanics. Halfords charge £27 for fit and reset i believe !1 point
-
That's why I didn't mention Castor oil in the same post,,😂,1 point
-
I'm flying mine at about 80mm with the standard control surface throws. I'm not a very experienced pilot but like that I'm finding it very user friendly. Good luck!1 point
-
She looked the part Phil, great work. I'll try and get one of my Sea Hawks sorted for the next even so we can fly some formations 🙂1 point
-
For low use or hobby cars or cars on a SORN a maintenance / trickle charger is a good investment. Dont forget nealy all cars from the 80s onwards had a an alarm or built in computer that draws a few mah that will drian and damage a car battery after a few weeks . I have a trickle maintenance charger in my hobby car , costs around £20 uses hardly any power and keeps car battery healthy and ready to go and far cheaper than replacing battery.1 point
-
As far as I can recall, in the 10-30cc bracket, we only have two 'effectively' silenced petrol engines in the club. Both have pipes that cost £150 or so. I was once told that to effectively silence a petrol engine, you'll spend as much on noise reduction as on the engine itself....... probably a slight exaggeration! Personally, I'd wait until the intended home for an engine is determined before shelling out on a solution that may be unsuitable e.g. a nice shiny pipe may be ok on a sports model, but offend you on a scale model....1 point
-
Every time I see a nice Corsair, I think "I need one of those"....... (Sadly the twist n turn retracts always put me off. Maybe one for when I've more Warbird experience).1 point
-
Thanks for the insight guys as I said not to familiar with RCV so always good to get direct feedback. I will bench run before I use on the model anyway just to check set up etc but sounds like all should be ok. Its not exactly my first model of this type so very familiar with radial cowls and cooling issues etc. Hopefully we'll get a dummy engine in place to assist and possibly help with balance as obviously most of the radio and electrics are all shoved up the front end, bit of a squeeze at this scale, so much easier on a 1/4 or 1/3rd scale job! I do intend to complete as BEB intended, a good friend, colleague and much missed. Linds1 point
-
Flight tested today. 4 oz. of lead removed from over the engine. CofG 1/2” back from plan position - elevator reduced to plan specified (3/8” up and down) amount. No apparent reduction in stability (it’s some time since I last flew the model) but still eager to nose over. Grass freshly cut but quite damp and draggy for the little 2” wheels. Inverted flight required definite push so I’ll be removing more lead.1 point
-
Or do this to it,,, It's one of the first pictures, I have got the spray bay in line with the crankshaft in my PC-9, after putting another extension on it.1 point
-
Congrats again on your successful maiden flight Phil, it looked excellent from what I saw through the camera lens, glad you got it home safe despite the orientation moment. Look forward to seeing the model trimmed and balanced again in May!1 point
-
If you read totos other thread (First taste of the sky), you'll see he has received lots and lots of advice - often incorrect, misleading, or contradictory. None of it resulted in a satisfactory ic experience........... any advice or comment I give is based on his past experience, and trying to minimise the risk of further disappointment. I'll make no further comment on this topic.1 point
-
only the one at the bottom and a small hole at the top to put a screwdriver through if you need to adjust the engine. Without the hood, run in the engine according to the instructions. With the cowl on you will have to adjust a bit. You'll be flying in no time. Install servo just behind the firewall. much better. with a servo tray just behind the firewall.1 point
-
Hello all ! Primer is painted ! Just a few weeks sanding before she gets her camo jacket fitted !1 point
-
Just a quick mention- I’m not a ‘builder’ - prior to this I’ve only built a galaxy models magician, top flite sea fury and dabbled with a Brian Taylor mosquito (gave up on that as too complicated at the time!). just want to show folk that with a bit of patience it’s possible to build something from a plan that even an inexperienced builder can be proud of. It may not win any awards at the nationals but I’m happy with it… I really like the brown paper method of covering - paper and all paints used (grey/blue/black/white) will have come to about £15 so it doesn’t break the bank!1 point
-
A dream to fly with 2 Saito .45 Specials, 8 years old now.1 point
-
Back after a holiday to find the weather hadn't improved greatly, still, there's always the hill and I had plenty of company yesterday.1 point
-
A bit more EDF practise today with the Depron North American XB70 Now very old for foam. Built in 2014 and last flown in August 2022. 70mm EDF exhausting through 6 scale nozzles which is not the most efficient set up but it works well enough. Just 3 minutes is all I got from its 2200mAh 3s but belly landed no problem. After 10 years it is now a bit "tatty". Needs some TLC.1 point
-
One thing i learned over the years is that you can never have enough SPACE AND TIME ! I worked all my life to have my own shop , wich i build myself . It's 100 sq M , two stories high , very happy with it !1 point