Leaderboard


Popular Content
Showing content with the highest reputation on 09/09/23 in all areas
-
I made a few more detail items and once again old biros have proved to be a most useful source for such things I made the small air scoop on the right hand side over the wing from an old pen top, a little bit of filler and a piece of thin ply and then the wing tip pitot probe from a biro inner, which still had some red ink in so that might prove messy should I ever damage it! I also made the two little aerials on top of the fuselage using pieces of snake inners which I made a push fit into some soft close cupboard door buffer pads so like the pitot probe I’ll be able to remove these for transportation. I finally decided where to fit my receiver switch, it’s snug but there’s just room for it behind the ejector seat. It’ll be out of sight but just about accessible with the canopy removed. With everything in primer it was now time to start with some colour. As per Phil Cooke’s recommendation I decided to use Lifecolor paints from airbrushes.com. After some research and from their ‘Mimetic’ range I used UA095 – Sky for the underside and UA516 – Dark Sea Grey for on top, along with the Lifecolor thinner. Six of each colour and a 250ml bottle of thinner proved about right for the task. I used the airbrush and compressor I bought last year for my little Alpha jet build I’ve not had much experience of airbrush spraying, all my previous Correx builds have been finished with rattle cans and/or vinyl so once again I’m on something of a learning curve here. That said it all went reasonably well and before long I had everything painted up in the sky colour. It took 4 or 5 coats to get a consistent even finish. Initially I had been using a 0.2mm spray nozzle but soon found the larger 0.4mm provided much better coverage. At times I was suffering with a gradual build-up of liquid paint in the nozzle which if left unaddressed would then splatter onto the surface I was spraying so found that soaking this away with paper towel every so often would help. I was mixing the paint like for like with thinner so maybe a different ratio would have helped or different pressures, I was spraying at around 20psi. With the sky done I couldn’t resist finishing off the arrester hook and applying some gloss. After some careful masking it was then onto the grey. The grey seemed to cover so much better than the sky had done. The blob on the tail fin was a nightmare to mask. I first masked off the plane and sprayed the whole blob in Tamiya flat yellow after which I then masked off the yellow and sprayed the black. I had a bit of seepage in places so there was quite a bit of touching up required afterwards but it didn’t turn out too badly. And then I masked and sprayed the concave exhaust surfaces in silver too. I finished my pilot and ejector seat off, making his harness straps by folding masking tape back on itself and cutting the required width and then painting. Perhaps he could really do with an oxygen mask and maybe a visor too so maybe I'll have a go at that sometime. I added my instrument photos to the unit I had made previously, after which I was then able to spray and fit the canopy. The Callie graphics vinyls were a delight to apply. I had to cut some of them where they overlapped the servo covers and ailerons. I was a little fearful when applying the fuselage roundel that the opacity of the vinyl might not have been sufficient when bridging between the grey and sky colours but my fears were totally unfounded. The ridge from my masking between grey and sky can be seen but the colours of the roundel are completely unaffected by the fuselage’s colour change. I wanted to add some further detail over and above the Callie graphic vinyls so with some assistance from my daughter in the graphics department we made some additional waterslide decals. I printed them onto clear waterslide paper so their colours got dulled down a bit once applied to the fuselage but they look ok nonetheless. I decided I wanted to add one or two panel lines, something else I've never attempted. I’m not sure quite how far I’ll go with them yet but for now have added a few around the exhaust, the trim tabs on the rudder and elevators and the flaps on the wings. There’s more still to do on the fuselage. Initially I planned on using some water based ink art pens I had since there was a good range of colours to be had but found they didn't mark that well and smudged all too easily so ended up using a black ultrafine Sharpie instead. Before finishing the fuselage and whilst the weather was good and warm I chose to spray a gloss finish over everything else instead. I am using Plastikote clear gloss and will probably break into a third can by the time I’m done. So here we now have a little SHINY kit of parts, all now ready for assembly All that remains for me now is to finish detailing and then glossing the fuselage and I’ll then be able to put it all together, if all goes to plan I reckon I should have a finished plane by the end of the month.12 points
-
Well ..... the big breakdown of today's goings on. Flight one ..... great take off leading into quite a few reasonably good circuits. Rectangular and a couple of figure of eights. Lovely smooth turns with just the right amount of aileron to give that swooping controlled look. .... happy. About half way through the flight ....... dead stick ...... my instructor brought her down with o damage what so ever. My instructor has not been totally happy with the fuel tank set up so it was decided to install another slightly different tank and fittings. That was comp.eted pretty quickly and back up she went for a second flight. Lovely take off .... even better and more sedate / convincing than the first .... very happy with that. Once agai ..... some pretty good circuits being flown, my instructor leaving me to my own devices as far as patterns that I was flying as he wanted me to get a good feel for the mldel prior to preparing me in readiness for some slightly lower flying circuits .eading to Lear long landing approaches and low passes. All going well and then got myself into a bit of a spin. .... don't know how it became so violent but it did. My instructor jumped in but could mot seem to save it from plum eating earthwards where it headed at a fair rate of knots. The long walk of shame was undertaken to retrieve the ,model which had came down a fair way out in the neighbouring field. Model retrieved and the damage looked fairly extensive but at first contained to the rear end. The elevator was completely detached from the tail but in one piece and u da aged at all. The tail where the elevator and rudder attach to was badly damaged ....... but repairable ( more on that later ). The wings had taken a dunt to the extent that they were forced about 4 inches along to one side. Several punctures both top and bottom and several aileron hinges ripped apart. ( not as bad as it sounds ). A gaping hole on the front underside of the under carriage and the wire wheel axles pretty badly bent and a broken prop. There were other bits of localised damage but I wont go on ....... I think you get the picture. So ... back to my instructors house / shed. Back end sorted. The severely damaged rear structure that holds the elevator and rudder was repairable luckily due to the way and location that it had sheared. That was sorted and the elevator and rudder back to serviceable condition. A couple of patches to the film finishing also done. The repair to the undercarriage and to the area damaged around the wing banc poles on the side of the fuselage which had been shunted forward reaking the fusealhe sides a it. ..... sorted. Wheel wires straightened out and various wing film punctures repaired. Both ailerons totally detached and rehinged as it was easier than trying to fixing around 60 to 70 percent damaged hinges. Broken prop taken off ( at my own house tonight ) but no replacement to fit until tomorrow morning. I've probably missed the detail on some of the other slight bits of damages as there were more. So ........ a few odds and ends to do tomorrow before going back up. Also a very thorough test of all repairs done and in general to all operating / control surfaces to ensure all are functioning properly. So ..... in summary ..... not the desired final outcome but what I can take away from it is that with the exception of the unexplained spin ..... my flying was pretty good. I can only wait until tomorrow to see if the repairs are up to it and of I continue from where I left off, or if other potential model issues will raise their heads. I think I'll sleep on it ..... toto3 points
-
Interesting article regarding the drone delivery and 'grab of airspace'. Thing is are they are delivering stuff to the NHS , in which case is the pharmacy located at the take off point or does stuff have to be delivered there first. OR is this a concept experiment in which case the whole of the UK would be a no fly zone for models, light aircraft, handgliders, micro lights etc and yes I know that this was the very reason RID is being proposed. The funding provided by the state? should be reclaimable if they get the go ahead. A proper trial would be to have a minimum of 60 up in the air at the same time leaving and travelling to assorted points within the corridor. Then it could be seen how they avoid one another. If they are using RID to aid avoidance then any company using airspace occupied by models, light aircraft, handgliders, micro lights etc should have their RID equipment purchased and supplied by the commercial operator. They are invading airspace already in use and if the governments intends licensing and thereby generating an income seems only fair that the operators also shell out to the current authorised users. Just a thought3 points
-
Thick fog at 7:30 am this morning. Even the Red Arrows display was cancelled for Southport airshow. We managed to fly UMX's and 3d planes close in for the first couple of hours and gradually the fog got burnt off and left a hot sultry day. All sorts of things flown, and lots of tea and bacon and sausage butties provided by one of the lads who brings a stove with him and the contents of his van as pictured 😁 Great days flying... Eventually😁3 points
-
Flippin,' hot! 28°, light wind. Some of us brave souls spent a nice few hours in the heat....3 points
-
It's a proper modeller's paradise in Middle of Lidl today. I badly needed some extra organising drawer unit capacity, but missed out on the Parkside offerings a few weeks ago, so when I went along they were all out and When It's Gone It's Gone! Anyway listed for this morning was a nice 12v Parkside cordless Li-Ion rotary mini tool - like a Dremel - with a bunch of accessories for twenty quid, so I popped along. Blow me they had the 30 drawer organisers back in stock, even though they weren't listed. In the meantime I'd mail ordered one from somewhere else, so I ended up with two today. Have to say that the quality of the Parkside item is better. Loads of other accessories for the mini tool on offer for grinding, cutting, sanding and some neat little boxes of micro drill bits ranging in size from the square root of nowt up to 3.2mm in small increments - three separate boxes, all neatly colour coded. I've found that you can't have enough mini-tool accessories, so stocked up on a full set. Well worth a visit to Lidl today - I don't expect those rotary mini tools will hang around for too long.2 points
-
79th anniversary of the Kassel raid, model event Tibenham airfield by Philip Goff » August 24th, 2023, 3:25 pm Dear All To round off the season. By kind permission of the Norfolk Gliding Club. 79th anniversary of the Kassel raid, model aircraft commemorative event. Friday the 29th of September 2023 Tibenham airfield Norfolk. The event is open to any model. There will be a minute silence at mid-day. Caravan and camping will be available and there is also toilet facilities. Thank you Regards Phil Goff2 points
-
Could have been worse. An electric scooter. 🤣2 points
-
He should have stuck to trucks, he's just been pulled off a bike.2 points
-
But if you are are on a BMFA or similar site that is known then there is no need for a RID as it will be registered site to avoid at all times.2 points
-
Ladies should look elsewhere. . . He is definitely not Mr. Right.2 points
-
How about.....RID on a LOS R/C model aeroplane achieves absolutely nothing.2 points
-
Once Brian’s plan arrives I intend to get it both scanned and printed. I’ll let you know how things line up. I am of the opinion, it’s close enough for our purposes. That is what sandpaper is for. 🙂 Dave2 points
-
Just goes to show, different perspectives - I haven't seen a truly genuine reason whey we should have remote ID, given a century of safely operating model aircraft without it.2 points
-
They also have a plasma cutter for all budding bank robbers2 points
-
My wife is going for a serious operation so I needed to keep myself busy and healthy so I decided to spend some time cutting parts for these 2 projects and not tempt fate with lots of balsa dust and cyno! The Red Eagle is for me as it is a nice simple build for when my wife is recovering and the Archie is for my son. My son has wanted to replace his Archie that he built whilst still in school and was lost in the fire.1 point
-
Over the past few weeks I've been gently modifying a vintage MacGregor Digimac III 27mhz transmitter to 2.4ghz, using one of Phil Green's excellent encoders and a Lemon 2.4ghz module. It's all part of my recent vintage nostalgia kick, aimed at successfully flying a KK Outlaw with the 1+1 single channel set up, which I failed to complete a flight with in the 70's. At the time I'd scraped together my pennies from my various part-time jobs as a teenager, to get a Gem 1+1 set from Roland Scott's, a KK Outlaw from the Manchester Model Shop in Deansgate and a PAW 2.49RC from Forshaws in Wigan. What I'd always wanted though was the blue-anodised class of a Digimac Proportional set, but my funds wouldn't stretch to that. Just this summer though, work on the Outlaw and a couple of punts on eBay saw me finally get hold of a couple of Digimac transmitters. In all a complete Digimac II set-up and Digimac III and IV transmitters only. I thought I'd start with the three channel set and thos was a nice clean example. First step was to remove all the 27mhz innards, but to retain the On-Off Switch and with the intention to use Phil's encoder, plus a Lemon 2.4Ghz RF module from Stuart Mackay. I don't have any sophisticated test equipment, so it will be a simple function test and range check to ensure all is well. I've also got a plan for a wee depron Super Sixty -more like a Super 30 - to use as a test bed. I followed the excellent document on the Mode Zero forum regarding set up of the encoder, with the assignment of the different channels, paralleling up the unused channels and getting the three main function connected to the existing pots. I wanted to maintain the look of the transmitter externally, with the only addition so far being a S/C button on the front fascia, beneath the main flight control stick in Mode Two configuration. Having read on Mode Zero of the benefits of flying On The Button, but with a safety net of the rudder-elevator propo stick to hand. I wasn't sure of the preferred position for the S/C button, so intended fitting another, on the top right of the case and having one sequential and the other compound. The other thing I considered vital was a throttle cut switch, as on my existing modern transmitters for electric flight - a long throw 2 position switch on the top right of the transmitter. Unfortunately the supplier sent two short throw, 3 position switches by mistake, so that remains to be fitted. Once that is in place I'll be able to fit the second S/C button. I've made provision for rates and expo internally, using the pots recommended in response to my question on Mode Zero. I 3D printed mounts for the encoder, RF module and the rate and expo pots, plus knobs for those pots. I decided against having the rates on a switch, but that might conceivably change. Power is provided by a 2 cell 2800mahl Li-Ion pack, which fits nicely in the space beneath the rates and expo pots mount. The 3D printed mount for the RF module resembles an oil production platform, supported on four nylon bolts which engage with captive nuts affixed to the case with double sided tape. That positions the aerial connection in the ideal location to accept the short antenna as it emerges from the 2,4ghz aerial housing. Phil Green was a great help again in providing some Zener diodes and resistors to make the meter function as an extended range meter, compatible with the 7.2v Li=Ion pack. I'm just waiting to fit those last two switches before the grand switch on and keeping my fingers crossed that the magic smoke signals don't spoil the show. Ultimately I want to dedicate this set to operating my Outlaw and, assuming that's successful, will make the same conversion on my Digimac IV, probably to drive my forthcoming Mini Super. The Pontefract retro fly-in back in July was a great catalyst to encourage me in this project. The single channel and vintage enthusiasts over on the Mode Zero forum have been marvellous, as their collective knowledge and encouragement has made this first attempt at a conversion so enjoyable, but especial thanks to Phil for answering the daft questions of a complete electronics neophyte and providing such super support throughout.1 point
-
This weather is too good to let it pass us by. So I have been out fling this lot again. And it was good to give The Sipa a good airing. Steve.1 point
-
Very surprised the aircraft wouldn't come out of the spin. The only thing I can think of is a CG too far aft?1 point
-
This video was produced 8 years ago. It shows the value of drones and what help they can provide in an emergency. Let's face it, most of our flying sites are in remote places so this technology should be embraced by us, hopefully while still allowing us to continue enjoying our hobby without too much restriction.1 point
-
I didn't know the U.S. navy did crop spraying. Maybe it's a feeder for fish farmimng. 🤣1 point
-
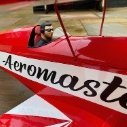
That's a superb finishing job Phil! I'd be scared to fly and scratch it (at a minimum!)! Great lesson in painting techniques!1 point
-
As per title . MMFC Situated near Iwade in North Kent is having a Swap-meet starts at 10 am , 9am set up. £7 a pitch . All buyers£1 . All profits go to Air Ambulance charity. Followed by an auction if enough interest. Free entry and small donation to charith if you sell anything. Then some fun comps in the afternoon , nothing serious just simple flying comps and spit landing stuff. Nearest post codeis ME9 8QE. For map go to Facebook.com/Medwaymfc click on Main flying field near Iwade.1 point
-
Aha, fat finger syndrome strikes again 😀 . A spit landing sound a good idea though 🤔1 point
-
I do like a good gobbing session1 point
-
Cunning. It's for the NHS so automatically gets Joe Public well on-side. It's then but a small step to imposing further blanket restrictions in the interests of security, jobs, borders, etc. This is one instance where RID, if used on 'hobbyist' drones or model aircraft, would obviate the need for blanket airspace restrictions, assuming the commercial lower airspace operators employed sufficiently intelligent collision avoidance systems. I don't think that it's unreasonable that this be demanded of them. They are, after all, the interlopers into 'our' airspace.1 point
-
Mine was free with a model mag years ago.1 point
-
After the new programmer turns up and you've used it, you'll go to put it somewhere safe. That's where the old one will be.1 point
-
Eric - spot on. I doubt that any of the plastic bags implicated in the "attacks" on UK airports even had their 73-digit Operator ID displayed correctly and they don;t even need a specialist tool to open them up and see inside....1 point
-
Good game. Biggest issue I have these days is that just about every scrum, or ruck, results in a penalty, and pretty much every international side can bang them over from anywhere in the oppositions half.... minor whinge over!1 point
-
Hi folks Still no second flight yet, the weather has been unsettled, but spring is slowly approaching so should be in for some fine frosty mornings to go flying. Finished those 2 pilots as best as I could the eyes give me trouble but it will do. I dragged the 1/4 scale Fokker D.VII down from the rafters. This plane has been quite the hanger queen for a good number of years. I started it about 8 years ago, but was very interrupted due to the nature of my work which took me overseas for 6 to 8 weeks at a time. Anyway this is the year it will fly!! The model is a Balsa USA plan and I built it from scratch. 88 inch wing span and about 9 5 kg all up weight. I will spend some time over the next few weeks making sure that everything is in order. Will update you on the progress. Cheers Steve1 point
-
Keep pushrods straight if you can, don't obsess about the hinge line for equal movement, you can sort that via TX.1 point
-
My tip for winning it is the Boks, be a laugh if Eddie led the Aussies to glory though.1 point
-
When I first converted my Wot 4 many years ago I used an Axi motor with 16 3300 NiMh like leckyflier, it flew well but a bit porky. Then I tried 4s 3000mA Lipo when they become more affordable, it went ok but much nicer on 5s 3000mAh lipo. Model is now in retirement but all the gear went in a Rival that I built. The Rival is nicer with 5s Lipo but about 2lb lighter it goes well.1 point
-
What a wonderful description!🤣1 point
-
From a couple of weeks ago at Winterton Model Flying Club. Pilot is on order and windscreen is being made as I think it would finish the Ohmen of nicely.1 point
-
Well I managed to make good use of the nice weather we have been getting. Flown these and my Lidl Autogyro which is still going well. Hopefully out again soon. Steve. 😊1 point
-
It may be just me, but I like to drill a small hole to mark the end of the intended slot before attacking it with a scalpel - helps to stop the slit becoming a split. Then, to turn the slit into a slot, I have a small double ended saw blade that fits in a scalpel handle - it came in one of those cheap craft kits full of odd shaped and not very sharp blades. It’s the only bit I use from that set but it’s certainly earned its keep over the years, exclusively for widening hinge slots.1 point
-
Bas To reiterate, the channel order is governed by the settings in your transmitter, for that particular model memory. If you go to System Setup Channel Assign You will be able to see which function on the transmitter is assigned to each channel1 point
-
Too nice outside to do much building but some gradual progress 🙂 Cut, faced and hinged ailerons Yes - am being lazy and going for very non-scale servo covers (did try homemade f3f style hidden linkages on F86 but quite a fiddle and more play than I wanted). Made servo boxes and remembered channels for cable runs (!) sanded in dihedral and glued wings:1 point
-
This bit is spot on! On indeed the basis of the BMFA position for many years with EASA and the CAA etc. In fact I recall back in the days when Graham Lynn was the technical representative for model aircraft flying in Europe he was asked by EASA to provide a definition of model aircraft flying. I think they were expecting a very long definition extending to a number of pages, when in reality it is very simple. "Model aircraft flying is the flying of any small unmanned aircraft, within visual line of sight of the remote pilot for the purposes of sport or recreation." That is still pretty much the position, doesn't matter how many rotors or propellers, whether it's home built or purchased pre built, flown FPV with a spotter or traditional line of sight, or whether on a club field or any other suitable location. If its flown within visual line of sight for sport or recreation it is model aircraft flying.1 point
-
That is the whole point. Make it 30+ pages long and wrap it up in impenetrable language, and the average model flyer probably won't have the time or will to respond. Then, when the response rate is low, they can say "We consulted with you, but you weren't that bothered". We (and the national association) are playing the game with a busted flush, and all the aces are in their hands...1 point
-
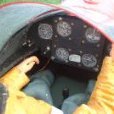
I’ve made some good progress over the past week or two so thought it was time for another update... I made a joystick from some random pieces I found; a rubber bung, some tubing and electrical wire and then fashioned the grip from a blob of car body filler. I decided to attach the canopy frame using a dowel at the front and two magnets at the rear which seems to work quite well. I also intend letting the canopy overhang the fuselage rear fairing by a few mm to aid location too. In the absence of any nice 3d printed item I’m going to use a photo for the instruments as I have done many times previously on my Correx builds. I couldn’t find a suitable image of the instruments for my specific Sea Hawk but found one similar. I printed off an interim paper copy at a suitable scale and then used it as a guide for making the instrument binnacle. As well as making the binnacle I added some extra strips of balsa along each side to provide more surface area for gluing the canopy... And then made something resembling the unit that sits on top of the binnacle, I’m not sure exactly what it is other than some form of head up display and it may even be unique to the aircraft from where the cockpit photo has come because every aircraft I look at seems to be slightly different After doing those little bits I finally had everything I needed to make a start on the glassing. Initially I tried using the kitchen scales to weigh out the resin and hardener but soon realised they weren’t up to it, only measuring to 1 gram. So I bought a better set that measures down to the nearest 1/10 of a gram. I made a tentative start on the control surfaces, starting with the ailerons, underside first followed by the upper sides the following day. Thanks to Phil Cooke’s earlier tutorial the rest of the bits and pieces all came along in no time. I found I was having to mix 2.5 times the weight of resin/hardener combined to that of the cloth which is more than Phil had been doing but it seemed to work for me. I then moved on to the tailplane, fin and canopy fairing. After blending the various cloth overlaps I was in a position to make a start on priming the wings and control surfaces. I used a high build primer to better fill the weave of the cloth. I found I needed four coats with much sanding in between before I had something like a reasonable finish. I couldn’t put it off any longer, I had finally reached the point where I needed to glass the fuselage itself! Phil thought I should be able to cover it in just two pieces; one lower and one upper piece. That sounded like being quite a challenge but Phil was indeed correct. I was more than amazed at how readily the cloth would form around the various curves and recesses and especially so going right into the intake on the tip of the nose. After that I was up for anything so then also applied a single piece right around that little tailfin blob too! Spraying the wings and control surfaces had been easy enough but I could see that spraying the fuselage was going to be something more of a challenge due to its shear size so knocked up a support frame using any wood I could find and a couple of steel rods (Rover 'k' series head bolts in actual fact ). This worked well and I was soon able to get the first coat sprayed. It's starting to look like a plane now. I’m now up to the third coat and once again it’s looking like four coats will be the order of the day. In between I’ve also managed to prime and get a base coat of black sprayed on to the cockpit parts so things are moving on nicely on that front too. In other news my paint order from airbrushes.com arrived this week and amazingly, after barely a week my graphics have also arrived from Callie Graphics, way out in New Mexico, so there should be no stopping me now! There are still one or two more detail items I’d like to add first but other than those it shouldn’t be too long now before I can start spraying the finish colours.1 point
-
Actually it is electric but the kit is designed for and has the parts for i.c mounting.1 point
-
Fw 190 A-8 in the Black 13 scheme of ace Pips Priller. Built over last 15 months from Vailly Aviation plans. Span is 92” AUW 16kg power Valach 85cc twin boxer with self starter. Klasskote paints, Sierra retracts. Just guns, aerials and pitot to add once trimming flights are over. First flew last weekend.1 point
-
My latest maiden, or that should be remaiden as this one had a few. The second MB5 in my fleet, brought from a chap in west London late 90’s, he was part of a club who made a their own fuselage moulds & foam wings for the MB5. This was one of a few models they produced in the 80’s ish, and had been stored in his loft for a good number of years after he’d finished flying it. I converted it from the OS40 to electric soon after, but that maiden didn’t go well (very aft CG!), and the remains lived in my loft until this winter. This time I had to first repair all the damage I’d done before making a better job of the electric conversion. After recalculating, measuring and checking the CG several times, I can report the last maiden went a lot smoother. Overall very pleased with how it flys even if it’s taken me over 20 years!1 point