Leaderboard


Popular Content
Showing content with the highest reputation on 01/10/23 in Posts
-
SWIMBO was having a sneaky look in my workshop. "well she said, thats a nice wing, it'll fit fine onto the car" How can I ever tell her, it was the tail for my Keil Kraft falcon ernie15 points
-
Had an enjoyable day at the BMFA Model Builders show at Buckminster, Manny had given me a couple of tables to demonstrate and promote building models using foamboard and depron. I think it surprised a number of people how light and cheaply airframes can be built using these easily available materials. Entry to the Builders show is FREE, why not come along tomorrow and say hi, it is also a chance to pick up some of your winter modelling supplies from some of the traders there. I have nothing to sell, just trying to show a different approach to airframe construction.5 points
-
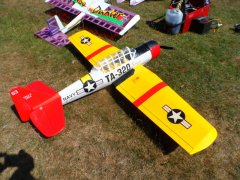
T7 Red Hawk.4 points
-
I saw this on this forum 3 months ago!3 points
-
+1 on the above comments. I can see you ending up with a shed full of trainers after you have gone solo wondering what you are going to do with them all. Try and stick with 1 plane and learn to fly it well. Then you can decide what you want to do and where your interest is going to drive you so you can buy and build accordingly. You may want to fly gliders, sport models, aerobatics, high speed, ducted fans or war birds, who can tell? Building one plane from a kit or plan sounds fine to learn the techniques and requirements of construction, but please go one at a time. I heard of a mention that to learn to fly you have to crash at least 13 models. This horrified me, proper training will have incidents and damage to a model which ought to be repairable but 13 models - no.3 points
-
I would only ever recommend using the fuel the engine is run on as a solvent to aid cleaning. Not recommended. Boiling ferrous components in water causes them to oxidise. The top layer of this oxide is easy to wipe off and in the case of a steel/iron piston and liner combo you can ruin the fit of the parts.3 points
-
One thing that's struck me is the cleanliness of the front wheels, suggesting little brake pad wear. The MG5 doesn't give true "one pedal" driving but I normally have regen at maximum and feather the brakes as it slows.2 points
-
Don't forget the Norman French! Although to be fair, Norman French was a very nice guy I used to fly with many years ago. 🤣2 points
-
I went today. Worth a day out and bought a few bits and bobs from the traders there.2 points
-
I correctly predicted (to myself) that a counterblast would be a waste of time 😉2 points
-
A post gone, to discuss topics like this one, politics will get a mention and provided it's not partisan it can stay, go too far and it's gone.2 points
-
Good luck with building your first model Toto. It will give you a great interest over the long winter nights2 points
-
Sorted it. I was taking some details from the ebay add When I actually googled the psu 7001452 j000 Z750p Plenty came up Got it powered up, fan speed lower and soldered some terminals to the 2 outputs. Thanks all2 points
-
I just scoured the verbiage looking for the start time, and noticed the "Now with free entry" is in the Latest news.2 points
-
I agree entirely with Don. You have a couple of serviceable trainers. I think that you should learn to fly first.2 points
-
I suggest you start looking for a 4.5 kg plane kit, or a 3 kg plane kit. Or both. The inertia of bigger stuff is a challenge; ie, the extra energy on impact, rough landings, causes issues. As in exponentially more difficult repair, and/or expensive repair. Toto, I love you, but concentrate on the challenge in front of your nose. Spend money, enthusiasm on that goal. I tell you again, a cause of failing in this hobby is, “ I’m spending a load of dosh on this, I’m not seeing much reward” . Usually spent on not NEEDED expenditure. Buy shmbo some flowers, chocolates, better investment.2 points
-
I said I wasn't going to buy any new planes for a while, but was going to replace some engines. A nice NIB Saito FA82A appeared on an auction site at a 'give-way' price........ No bidding war so Mr Postie delivered it a couple of days later. So, what do I replace...... Prime candidate was the old SC91 in my Valiant. Then I flew it again, and was reminded that the engine and plane were already a perfect match. Couldn't be bothered to fix my Ultrastick, so ordered this from Model Shop Leeds at a very good price. An oldie but a goodie, made even better by the 3D printed engine you can see. Maidened it today - flies nicely with just 2 clicks of 'up' needed. Sadly, a loose spat limited it's airtime. (There are now 3 of these, of various ages, in our small club - mine is the only noisy one!)2 points
-
Three phrases a husband should practice regularly to ensure married harmony: "Yes dear" "That would be my fault dear" "My goodness, that's a bargain". Covers 99% of situations.2 points
-
In the Tesla regen is very marked and brings you to a complete stop. I've always tended to brake well in advance, so it wasn't that much of a change in "style" for me, but "one pedal" driving definitely takes a little bit of getting used to. On the rare occasions that I charge the car to 100% regen is missing for a few miles (you can't put charge in a full battery!) and that catches me out when I suddenly realise I've got to use the brake pedal!1 point
-
Speaking from my own experience, regen braking is effective until about 1 mph then the brake pedal is applied to come to a full stop. In iPedal it will automatically stop the car even if the brake pedal isn't used! There is even a brake disc cleaning function so I don't have to worry about the discs.1 point
-
Remiss of me, after that request and reply, I did not attach the photo, I have of Laurie peake. (1986?) clearly a very accomplished and likeable character, with a great sense of humour. I particularly liked the “scamming the scammers” routines. I am sure he is greatly missed by all who knew him, and glad to have my own small connection. The simprop RC outfit in the photo is ( I think) the one I have, in my small personal collection of old nostalgic RC gear. steve1 point
-
Plate glass is certainly pretty flat but getting the pins in is a bit troublesome. 🙂 Ahhh.... I see i have been doing it wrong!1 point
-
Ha! As Dave Platt said jokingly [if you try pinning] "it's hell on the thumbs!" Instead use weights, masking tape, and custom made jigs superglued straight on to the glass (as in the picture).1 point
-
I don't expect ED's blatantly political post to remain after a mod has spotted it.1 point
-
Yes Paul, car was new when I bought it September, 2020. Mileage is low at just over 14,000 miles (partly due to Covid). Tesla are a bit peculiar in that they say that no routine servicing is required. The filter replacement and brake check just seems common sense. The problem with brakes is that, due to the regenerative braking, which is quite powerful on the Tesla, you don't use the brakes much and so they suffer from surface corrosion on the discs. I make a point now of deliberately using the brakes occasionally just to try and keep the surfaces reasonable.1 point
-
I think I mentioned it before, plasterboard is the stuff to use, pull it out of a skip or get it from DIY shed, cheap and disposable either way👍1 point
-
Personally, I wouldn't worry too much about weight, unless you're trying to use a 'lightweight' power train. The wing area is enough to not have to actively lose weight. The manual does leave quite a bit to the imagination, can't comment on the motor mount as this must be a fairly recent addition, mine (built 4 or 5 years ago) didn't have it. Also the kit was the kit then - no options for with or without accessories. Did have a spinner included though, along with the now 'extra' bits & bobs. I just mounted the motor on standoffs directly to the bulkhead, and assumed that any side / down thrust was built in to the design. Obviously it's easy enough to adjust with the mounting method I used, but I don't recall ever having to do anything in that regard. Kim1 point
-
Don is so right in his comments - I keep banging on about modellers's burn out because I've seen it happen several times before - wasted money, wasted time and wasted effort. This hobby is very exciting and we all go a bit over the top from time to time, sweets in a sweet shop type of thing and I am guilty of a touch of retail therapy as my workshop and model storage area will show.1 point
-
My Ender 3 has been (and continues to be) a good FDM printer. However last month I made the plunge into SLA. It is a steep learning curve.1 point
-
One should be enough to get to solo if you're instructed on a buddy box. You'll likely trash it in the 12 months after when there is no 'safety net'...1 point
-
Will do later.1 point
-
Nigel, I think they dropped the entry fee because a few traders dropped out.1 point
-
Hmmmm I have had previous experiences in not gluing down certain materials. Cork for example which I used as a means of sound deadening on model railway baseboards. Maybe sundeala could be different but if it warped like the cork did ... I'd be gutted ... especially at the price. The building board will be kept and used in the shed so will be exposed to changes in temperature. The shed is a twin skin insulated wall construction but it still has significant temperature changes over winter. It is however dry. My intention is to look at replacing it next year all going well. Toto1 point
-
The thread is dangerously close to straying into party politics. Let’s make sure we keep within the forum guidelines.1 point
-
As soon as it arrives ...... it's getting glued down. I'm intending to use UHU contact adhesive or similar. I'm not sure whether to weight to it once glued as Sundeaka is a paper based product that may soak up the glue ... through to whatever is holding it down. In saying that .... that may be the case it I was using a water based wood glue but UHU is a thick gunk which should just adhere without soaking in. Toto1 point
-
Plasterboard laid on a piece of kitchen work surface on a flat table, used it for years.1 point
-
Hi Geoff. I just ordered a bit of Sundeala from the Sussex Model Centre. £ 19.50 for 10mm thick stuff. I know its expensive but Sundeala has always been the Rolls Royce in this field. What I did not reckon on ( and I skipped through and hit the button before realising ) was the delivery cost. £ 30.00. I thought that was for the board 1220mm x 600 mm and the delivery ( say £10.00 ) .... No ..... the whole thing cost me £54.00. I tell you ..... this better come in good condition or the thick brown stuff is going to hit the blades. Anyway ..... its done now ..... put it out of my head. toto1 point
-
And small shops in said towns may feel the consequence when folk go other places. Only time will tell the outcome.1 point
-
I do the same, but with CA. (Actually, one doesn't really have to open up the join with CA, because it wicks into the joint.) I generally use far more aliphatic glue on models than CA, but this is a near-perfect application for the latter.1 point
-
And please dont use any form of Castor oil. Its bad enough in glow fuel but with the higher running temp of petrol it will coke up almost diamond hard. We used to add castor to our fuel back in the Rocker biking days for that super smell. Different story when it came to de- coke time 🤬.1 point
-
Horses, My dour old Scottish vet to say, " Dangerous both ends and unsafe in the middle."1 point
-
Congratulations Roy, your final reaction to your flights really sums up why we still build our models. I have been watching this as it developed for 2 reasons, Bowmans was one of the 3 model shops in Ipswich which I used to frequent as a teenager, the other reason is I built a Magister too. Mine is a much modified build from a David Platt plan with me trying to loose quite a bit of its weight, being 78" in wingspan and just under 5lbs in weight. Flies quite sedately but quite aerobatic when opened up on its 4S 500mAH battery. My landing do tend to a bit like your 3 pointers, 2 wheels & a nose and the UC on mine is way too springy Link to my build is here.1 point
-
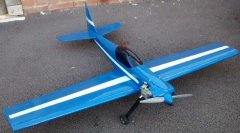
Decided to use the wire U/C and 2.25" diameter wheels supplied in the kit. I had previously thought about fitting bigger wheels, say 3", to cope with our patch - plus I was worried about the axle bits which had been cut too short for a collet each side of the wheels on the rear ones - but decided to give the original equipment a go. The trick was to solder a washer to the axle just before it became a radius, using a simple wooden jig to keep the washer in its correct place and perpendicular to the axle (ignore my substandard soldering skills!) and this left just enough room for the collect to fit and its grub-screw to bite.1 point
-
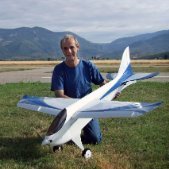
Finished, can any one recognise the colour scheme?1 point
-
Jonathan, If you are still searching for a colour scheme for your Gangster, here's what I did for my Gangster 75 which I built from an unbuilt original kit. This is a foam wing and unfortunately is made out of rather heavy foam. All the covering was either Solarfilm or Hobby King sourced. In the air, the scheme is very easy to see with great differentiation between the top and bottom pattern.1 point


.thumb.jpg.632415da66ae2d3b91c91514c153e5df.jpg)