Leaderboard


Popular Content
Showing content with the highest reputation on 27/02/24 in all areas
-
This weekend saw completion to active service of two of my Dark Nights Fix Up projects and I couldn't be more pleased with how they turned out. The Balsacraft Spitfire refinish as a Spitfire PRXIX has been covered earlier and had her maiden flight on Saturday, which was perfect - the model is wonderfully stable, has a decent turn of speed and good vertical performance and looks smashing in the air. Flying pals Derek and Steve captured some lovely images on Saturday and Sunday, as seen below - thanks gents. 👍😎 The Durafly Spitfire Mk 24 to Seafire Mk XVII conversion hasn't had any in progress pictures included in the thread, so I'll put some in here. The swapmeet bargain was a bit beaten up, I don't particularly like the latest Mk of Spitfire but was somewhat surprised how well she flew, as quite an early Durafly model. I had to do something with the finish though and get rid of that horrid FMS pilot. I much prefer how these late mark Spits look in FAA colours and set to to make it a little more like a Seafire. That involved removing two of the cannons and cannon blisters, then 3D printing an arrestor hook and adding a fairing around that from litho plate. I wasn't keen to split the rudder, so plead artistic licence on that. New cockpit interior and 3D printed pilot figure and eventually decided to replace the Durafly servos and do away with the flaps. After some deliberation I patched up the worst of the dings in the foam and then covered the model with EzeTissue and water based EzeDope, before painting with appropriately thinned B & Q acrylic emulsion paint, Cut vinyl national markings and serials done with my Silhouette Cameo, prior to adding some relief to the canyon-esque panel lines with a light grey water soluble pencil and a final blow over with satin WBPU applied by airbrush. I think the Seafire XVII looks so much better than the Spitfire Mk 24 and yes, I know the wing is more like a Seafire Mk47, but there's no massive five bladed prop or contra rotating set up here. Remaiden of the Seafire was unfortunately cut short on Saturday by tipping up in the moss and breaking a blade off the four bladed prop. However on Sunday a drama free handlaunch was followed by a very comfortable flight and again the model looked lovely in the air, admirably captured by Steve. I'm really pleased with how both of these have turned out and added another couple of Spitfires to active service - you can never have too many Spitfires!8 points
-
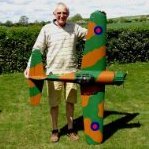
Just finished this Chilli Breeze built from the RCM&E plan (Electric version) using the setup recommended by Delks and 4 max with 4s 3000 mah lipo Ready for a decent day to maiden it.6 points
-
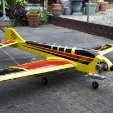
I finally fixed her tonight,the parts arrived and I did it,very proud of myself and I just need a test flight now,happy days.2 points
-
Well I need to make a new dolly ASAP, up at the field at the moment, first flight this morning the FW fell out of the dolly breaking the prop on the tarmac. But much worse is that the ply engine former has cracked and there isn’t a lot of room to replace it so I may have to use some carbon tow and resin to repair it. Bearing in mind that it wasn’t a heavy ‘crash’ maybe a thicker former for new builds?2 points
-
Lidl has these little dovetail pull saws/ Japanese saw, in stock from March 3, with 2 blades 17 tpi and 22 TPI. £7.99. I can't recommend them enough. Absolutely brilliant for model making and larger jobs. I've had one for several years now and it's still very sharp. They don't seem to stock them very often, so I'm going to buy another.2 points
-
Piers - if you'd like a print of the louvered vent for the Vampire just drop me a PM with your snail mail address and I'll print one for you and pop it in the post FOC.2 points
-
Two tunnocks caramel bars standing in the arrivals lounge at Glasgow airport. One turns to the other and says, how long you been a wafer!2 points
-
Simon and Roy I love the pictures of your aircraft, both are a credit to you. The MB 5 is progressing well, retracts are fitted and working and even holding air for more that 24 hours which is great but I need to see what they actually do at the flying field! I am not sure what the weight will be yet as I often find the pilot and airframe fly better when they do not know that they are heavy! the length is 190cm with the spinner. The motor I have fitted is a EMAX 5335 which will use a 19 to 22 inch prop. The Motor on the drive unit is a EMAX 5345. EMAX do not give any performance detail other than prop size and recommended weight. All servos and pushrods are fitted so we hope to test fly in about 2 weeks time. I will be doing some tests to find the best prop to use. Thanks for the info on the props but being in South Africa means it is very expensive to get stuff due the the exchange rates and courier fees. I am a bit of a cheap modeler that gets a lot of my stuff second hand as Byron and I are always busy building. We also mainly fly early morning at our own field so the aircraft are not display aircraft. We were invited to a club on Saturday and our 4 aircraft were the only own constructed aircraft! Scratch building is really dying in South Africa2 points
-
Yesterday my plane took its maiden flight after I have finished repairing previous owners damage. It flew well only needed minor adjustments to trim the ailerons and elevator. I got home checked ailerons and did a minor adjustment. I went to check the elevator to find the nut securing the horn push rod fitting had come lose and fallen off. I was lucky it was only held in place by the tension on the push rod. Now I have to try and find another tiny nut or replace the whole assembly. Next time I will put on some lock tite so it can't come off. I know the original nut was tight prior to the flight as I had checked it the previous day. I was lucky!1 point
-
Horses for courses - most of my models now have none, but a few have some, on the control surfaces that need it...... not necessarily all surfaces, not necessarily same amounts on each surface....1 point
-
I agree 100% with what Jon says above and we both come from pretty much opposite ends of the spectrum, but I do use a lot of expo, but that's in a very specialist type of flying (pattern flying) where I really do want the controls very soft around centre. Same experience as Jon, most club type pilots fly with far too greater control movements making models very twitchy and difficult to keep on a straight line, the other advantage of setting the full aileron by the roll rate you want is that it's easier to exit rolls on point if the roll rate is consistent.1 point
-
Very nice model and equally impressive flight. My kind of flying .... leisurely, relaxing airmile munching flying. Nothing too stressful by way of aerobatics and a pleasure to watch. Also a very nice recording captured by the headcam..... what are you using for the recording ...... I may invest in something similar. Toto1 point
-
Printing the parts for an entire model plane sounds attractive but it does not solve the problem of using the same material through out the entire structure coupled with the fact that a printed part has a significant 'grain'. It is stronger and stiffer along the line of the print than across it. In PLA this effect is pretty significant Put all this in the mix and you are bound to end up with a less than ideal plane from a structural point of view. Even a classic balsa built up plane uses different materials where appropriate like different grades of balsa, hardwoods, carbon and aluminium tube as well as glass cloth or a heat shrink polymer.. My own view is to use printed parts including using different print materials where the benefits of the printing process outweigh any structural issues. My own example of this process is in my simple 52" (1320 mm) span "Big Dragon" pusher. Actually built as a follow on to an slightly larger all Depron powered glider to explore and test my 3d printing design skills as well as to hopefully create a more practical plane. The fuselage which includes the wing pylon that has a built in cooling duct for the ESC within it, the motor mount and the battery compartment are all printed in PLA as are the wing ribs. The wings are skinned in 3mm Depron which has a hard balsa spar. The tail boom is a glass fibre tube. The tail surfaces are balsa reinforced sheet foam. It weighs 743g (26oz) with a 2800 mAh 3s on board. Full power is rarely used unless you want to go straight up! The printed components added about 50g compared to the earlier Depron fuselage built up from 6mm thick foam but the PLA is stronger and probably gives better aerodynamics. If you want to build an RC model airliner printed fuselage formers represents a really economic way to make lots of identical fuselage formers. The clever bit is how to use them!1 point
-
As far as I know, the flocked hinges are inserted first, you get everything all lined up in place, and only then you drop CA onto the hinge to fix it all in position. There's no 'repositioning' going on...?1 point
-
Went with the Armsoar powertrain suggested above and some 3s batteries. I'm very impressed with how small and light the motor and batts are! I think the batt and motor combined might actually be lighter than the old receiver battery I was using in it 15 years ago! I chopped the nose off, the fuselage is oval in section not round, so I experimented shoving different size penny washers into the nose until I found one that was the right size to "persuade" the front of the fuselage into a perfectly round section to match the spinner. I then used that washer as a basis to set about making a bulkhead from some surplus carbon which I must have laid up about 10 years ago (knew that would come in handy). Lots of in and out to get it to the required shape, but its dry fit now and looking pretty good. The spinner isn't a bad match for the shape of the fuselage. The motor power cables can be persuaded to fit under the canopy and the canopy itself is almost there, just needs slight modification... The tolerances are, shall we say, "toight". There must be all of 0.5mm around the front of the motor. Drilling the motor mount holes in the right place in the bulkhead to achieve clearance was an absolute torment! Been a while since I've worked with something this small and delicate- good for the soul. Next step is to tack in the bulkhead with some epoxy, remove the motor and then glass in the bulkhead properly... Ps- Can anyone recommend a transmitter which would work for this and a selection of other stuff- flying wings, helicopters etc? Ideally less than 200?1 point
-
Just experimenting with a home made head cam Toto. Hangar 9 Meridian.1 point
-
Steve, These Kavan hinges would be fine for your model, three for each elevator half would be sufficient. Before gluing, put a very light drop of oil on the pin and work it in, then glue the hinges with epoxy. Provided you've got some epoxy in the holes and a smear on the flanges, they won't pull out. Once you flexed the control surface a few times and satisfied yourself that all is moving freely, leave the glue to set. The pins are quite easy to remove by pushing with a flat bladed screwdriver rather than trying to pull them out with pliers. When the model is completed you can reinsert the pins or if you prefer slide a length of piano wire through them all, though this means you'll have to bend over one end and trap it in the wood.1 point
-
Well nobody else has offered any opinions so far..... I have never actually used those loose pin hinges as it seems to be too tricky to insert pins after building-in the hinges. My view is that for a large model it's best to play safe with the elevator and use the larger hinges with pins already inserted. But in either case secure the hinges with cocktail stick glued in and then snipped off (after glue dries) with nail clippers.1 point
-
There's a danger we are getting more fun out of playing with our dollys instead of flying !!!😎1 point
-
Also for the second race Explained: Why the first two F1 races in 2024 are being held on Saturdays (msn.com)1 point
-
For launching I think it needs to hitch a ride on a model 747 like the space shuttle 😆1 point
-
PM sent 👍👍1 point
-
With the wing and nose in place the rear end now looks quite Stiletto(ish). But include the nose and it doesn't! The wing still has the flaps and ailerons to be added before they show their full? area. Given how low set the wing is the ailerons will have to have top side horns. Still thinking about how best to hand launch it as the fuselage is too wide to hold directly.1 point
-
No problem for Richard as he makes train kits! 🚂1 point
-
They were 3d printed to make sure they had enough of a flat to run on the gutter1 point
-
Yes, those Japanese saws are superb - I find mine especially good for roughing out foam blocks, where the long, thin blade is a boon.1 point
-
1 point
-
I came across a design for a louvred “cheat vent” on Thingiverse and can’t recommend it highly enough. It gives a very noticeable performance boost for little effort or expense if you have access to a 3D printer.1 point
-
I think if we've learnt anything about dolly launching , its that the closer you can get to it just being "a normal " aeroplane the better . What I mean is , Erics dolly adds very little above a fixed undercarriage set up .The commercial one seem too big , too high and too heavy . Basically a wooden crucifix with a pair of old bent wire legs and some wheels of 3" or above will probably do the job .1 point
-
1 point
-
It doesn't look like much is holding those cabanes in place... 🤷♂️1 point
-
Another belting morning yesterday. Really light winds and lots of great flying. Managed a re-maiden with my Durafly Spitfire 24 to Seafite XVII repaint which flew beautifully, plus another flight with the Balsacraft Spitfire PRXIX. My Volantex Bf109 Weiss 14 has been one victory short of Ace status for a while, but I cant in all conscience claim one for the midair which saw a chunk taken out of the rudder by Mike's Spitfire, even though both models were downed. Great fun. Here's a couple of snaps of the flying.1 point
-
I have printed a couple of Planeprint’s models with ColorFabb LW-PLA. After the first one broke apart spectacularly in an area of high stress, I’ve learned that you need to reinforce any potential high stress areas with longitudinal strips (5mm x 1mm) of carbon fibre. I’ve not had any problems printing LW-PLA with my Ender 3 V2, as long as you follow Planeprint’s instructions to set up the correct profiles in Cura.1 point
-
That is such a nice fuselage that it seems a shame to butcher it. Why not put a motor on a pylon up above the wing, where the shaft and prop will be protected? You can then fly it as a pure glider still if the opportunity arises.1 point
-
1 point
-
Maiden flight day1 point
-
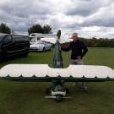
My latest build, a Brian Taylor Corsair, precut parts from Sarik. The plan shows fixed undercarriage, twist and turn retracts don't fare very well on our strip so no undercarriage and a dolly launch. Video from a mobile phone. 61" span 580kv 5556 motor 5s 5000 8lb weight ready to fly. VID-20240216-WA0001.mp41 point
-
Hi Dave & welcome, Totally agree with others above, 1st step is finding a club and trainer you can work with. If you read one of Toto's threads on here, he had a poor start with unreliable training and suitable models which left him frustrated with inconsistent results, not really anyone's fault but just they way things go sometimes. Speak to your trainer after a few goes on the sticks and see what machine they recommend. To me, bigger the model the better until it gets unmanageable. Aim for 1500mm (52" ish) to 2000mm (72"ish). They are normally steadier, can handle wind easier and are easier to see. I have trained using 48" all the way up to 78" including a twin. Try and keep it simple as there is a quite steep learning curve. Most of all have fun!1 point
-
I've been driving an elecric car for three and a half years. So here's my take on the pros and cons of driving electric. First I drive between 10.000 to 12,000 miles a year, so average mileage. Apart from local shopping trips,trips to the flying field and other local social trips which tend to average under ten miles. Visiting two of our children and sister in law involve round trips of between 50 to 100 miles. Our third child lives in Glasgow, we live in Reading Berkshire, so far we have not visited him, more on that later. I have a charger at home and use Octopus Go tariff which until recently the off peak rate was 7.5 p/Kwh This means that an average charge of 30Kwh costs about £2.25 for around 180 miles, my average long term energy consumption is 4.8 miles per Kwh. Other running costs the first set of tyres lasted around 30,000 miles replacements like for like was £500. Servicing first two years £75. However the 30,000/3year service was £450, this involved changing brake fluid and changing the drive battery coolant. Yes the battery is water cooled and the car has a radiator. Now the downsides. The car had a habit of destroying the 12 volt battery, remember the vehicle systems are powered by a 12 volt battery. The current battery, not OEM is OK, but a software upgrade at the last service obviously has some bugs. If the car is left unused for about 36-48hrs the vehicle drains the 12v battery. Highly inconvenient. On one occasion recently whilst defrosting the car, everything on scenario after about 10 mins a low 12v battery flashed up. Odd because when you start the car the 12volt battery is immediately charged from the drive battery, not this occasion. Last uear I hit a deer and damaged the 'radiator' grill. The dealership not interested in repairing it. Tried a couple of body shops who would't quote, I guessed because its an EV. So on the basis of 'how difficult can it be' I ordered a replacement grille and waited three and a half months for it to arrive. Working on the basis of YouTube is your friend I searched for how to remove/replace a Hyundai Ioniq radiator grille,....NOTHING . Lastly long journeys, I mentioned we have a son living in Glasgow, the distance is just over 400 miles. He doesn't have an EV charger so we need to find an Hotel with on site charging. Nothing in the city despite Premier Inns claiming that their hotels have onsite charging (this may have changed in the last few weeks). Yes there are hotels in Scotland with chargers but they tend to be boutique hotels attached to golf courses with prices to match. Until autumn last year the last services before Glasgow was Tebay services in Cumbria, although Gretna services opened charging facilities last autumn. So some very careful planning needed to complete that journey. Finally battery degradation/ loss of range. None detectable during my ownership of the car. Seasonal variation up to 20 miles during cold spells, hasn't changed in the three winters ofowning the car. My PCP deal ends mid year so I am beginning to consider what next. Another EV, prices seem to have inflated since 2020, there is nothing directly comparable to the Ionq. Most manufacturers seem to be going for larger vehicles with the attendant high price. Last year I took a test drive in a Ford Mustang mach e its price was £60000 at least £15000 overpriced in my opinion. a PHEV, this would solve the Glasgow issue and choosing the right model my day to day use would mostly be electric traction. So there is an account of three and a half years experience. I would say don't believe all you read pro and con, both sides of the argument each have their respective axes to grind.1 point
-
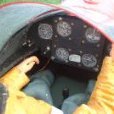
Right, she's ready* 1/6 scale spitfire Mk1; P9374. This is a replica (let's not be too eager and call it 'scale'!) of the aircraft that crashed on it's second operation onto the beach at Calais and remained there until the 1980s before being removed and eventually renovated to flying condition. This is detailed in a wonderful book kindly given to me by Peter Miller. As happens with me, reading the book (and particularly John Romaine's pilot notes of the maiden flight) inspired me, and I was 'locked on'. This is the latest evolution of my learnings of how to make use of Depron. Particularly laminate flooring under floor insulation. This is sold by B&Q under the Diall brand in white in 3 and 6mm and their own brand in black at 6mm. The construction uses some ply and balsa to put strength where it's needed (a hard structure between wing root and motor mount), and B&Q 6mm square strip wood for the wing spars. It has flaps, retracts and Oleos and is set up with a 5065 320kv motor on 6S and currently spinning a 17x8 prop. I'm yet to do the full power checks, so not sure what the output is, but expect around 900-1000W. The battery (3300maH) sits vertically behind the motor, and it looks to balance without ballast. AUW is 8lb. As this model is 74", this is very light. It's the same size as Mick Reeves' Mk9, which apparently fly very well, and usually come in at around 12lb plus. Jon from Laser reckons this is the correct weight, so I may have to stake it down to stop it floating off! In any case, I should get a nice scale speed. It's covered in 25gsm glass cloth applied with B&Q water based varnish. Paint is good old valspar (again, B&Q) matchpot emulsion matched to the book. It's a tiny bit light, but the effect is good. This is sprayed with my little HVLP gun, and then sprayed over with a light coat of gloss varnish to give a slight sheen for the vinyl to adhere to. Vinyl, canopy, decals and the wonderful dash are all from Mick Reeves. The exhausts are 3D printed. *Some detailing to do, electrical checks, a lot of worrying, and purchase of bike clips notwithstanding... Graham1 point
-
Yes, the 'top hats' go under the fixing lugs. GDB1 point
-
I am not aware of all the details but the basic impression is that the model flew off under power and would continue until it ran out of fuel. Switch failure is being offered as a possible cause so i assume a failsafe was set but did not activate. If the switch did fail or battery disconnect the fail safe would not have had time to function. If the model can be recovered it might shed some light on the failure mode. The chap in question is quite distressed by the event and its potential consequences and questioning his continued participation in the hobby. Finding the model is as much to give him peace of mind it didnt hurt someone as it is about actually getting it back.1 point
-
If he gets it back, hopefully he'll then set the failsafe, so it will come to earth before the fuel is all used in the event of another fly away... But I do hope he gets it back.1 point
-
Hi all, It seems that the wheels are on the way to me. Paypal have emailed me to say that they have been despatched, even though i have had no response from the messages i have sent. It'll be interesting to see what i'll pay for carriage and tax because that's not on the invoice. Just glad to get them really. Thanks everyone for the help1 point
-
Hello Widget. I have one of these that I have flown often over the last 5-6 years. It is a brilliant model and flys realy well. I fitted mine with mechanical retracts and powered it with an OS 70 FS which gives it more than enough power. it is getting quite tatty now as i twend to fly it if the conditions are poor. If they still made the kit then I would get another one without any hesitation. When fitting the retracts slant them well forward or you will have it nosing over all the time and if poss build in quite a lot of right side thrust as it has a tendancy to swing left on take off If I can help in any other way let me know. Regards, Glenn.1 point