Leaderboard


Popular Content
Showing content with the highest reputation on 21/03/24 in all areas
-
I'm not sure this is classed as funny ?9 points
-
I remember the good old days when Snap, Crackle and Pop came from my breakfast cereal, not my body.8 points
-
Like to thank Jon for all the help he gave me over the years He is a true gentleman .5 points
-
I managed get out for a session today. I decided to take out my electrically converted Capiche 50cc. She has only had 9 flights so far and now I have sorted out the trims today was a good day for a test. Light cloud, wind 4-6mph down the strip. On the first flight when opening to WOT in the air I noticed a short high pitch wine which disappeared at lower throttle settings. I thought may be the timing was too advanced or the thing was about blow up! Landed and after examination on the ground at full throttle I notice a 6-7" loose of seam covering on the starboard leading edge flapping around in the slip stream. Out came sellotape from my tool box and put that right. And viola on the next flights not a peep so all good now. I am sure this has happened on a previous model some time ago. Anyway the session continued without trauma and I must say I am warming to her. She is very precise and always stays in the position you put her in until the next TX input. 👍I think one of our regular contributors, Peter J. is right in saying she is a bit porky in his experience. I do think she could benefit from a bigger motor (mine is a Dualsky 6000.8 model) as largely all the weight is in the front with the power packs well forward. Something to think about.......4 points
-
Back to the wing . The ailerons can now be detached from the main wing . Its easy to do as the ply core that keeps them together is very thing and partially cut already . I sanded an angle on the front face of the aileron which allows the ailerons to pivot down . I've set in three mylar hinges on each aileron . They will be pinned with a wooden cocktail stick . My usual method for installing the servos is shown below . Its quick and effective . Start by wrapping each servo in masking tape , then simply hot glue (or epoxy ) the servo to the wooden servo box lid . If you need to change the servo at a later date , you just cut through the masking tape and out it pops . There is a little silicon ring keeper on each kwik link . Its made from fuel tubing. Finally you can screw the lid down . When you do the other side , position the servo in a mirror image of this one to ensure that the ailerons work opposite rathe than together.4 points
-
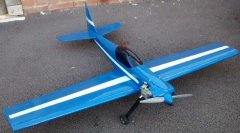
Now the M23 is ready to take of.The Hacker A50-12L V4 consumes 56 amps at full throttle.Let's get started3 points
-
I've been beavering away with my new Wot 4 Mk2 fuselage and getting near to completion. The wing fits OK and the tail components are glued in. The tailplane is more or less parallel to the wing (more 'more' than less!) and its incidence relative to the wing is 1 deg positive, which is the same as an old Wot 4 Mk 3 I dragged out the loft to take to a swap meet on Sunday (it didn't sell! - Now on eBay) The fuselage seems to be fairly light - hopefully not at the expense of strength. The sides are 3mm balsa and the doublers 3mm Liteply, lightened further, as can be seen in the pictures. The battery tray has been extended from my original because I had to put weight on the tail when the battery couldn't be slid further back. The battery position will be fixed with foam pieces at the front and back (the front to protect from protruding motor-mount bolts. Here's the area under the wing, which will be home to the elevator and rudder servos - and possibly the receiver. The under side will be sheeted once the closed loop rudder and elevator push rod are installed Onwards and (hopefully) upwards. The now no longer ARTF Wot 4 will fly again!3 points
-
Meanwhile in India3 points
-
H all, I was sat on the train to London this morning chatting to the guy next to me, I showed him a picture of the missus and he said, "You should see my wife", I said "why? Is she a stunner as well", he said " no, she's an optician"3 points
-
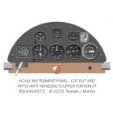
Craig here. 62 semi retired. I live in Stockport area South Manchester. Completely bored with mundane TV programs I decided I wanted to do something more with my "down time" So I purchased a 1/35 scale plastic model WW2 vehicle kit and began my journey of building painting and generally being creative. After completing my first attempt and even doing a diaorama I was quite pleased with the result. What to do next I thought and as I have always had an interest in Aviation in particular WW1 and WW2 aircraft I thought I would build one of these next. However on my perusing of the WWW and various on line retailers web sites my fancy started to become tickled by the thought of actually flying something I built myself. So in my usual compulsive way I bought a kit thinking I'd learn to fly it afterwards. Yes Yes I know I already know now that I have gone about this in completely the wrong way but the deed is done and so contrary to all advice I will proceed with my build and then maybe buy a little RTF trainer aircraft of some sort and join a local (ish) club to continue my journey. According to google I think that Sale Model Flying Club might be the nearest to me. I opted for the Belair Kits Nieuport 11 24" wingspan model as I think Bi-Planes are a thing of beauty and I have been busy buying tools adhesives and stuff. All very exciting. I'm not much of a blogger or vlogger but I might post some photos of the various stages of the build etc. I am thouroughly enjoying reading the various posts in the forum and I am grateful for the resources and the time people take to offer advice and tips. thanks for listening. Craig (my forum name is due to my love of riding motorcycles by the way)2 points
-
Maidened my Chilli Breeze this afternoon. With an Irvine 39 on a homemade tuned pipe it literally has unlimited verticals rolling all the way.2 points
-
The first flight was successful. The Hacker consumes 56 amps at full throttle.After 5 minutes of flight time, there is still 72% remaining capacity in the battery.You can do wonderful classic aerobatics with the Messerschmitt.With the Hacker and 6S, the turn goes endlessly upwards.At the first interception I was afraid that the wing would break because of the hard balsa spars, but nothing happened.The M23 from Sarik Hobbies is a very beautiful model and immediately catches the eye.Congratulations to Jim Newberry2 points
-
Bigger definitely better, easier to see and doesn't get blown around as much.2 points
-
Thanks for all the replies to my question. Maybe I'll do a FW190 first. Then worry about a sea fury2 points
-
I've been a bit sidetracked recently with other stuff but have got a bit more done: I decided to make the motor mount/battery box removable in case I decide to fit a sound system at a later date. Next job was to sort the wing mounting. After fitting some m4 bolts into the back of the T-nut, I put some marker pen ink on the ends and then fitted the wing and pressed down to make an imprint. After drilling the holes slightly oversive, I then 3d printed a pair of washers. This allows fine adjustment of the position of the wing by measuring from the tailpost to each wing tip and adjusting until they are the same. The washers are then glued in place. I then made a start on the wing fairings. More later...2 points
-
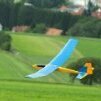
From experience I fully agree with the Gentle Lady, and the Sophisticated Lady is fine as well, as is the Multiplex Easy Glider. I started on the Hi-Start with a Robbe Silence foamy, and later a Sig Riser, which was and still is teriffic! When build like the plan the is very strong, I once ripped the Hi-Start with it, the plane was fine. Nowadays I mostly shoot up my Höllein AndREaS RES glider. For the last couple of years I have been using the RES bungee from SETA Modelltechik. It is geared towards the RES competitions but very suitable for the 2M stuff weighing maximum 1KG. It has 15 meters (amost 50ft) of bungee tubing, and 100 meters (328ft) of 0,7mm yelllow nylon. This set is worth it's weight in gold. It is not explosive, but releases the energy nice and gradual. Stay away from the woven stuff. Give HI-Starting a try, when you had your first thermal flight you will be hooked. Look mom, no engine! The pictures are my Pilot QB2500, a friend captured it beautifully. This is the stuff I use: https://zeller-modellbau.com/zubehoer/zubehoer-res-modelle/hochstartschlauch-silikon-8-mm-o-15-m-gelb-seta-modelltechnik/2 points
-
Quick update, I am now out of hospital in an amazing rehab centre , and am now doing loads more physio and they have lots of incredible specialist equipment including an exercise bike that has electrodes that you attach to your weaker limb that fire in time with the rotation of the pedddles to encourage your less good limb to relearn it’s role! I am so lucky to get a place here, as sometimes people wait weeks, but I got in last week only about 2 and a bit weeks after my stroke. That is ke, as apparently the early days after a stroke are when you have the best opportunity to improve.2 points
-
Got a delivery of sticker paper for the inkjet at the weekend, so the last few markings are now done to "complete" my FW190 - for now. Topped off with a coat of matt varnish (aerosol spray) after deciding not to do any more weathering - not sure my attempts were adding anything, and possibly going backwards! For now I'm going to enjoy flying it until the retracts addendum becomes available - and at that point (assuming I've not crashed it beyond repair...) it'll be back to the build table to fit the undercarriage. SO pleased with how it looks in the air - did a big half loop today before rolling back out and diving down along the strip and it looked absolutely brilliant. Dead chuffed for a first build.1 point
-
I have used their micro servos, they perform well1 point
-
I swear by my Speed Flea. Only 9g and it's great! Just plug into the balance lead on any lipo and wait for satellite lock. KB1 point
-
Those Sarik sets of parts are not the same as kits - they vary but may be just be plans with laser cut ribs and some other parts. I don't think they ever have the wire parts bent to shape and supplied as one would expect to get in a kit or supplies of fixtures and fittings. They don't necessarily have the wood selected for exact use ( i.e. lightweight balsa for tailplane etc ) - except for the lasercut parts you will be on your own in selecting wood. A proper kit will have all the parts needed except engine, radio and covering - you would expect to find wood selected for correct density& grain to suit each part, building instructions, tank, engine mount, undercarriage wire parts bent to shape, wheels, collets, horns, hinges, possibly decals included. For the inexperienced builder a good kit ( for example the SLEC Fun Fly which has all those items) will be better. Sets of cut parts are more for the person who has a stock of balsa and fittings to hand together with the knowledge of the type of balsa to select for each particular use.1 point
-
Just change the battery box srews for magnets and drop the oily smelly noisy idea! 😁1 point
-
Absolutely. If you want a new toy, get a new toy. But don't bow to clubmates pressure........1 point
-
No, but you probably wouldn't replace a perfectly serviceable model that did everything you want, with one that does exactly the same thing but is a different colour......... Would you? I know some would. But not me. And the OP seems to be in the position of being pressurised to 'go with the herd'. Diffrent strokes for diffrent folks.1 point
-
Great looking plane Adrian. Wishing you many years to enjoy it.1 point
-
Craig Glad you are considering a more normal route to learn to fly RC. There is of course nothing stopping you building your Nieuport 11. Biplanes can be fun to build and look wonderful when finished but they are pretty delicate structures. It may seem odd but for flying "small" is more difficult than "large" and 24" (its actually 25") span is by no means big. The reason is simply that small planes react faster to everything and the one thing any human learning to fly needs is time to convert what they see a plane doing in the air into the correct and timely reactions on the controls. The slower things happen the easier it is to learn the eye/hand coordination. When you join a club you may be surprised at how big and heavy the club trainer plane is. It will likely have buddy controls as well meaning the instructor will have a set of 'master' controls both to be able to demonstrate what is required and to prevent you damaging the plane or anything else. After all two seat dual control is the only way you learn to fly a full size plane. Do post some pictures on this site as you build. Don't worry about any lack of skill or understanding. We have all been there. Pictures greatly help others to give useful advice and even if you don't actually need help the pictures of what you achieve can give encouragement to others thinking of starting out.1 point
-
Riding a sports bike at 72 kph Paul! No wonder you're too tired to drive to La Coupe Des Barons!1 point
-
I did manage to create this last year when experimenting with the output from a Futaba SBS-01G using GPS visualizer. The flight path is a bit erratic compared to John Lee's efforts from 2020 - Skywriting. Needs work on the thickness of the trail etc. It does show the flattening of the curves that Phil mentions. Geoff1 point
-
72? is that age or speed1 point
-
Hi Dave If you have the time to do it I'm sure it would be of interest. Put a bit of the E back in. Geoff1 point
-
hello Rich....i've sent you a reply PM.... thanks. ken Anderson.......ne...1....shifty dept.1 point
-
Gorgeous looking bike David.1 point
-
Good to hear you're in such a good rehab centre Matty. It's obviously never great to have a stroke at any age but at 44 I'm sure they will be able to successfully rehabilitate you to a good level. All the best with your recovery and keep up the good work with the physio.1 point
-
Or the bad news , we have amputated the wrong foot, -------- the good news is the man in the next bed wants to buy your slippers.1 point
-
Good to hear it,,,1 point
-
Maybe a hybrid version with a standard car engine on a generator / battery would be the answer. You never know it could catch on and equip cars,,,😄1 point
-
Probably the reason everyone I dealt with when I had my cataract operation a few months ago asked what my birthday was - however, I was disappointed that I got no extra cards on my birthday in January.1 point
-
The way to build a Fury is to persuade Richard to make it his next kit, after the Tempests are all sold and the (balsa) dust has settled. Put me down for one by the way (preferably bigger😊)1 point
-
Well I did and this is what it looks like so far. Exactly the same as the original wing. No problem running the aileron servo wire through the wing. ? There is a 2 mm thick balsa spar flange in the lower skin under the variable thickness Deron shear web. The same is on the rear edge of the front portion of the top skin. Note the skin preform. The rear portion of the top skin only goes on once the wings are joined and the aileron servos installed and tested. It follows my preferred method of only using printed components where their properties result in a net benefit to the finished structure.1 point