Leaderboard


Popular Content
Showing content with the highest reputation on 22/03/24 in all areas
-
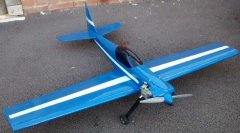
Field waterlogged? No problem, take up waterplane flying! Here's a few pictures from our regular flying session at Kitridding Farm on Wednesday. Many thanks to clubmate Mark Newburn for the excellent photos.10 points
-
Last visit to Laser Engines to collect the first and last production V 310 pair. Thanks to Jon for the final push which just leaves me to do this pair justice in a suitable model (DH).7 points
-
Got a delivery of sticker paper for the inkjet at the weekend, so the last few markings are now done to "complete" my FW190 - for now. Topped off with a coat of matt varnish (aerosol spray) after deciding not to do any more weathering - not sure my attempts were adding anything, and possibly going backwards! For now I'm going to enjoy flying it until the retracts addendum becomes available - and at that point (assuming I've not crashed it beyond repair...) it'll be back to the build table to fit the undercarriage. SO pleased with how it looks in the air - did a big half loop today before rolling back out and diving down along the strip and it looked absolutely brilliant. Dead chuffed for a first build.7 points
-
Great photos lads. Float flying has always been my favourite.4 points
-
Just more of the same really. The weather has been dreadful and the field has been waterlogged for weeks but it is gradually improving. We have to make the most of any opportunities as and when the weather allows. Looking forward to the ground getting firmer underfoot.3 points
-
So I’ve finally gotten around to starting the build…. Tony Nijhuis Bristol Beaufighter. I’ve used the part kit and additional wood pack from Belair, ribs/formers etc all nicely cut and go together well!2 points
-
To view data, use Google Earth Download & open Google Earth. Remove the SD card and insert into an SD reader on your PC. In Google Earth, use - File – Import – {select the file from the memory card reader Dataxx.csv}. Ensure “Delimited” and “Comma” are ticked then press “Finish”. It will ask , “Do you want to apply a style template to the features you ingested?” Create a new template and you will get:- In “Color” 1) Set “color from field”. 2) Select “speed” as the field. 3) Set the start colour to blue and the end colour to red. 4) Change the number of “buckets” to a high number say 50 (this is the number of shades between blue and red!). Note - you cant have more buckets than you have number of different speeds in your data! 5) Press “height” tab. In “Height” 1) Select “Set height from field” 2) Select “Height” as the field. 3) Select “Continuous” 4) Slide the slider so the maximum height to be displayed is approximately the same as the maximum in the data for realistic height display on the map (you can make it bigger if you want to exaggerate the altitude display?). 5) Select feet (the gps records hight in feet on the SD card). 6) Press OK. 7) Save the setup file as a name e.g. “height and speed.kst” More to follow!!!2 points
-
GPS module Bit of a minefield these modules are. There are loads of different versions on ebay – Neo6, Neo7 & Neo8’s. They all seem to work at default 1hz sampling rate but they should be able to sample much faster. Many don’t remember their settings and default back to 1hz. Some remember their settings but this info is retained by a charged capacitor and is lost after a few days. This is down to the modules being low cost and in some cases, the chips being fakes?? Quite what the full story is re fake chips I don’t know but they all generally work ok at 1hz sampling rate! Some boards wont allow you to change sampling rates and these are definitely fake being TD1030 gps modules re-labelled (badly – see pic). Given their cheap price, they do seem to work reasonably well at 1hz however. The GT-U7 (Neo-7m based) seems to work well and seems to remember its settings and is smaller. There are also the newer Neo-8 modules that ebay sell which I haven yet tried but should be ok (if genuine)! The newest Neo9 modules are less readily available and are more money ~ £30 upwards – again not yet tried one. Neo-6m Neo-7m v2 GT-U7 (Neo 7m based – smaller) Fake neo-6m. Original sticker outline visible and an uneven surface from old glue! For smaller slower models, the default setting of 1 per second data rate is fine but on a jet at 200mph a long distance can be travelled in 1 second and a path that crosses many other paths during a flight can difficult to visualise on a screen. Interrogating the GPS module using UBLOX software. Using Ublox software https://www.u-blox.com/en/product/u-center. This software allows you to interrogate the modules (even fake ones) and display live information on its many screens. It also allows many alterations to its operating parameters such as baud rate, sample rate plus much more. Some GPS modules have a USB connector and these connect directly to the usb on the PC with a suitable lead. If it doesn’t have a usb connector, you also need an “USB To TTL FT232RL FTDI Serial Adapter Converter” (approx. £4) and connect it as shown (make sure its set to 5V on the jumper). FTDI - GPS VCC - VCC Gnd - Gnd Rx - Tx Tx - Rx Leave other FTDI pins disconnected. Once the UBLOX software is running and the GPS is powered up, wait for the GPS to find satellites (LED on GPS starts to blink). This works inside a house if near a window. It may take several minutes first time round. Make sure the antenna is ceramic side up and don’t let it touch the circuit boards. If it doesn’t communicate to the PC, check these settings on the UBLOX software:- Receiver > Connection and Receiver > Port. You may have to tell it what Com port its connected to (its never Com1) and its baud rate which is 9600 by default unless you change it. Once communicating, you can play with the software to get a feel of the gps module. The next bit is for information only as my software does this automatically on reboot but its interesting to play with however. Make sure the baud rate is returned to 9600 or 38400 if you change it otherwise my software may not be able to talk to it! To alter the scan rate, go to:- View > configuration view Look down the list to find “Rate (Rates)” and you will see its set up for 1000ms. Adjust this to 250ms for 4 scans per second. Then click “send” button. Having done this, you need to speed up the comms rate as there is too much data for 9600 baud (data is jumpy and erratic on the screen). Look down the list to find “PRT (ports)” and you will see its set up for a baud of 9600. Adjust this to 38400. Then click “send” button. Finally go to “CFG (Configuration)” and check that the “save current configuration” is ticked and press “send” button again. You should see the barcharts updating much quicker having done this. There are many other things to play with but that’s beyond this project and me!!!2 points
-
It certainly is. It is many years old but still flies perfectly.2 points
-
You're scaring me guys. I have a dozen New Power servos in 9g and 17g sizes, some with metal gears, some not. I have had one faulty on delivery, but otherwise all have worked fine, some for a couple of years now. One or two of the metal geared 17gs are are little noisier than the others. The last faulty servo I had delivered, about a year ago, was one of two std sized Multiplex digital servos. Not what I expected.2 points
-
Maidened my Chilli Breeze this afternoon. With an Irvine 39 on a homemade tuned pipe it literally has unlimited verticals rolling all the way.2 points
-
Arduino based GPS flight logger - Dave Windy Miller What follows is quite in depth but hopefully clear enough to someone with a bit of Arduino experience and I can answer any queries you may have! I thought I would share with you my experiments with a flight logger made for less than £25 that includes GPS coordinates, GPS speed and barometric height. All this data is written to an SD card that can be read by Google Earth. This is my original logger built with a Neo-6m gps module built into a Futaba receiver case and attached to a ply base for attachment into my “Hotspot” turbine jet. I have since dropped the small oled display. A smaller version would be possible with a purpose build pcb c/w the processor chip The data is recorded onto SD card and can be subsequently imported into google earth and displayed as a flight path. Whilst altitude can be obtained from the GPS, ive found this is less than reliable with the altitude changing by 50ft or more just because the satellite count changes! A BMP280 chip can be set to be zero at the point of reboot and show altitude above launch in feet and is reportedly good for +/- 1ft which is 0.5% error over 400ft but read below re atmospheric pressure effects! For info:- Barometric chip bmp280 The height to pressure response is a curve but for our range of altitudes it is linear for all intents. The barometric pressure affects the readings with a drop of 1mb equalling ~28 feet in altitude. The difference between low pressure and high pressure weather can be equivalent to an altitude change of 2000 ft or more! Ideally, you would set the barometric pressure and height above sea level each time its used but this is a faf. To avoid this, I set the height to zero on power up so all altitude change is relative to this point until its reset (as it’s a near enough linear response). Any barometric changes during a 5 minute fight are generally negligible unless there’s a severe storm looming! If it drifts negative before take-off (baro pressure increasing), the software resets this to zero so as it stands my software would need a modification if used on a slope soarer flying below you! The pressure these sensors detect has to be static pressure and not be affected by the air velocity. Whilst this is difficult to quantify, mounting the sensor in an inlet duct or in front of a fan impellor for example isn’t a good idea. If possible, mount it in, say a cockpit that isn’t greatly affected by the airspeed / throttle position. The barometer chip I used is a BMP280 although a BME280 will work as will a BMP280/AHT20 dual module (all must be 5V versions). There are two address for these chips so you may need to edit the line in the code:- bmp.begin(0x76); for BMP & BME 280 which is the normal default bmp.begin(0x77); for the BMP280/AHT20 combined. Some are 4 pin and some are 6 pin. Both work, just ignore the pins not shown in the circuit diagram1 point
-
The flight of the B17 Flying Fortress. This iconic bomber from the second world war flew many missions over Europe and was instrumental in helping to shorten the war.1 point
-
So... Did P1 and P2 give us anything useful to base our predictions on? Or just confusion? Norris headed P1, but was 9th fastest in P2. Leclerc was fastest in P2 but 4th in P1. Verstappen was 2nd in both. The Mercedes duo of Russell and Hamilton were 3rd and 9th in P1, but only 6th and 18th in P2! And Stroll and Alonso put their Aston Martins 4th and 5th in P2 after 7th and 18th in P1. Make of all that whatever you will! But whatever you reckon; Don't forget your predictions! As already mentioned, qualifying is at 5am tomorrow, Saturday, morning.1 point
-
Making the GPS unit I will describe the latest version which consisted of :- 1) Arduino Nano £3.50 (CH340 versions need ch341 driver loading onto the PC 1st - https://www.wch-ic.com/downloads/CH341SER_EXE.html ) 2) BMP280 board 5V £3.50 (either 4 pin or 6 pin version but must be 5v) 3) SD card read/writer board 5V £2.50 4) Neo7M c/w antenna £8.50 5) Veroboard & wires 6) SD card 32gb or less (fat32 formatted) My module was powered by a 400mA AAA NiMh and will run all day on one charge. Ive tested it down to 3.5v so could be powered from a 1S lipo, balance lead or 3 cell nimh! I recommend that the power source is independent from the Rx battery for obvious reasons! I used Veroboard with the tracks cut using a drill bit and wire links added to achieve the circuit as shown below. I only soldered in the pins required on the Arduino Nano rather than all of them which simplifies things. If you add wires to run underneath the Nano, make sure they are insulated to avoid risk of shorting to the Nanos underside. A 4.8v to 3.8v supply can be used as shown but its also possible to connect 6-10V to pin “Vin”. The Nano generates 5 volts through a voltage regulator which then connects via the “5V” pin to the other boards as shown. The risk here is a mistake with 10V may burn out one or all of the boards (best get it working on 5V first). Also note – the Nano’s voltage regulator isn’t designed to power other modules so run it on the lowest voltage possible to avoid overheating. The 5V (vss) and gnd power connections are self-evident and connect to all boards. Below are the other connections. From To Nano D2 SD card reader CS (chip select) Nano D3 GPS TX Nano D4 GPS RX Nano D11 SD card reader Mosi Nano D12 SD card reader Miso Nano D13 SD card reader Sck Nano A4 BMP Sda Nano A5 BMP Scl The Nano has a reset button and pressing this when its running will close down the current data file, open a new one and reset altitude to zero. This is useful just before a launch! I used a nylon screw/nut through the case, left with some slack so pressing the screw head hits the button! It can be first built on plug in bread board first just to get it working of course! Software Software version “gps_var_rate_serial.ino” and “gps_var_rate.ino” I decided to have the software sample at 4 hz but write at a variable rate to the SD card. Every 1 second up to a speed of 75 mph, every 0.5 second up to 150 mph and every 0.25 seconds above 150 mph. These thresholds values can of course be altered! To overcome the issue of cheap modules “forgetting” their settings, the sample rate and GPS baud rate are programmed into the GPS module from the Arduino during each reboot. This also saves having to pre-program them manually before use! To accommodate the faster sample rate, the gps baud rate is set to (38400) and the serial data output is at 230400 baud. This version will not work on a Fake Neo.6m (rebadged Techtotop TD1030 GPS). Software version “gps_1s_serial.ino” and “gps_1s.ino” This software uses a GPS that samples once per second and a gps baud rate of 9600 (the default settings). Suitable for a GPS module that cant be adjusted and is ok for slow to medium speed models. The serial data output is at 115200 baud and should work on all Ublox GPS modules (and their fakes). I have noticed that spirited aerobatics can temporarily affect GPS reception but this is usually only a few data points affected (the data freezes briefly!). The software need various libraries installed into the Arduino IDE to work. https://github.com/mikalhart/TinyGPSPlus/archive/refs/heads/master.zip https://github.com/greiman/SdFat/archive/refs/heads/master.zip https://github.com/adafruit/Adafruit_BMP280_Library/archive/refs/heads/master.zip If you don’t know how to install library files, see https://support.arduino.cc/hc/en-us/articles/5145457742236-Add-libraries-to-Arduino-IDE in particular the bit about importing .zip files. Each version of the software has 2 options, one that reports the data as a serial stream as well as onto the SD card. The other version only stores data to the SD card. The serial version shows the data live to the Arduino IDE’s “serial monitor”. The non-serial versions have this disabled simply to give a bit more headroom for the software memory on the Arduino and is best for the version that will fly! Using the Serial monitor With the dataloggers Arduino attached to the PC via a USB lead and the Arduino IDE program running, press the serial logger (top right of the screen and looks like a magnifying glass with a dot in), check its connected to the correct COM port (Tools > port) and set the baud rate to 115200 or 230400 depending on software version. You should see the data appear line by line each second on the screen. You can see its altitude vary if you lift it up a few feet. If its gibberish you have the wrong baud rate!1 point
-
I remember Brian many years ago when the Kyosho 90 Spitfire was released for sale, I always regret not buying one. I was very friendly at that time with an English man who was working and living in Dubai. He was also a member of the local rc model flying club and his favourite plane to fly with a 91 fourstroke engine was this very Spitfire.1 point
-
It’s been just over two weeks into the build - so far the only hurdle to overcome was getting the thick fuselage sides to conform to fuselage former F2 - initially they weren’t having any of it but with patience and brushing plenty of Ammonia onto them I was able to get them to curve nicely around.1 point
-
Bill Snap! No magnets yet (they are on order) but top and bottom pegs. Not a problem for the bluff nose but the same will be used for the long one. For the maiden I simply held the bluff nose in place with little bits of Blenderm tape. Yes I have flown it, sort of, twice! It actually has sufficient thrust but proved to be tail heavy. The result is it went into a climb immediately after the launch. With no forced airflow the eelvator has virtually no effect so it stalled. First time little damage, second time even with full down elevator trim it still stalled with rather more damage. As you can see it rather took out all the "sticky out" bits on the right hand side! I later discovered when the RH wing was ripped off the aileron link stripped a gear in the servo too. You can tell how muddy the grass actually was. It will mend no problem. I will move the battery forward and a bit to the left to counter the weight of the ESC. As the thrust appears adequate I will reset the drooped ailerons to neutral as well which should reduce the nose up pitch. My fear is the huge fuselage area compared to the flying surface areas will require the CofG to be remarkably far forward for stable flight. My late Bachem Natter was a bit less aerodynamically extreme and it was a pusher so had adequate thrust. But it still needed the CoG to be at just 16%. Until I set it that far forward every flight ended in an uncontrollable stall. I nearly gave up after 4 rebuilds but once right it flew remarkably well. https://www.youtube.com/watch?v=cq6MzWCXn60&t=30s I can only hope the X-3 gets "sorted" before it gets completely wrecked.1 point
-
Its off to Logicrc for a new screen. Hopefully that will be all it needs and there isnt any underlying issue!1 point
-
Jon, I am sure all the forum members wish you well in your new and hopefully very rewarding career with your new company . The forum and all the Laser users worldwide appreciate the efforts you have made to make Lasers the great British engine. I hope to see you again at the next Modelair meeting at Old Warden.1 point
-
Some years ago I was on a Coastguard call out to a man walking the Pembrokeshire coast path who was reported to be having heart problems. This was in a spot well away from any roads. We were crossing several fields in our 4x4 rescue truck when we came across two Ambulance men who were on foot carrying their equipment. Picked them up and between us all were able to sort him out and get him to the ambulance still conscious. Talking to the paramedic he said that just three weeks before he had had a triple heart bypass! He said he had been told to do plenty of exercise. Told him we did not think the doctor meant walk the rugged Pembs coast path.1 point
-
Need to start mine soon, as I think it will be very tight to finish both the FW190 and the Tempest before the D-Day 80th Anniversary, which is only just over two months away. Need to clear the bench first though and airbrushing roundels is a time consuming exercise.1 point
-
Looking great there Lipo Man, you must be delighted with that as a first build.👍😎1 point
-
I've dusted my Pixie off for some relaxing flying this Summer Video1 point
-
That looks the business and for a first build too, you must be, and should be, well pleased.1 point
-
Thanks chaps, as always, much appreciated.1 point
-
Now the M23 is ready to take of.The Hacker A50-12L V4 consumes 56 amps at full throttle.Let's get started1 point
-
Like to thank Jon for all the help he gave me over the years He is a true gentleman .1 point
-
Bigger definitely better, easier to see and doesn't get blown around as much.1 point
-
I remember the good old days when Snap, Crackle and Pop came from my breakfast cereal, not my body.1 point
-
Craig Glad you are considering a more normal route to learn to fly RC. There is of course nothing stopping you building your Nieuport 11. Biplanes can be fun to build and look wonderful when finished but they are pretty delicate structures. It may seem odd but for flying "small" is more difficult than "large" and 24" (its actually 25") span is by no means big. The reason is simply that small planes react faster to everything and the one thing any human learning to fly needs is time to convert what they see a plane doing in the air into the correct and timely reactions on the controls. The slower things happen the easier it is to learn the eye/hand coordination. When you join a club you may be surprised at how big and heavy the club trainer plane is. It will likely have buddy controls as well meaning the instructor will have a set of 'master' controls both to be able to demonstrate what is required and to prevent you damaging the plane or anything else. After all two seat dual control is the only way you learn to fly a full size plane. Do post some pictures on this site as you build. Don't worry about any lack of skill or understanding. We have all been there. Pictures greatly help others to give useful advice and even if you don't actually need help the pictures of what you achieve can give encouragement to others thinking of starting out.1 point
-
High Start , those lovely pictures of the QB 2500 reminds me to complete my QB that has been languishing after having 80% airframe work completed.1 point
-
Motorcycling and Aeromodelling share quite a lot in common IMHO and experience. Been into both continuously since my mid teens ( started with Yamaha 'Fizzy' and Graupner glider back in '73). Entrenched views about makes and 'how to do it' - those that ride or fly in the very worst weather and like to wear their discomfort as some odd badge of honour. Synthetic or Castor based fuels in our model engines and the opinions surrounding E10 and E5 petrols for our bikes etc etc I think you get my drift. HOWEVER.........both activities have some of the nicest people you'll find anywhere (always the odd misery here and there), eager to help a fellow flyer or rider in bother and eager to chew the fat. Welcome to the hobby Gravel, I think you'll enjoy it.1 point
-
Riding a sports bike at 72 kph Paul! No wonder you're too tired to drive to La Coupe Des Barons!1 point
-
Still riding mine at 72,,,1 point
-
It's quite a tough climb on a bike. I rode a hill climb there a good few years ago when we were staying at the YHA nearby. When I had the accident that damaged my spine, I got out on my bike as much as possible. Glad you're making progress, Matty.1 point
-
Quick update, I am now out of hospital in an amazing rehab centre , and am now doing loads more physio and they have lots of incredible specialist equipment including an exercise bike that has electrodes that you attach to your weaker limb that fire in time with the rotation of the pedddles to encourage your less good limb to relearn it’s role! I am so lucky to get a place here, as sometimes people wait weeks, but I got in last week only about 2 and a bit weeks after my stroke. That is ke, as apparently the early days after a stroke are when you have the best opportunity to improve.1 point
-
Update as promised: Sorry… Thank you for your patience, we’ve spoken to the tech guys and due to the increase in spammers on the site, it’s affected the protection levels, making it hard to log in. They’ve made some adjustments their end which should have solved the problems. Do let us know though if you’re still experiencing any issues. Fingers crossed for next weekend!1 point
-
The photo does not do the weather justice although we did have a few spots of rain, wind was down the runway/over the gate. The Red Sparrows (Red Arrows edf hawks) team were demonstrating just how big the sky can be when trying to fly in formation 🤣 Two maidens of which my OV10 was one, flies as nice as the P381 point
-
A good turn out at our field today, light wind and sunny until the afternoon, then clouds hid the sun and the breeze felt quite cold I spent 5 hours there flying my Warbirds Replicas FW190, a Spitfire and Corsair.1 point
-
Just back from a totally successful afternoon at the flying field. Weather was grim (high winds, and gusty at that) but it was directly along the strip so decided to brave it. I’m flying with the recommended throws and 20% expo and it’s sooooo user friendly. I was mainly flying gentle circuits at about half throttle just to get a feel for her, and after my first four minute flight found my battery was still at 72%! (that’s for a 2800mAh 4s, 800kv 4250 size motor and a 12x8 prop). A few bits of finishing off still to do, but very happy with her. Can’t really imagine how a balsa warbird aimed at a new builder could have been made any better! Hat tip to Richard the designer - I think this one has nailed the brief!1 point
-
A visiting chopper stopped our weekly ground maintenance day But we still managed to get the work done, our model flying area is now like a bowling green and the rest of the grass runway (full size) isn't far behind! And there was time to get a couple of flight sin with the Hanky Plan Foamy Foamies and my Viperjet (picture taken at home where the grass is a bit longer!)1 point
-
Was at the flying field tonight with my T28 Trojan. The weather was glorious.1 point
-
Three days of good weather in the North East has seen me flying this one. Laser 100 powered it has now had many flights and the engine is beautiful , starts first time and performs well , ticks over like a watch 6 -10min flights each day, on to my last gallon of Laser fuel so need to order some more. Nearest model shop 80 mls. away1 point
-
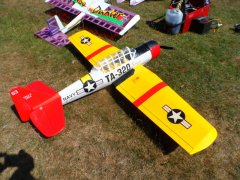
Tony Nijhuis Jet Provost built from TN woodpack and RCM&E Plan. Flew great once in the air. A bit fast for me though.1 point