Leaderboard


Popular Content
Showing content with the highest reputation on 24/03/24 in all areas
-
And today I stood up under my own power and can now transfer between bed and chair without the hoist on a natty trolley-like contraption they call the re-turn https://www.directhealthcaregroup.com/app/uploads/return_product_brochure_uk_12pages_1505_low-10.pdf6 points
-
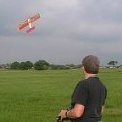
Had about 10 short trimming flights this afternoon. It’s the first time I’ve been out since early January!! The flaps worked very well at 90*, and needed only 3-4mm of down elevator to compensate. The plane will need some weight on the port wing but that will be done this week as it’s due to pour down all this week....again5 points
-
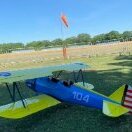
First field meeting of the Butcher Birds and with a discussion revolving around rates and C of G I think we can say we are getting quite close (apart from me and my colour scheme!. John i having a few issues with the spinner as it seems to change its seating position differently each time the prop is removed. Lets hope the bank holiday weather is going to be kind to us and we can get the remaining two in the air (dollies have all been finished), oh and I sort my paint work out!5 points
-
A £10 special, Functional resto for the summer, needed a nose job, pan of hot water, glue and filler. nose retract with trailing link and larger wheel, larger diameter mains, trailing links to follow-may be. Top cheater curtesy of Leccyflyer. Plenty of previous owners mods to tidy if its still with us come winter. Roughed out a rudder plan, single servo with connecting rod aft and in-line with the elevator, so kind of hidden. Cheap Powerfun 4S 12 blade edf en-route from aliexpress. Silver was Humbrol met silver, exact match but shiny so a splodge of matt minwax and nose Tamiya red, will supply codes if anyone asks.4 points
-
Tail feathers on nice and straight , plus provisional canopy fitted (yours and mine will be clear )4 points
-
The very limited flying over the winter means I need to get in some practise with EDFs as I hope to get the rather "extreme" Douglas X-3 flying. The better my flying skills are the less likely it will might not get any more damaged that it already has been. I decided to fly some of my EDFs that have spent most of last year "hanging on the wall", quite literally. First was the 50mm EDF DH "Swiss" Venom although on this occasion it was flown without the tip tanks. 44" span, it is a Depron job and light at 520g but with a 1300mAh 4s and a clean airframe it is no slouch. Those twin booms are delicate so a belly landing needs concentration and accuracy. Next calm day it was the exact opposite. The Depron Douglas Skray . 36" span and a similar weight to the Venom but with over twice the wing area. A gentle slow flyer but like all delta the drag rises rapidly in any sort of manoeuvre. Flown bank and yank nose drop in a turn is pronounced. Pull too many g and it almost stops flying! Next was the Hawker Hunter F6. 50 mm EDF 33" span and made entirely from 5mm XPS sheet (no balsa or carbon!). At 385g a bit heavier than the Venom although not quite as fast but flies very nicely. Decorated as a Black Arrow of 111 squadron who managed to loop 22 of them together in formation. Today late on (17:20) the weather improved considerably so it was the turn of the P1052 better known as the prototype swept wing Sea Hawk, Still a "portly" Sea Hawk fuselage with a modest power 55mm EDF. Like the Hunter made entirely from 5mm XPS sheet This was my second Hawker, the first was a Sea Hawk. I made a better job of the complex bifurcated inlet and exhaust duct so it had more thrust from just a 1500mAh 3s. Two were built. One still exists at IWM Cosford. The other was modified with a bit more thrust but broke up trying to go supersonic in a dive. The test pilot did not survive. Hopefully at the next calm day I will be able to try the Douglas X-3, again and be a bit better prepared to not break it.3 points
-
Afternoon all! I wonder how many of us actually watched the race live at 4am this morning... I didn't - I recorded it and watched it at breakfast time! With the channel 4 highlights programme well under way I'll post our results here without any comment on the race itself for the moment. Usual disclaimer; If you are watching the recorded highlights and don't want any clues about the result then maybe you should look away now! So, here are our scores for today; Pos League Rank Team Manager Pts 1 1 5 Essex Racing Tony Clark 173 2 4 5 Hidden Cucumber fat brownie 161 3 16 0 Norfolk Flyers Kevin Fairgrieve 158 4 2 5 PSS Power Flyer 156 5 9 3 teewrex John Tee 130 6 6 1 Revers Racing Pete B 126 7 10 3 Torque of the devil Stu 118 8 14 0 Pitts Specials john stones 117 9 5 3 DMFC Racing Team Simon Webb 113 10 7 3 Team Charles Picd Charles Pic 109 11 3 2 Mannschaft Carl Brotherton 104 12 8 5 GASTON Formula Chris McG 98 13 13 2 LetsGoTotoLetsGo GrumpyGnome 96 14 15 0 Hans Brake Zoonie 92 15 12 2 The JP Specials johnpflyrc 86 16 11 3 Iqonic racing iqon 71 Topping today's results is Tony with 173 points. Second today is "fat brownie", aka PDB, with 161 points. Close behind in third today is Kev on 158 points. Well done to today's top 3. And I think we now know who has Ferrari in their teams! So now to the overall table; Pos League Rank Team Manager Pts 1 1 5 Essex Racing Tony Clark 457 2 2 5 PSS Power Flyer 435 3 3 2 Mannschaft Carl Brotherton 430 4 4 5 Hidden Cucumber fat brownie 425 = 5 3 DMFC Racing Team Simon Webb 425 6 6 1 Revers Racing Pete B 415 7 7 3 Team Charles Picd Charles Pic 412 8 8 5 GASTON Formula Chris McG 401 9 9 3 teewrex John Tee 368 10 10 3 Torque of the devil Stu 349 11 11 3 Iqonic racing iqon 346 12 12 2 The JP Specials johnpflyrc 340 13 13 2 LetsGoTotoLetsGo GrumpyGnome 339 14 14 0 Pitts Specials john stones 328 15 15 0 Hans Brake Zoonie 300 16 16 0 Norfolk Flyers Kevin Fairgrieve 293 We have a new leader in Tony, with Ade (Flyer) close behind - both move up 5 places today, as did fat brownie, in his case to 4th. This means Carl, Simon, and afew others move downwards... Kev's great result today still leaves him at the foot of the table after his unfortunate issue with the first race - but now very close to Zoonie in 15th. Next up is Japan, so another early start. That's in 2 weeks time, with qualifynig at 7am on the Saturday, the race at 6am on Sunday.3 points
-
First I apologize for publishing in Spanish. Then thank everyone for your interest and quick responses. This forum is very helpful for less advanced builders and this thread about the Stampe is very interesting since each of you contributes your grain of sand and your peculiarities to this model and we are all getting ideas. I would also like to modify the upper wing in three parts and the lower wing in two to have access to the interior of the fuselage. I am studying how to do it....Thank you all very much for your help and understanding, greetings.2 points
-
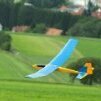
Test flown this afternoon, built from a Derek Woodward plan as an i.c model (not by me), bought from APOB and converted to 3s electric. Chilton DW1, i plan on building a larger one using foamboard and depron at some point.2 points
-
Particularly pleased at the compliment on the grass strip - I do the mowing! 😇2 points
-
Now all repaired and ready to go. The battery has been moved forward and to the left to counter the weight of the ESC. It was this imbalance that caused the right wing to drop a the stall. The previous and new CofG position are shown. My trapezoidal calculations suggest the new position is at 21% of the mean effective chord. With such limited elevator authority I am anxious not to move the CofG too far forward too quickly but I fear it might need to go still a bit further forward however it would not be difficult to adjust things too allow the battery to slide further forward. We shall see once the weather calms down, although if the weather forecast is right it could be after Easter.2 points
-
Great to hear you’re making progress.2 points
-
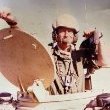
My latest, back from my repair shop, a donated airframe of a VMC Hurricane -a rubber powered model, 16" span, about 60g in weight, converted to full house and electric flight with the innards from a Volantex Super Cub by my pal Bob. Unfortunately the Hurricane met with a more rigid object in the form of the windsock a few weeks ago and Bob passed the badly damaged, but repairable, airframe on to me, as I'd been wanting a Hurricane to add to the fleet of wee fellers. I built a replacement wing, covered it with 38um laminating film and after paining made some new replacement laser waterslide decals. All done now and waiting for a remaiden.2 points
-
Arduino based GPS flight logger - Dave Windy Miller What follows is quite in depth but hopefully clear enough to someone with a bit of Arduino experience and I can answer any queries you may have! I thought I would share with you my experiments with a flight logger made for less than £25 that includes GPS coordinates, GPS speed and barometric height. All this data is written to an SD card that can be read by Google Earth. This is my original logger built with a Neo-6m gps module built into a Futaba receiver case and attached to a ply base for attachment into my “Hotspot” turbine jet. I have since dropped the small oled display. A smaller version would be possible with a purpose build pcb c/w the processor chip The data is recorded onto SD card and can be subsequently imported into google earth and displayed as a flight path. Whilst altitude can be obtained from the GPS, ive found this is less than reliable with the altitude changing by 50ft or more just because the satellite count changes! A BMP280 chip can be set to be zero at the point of reboot and show altitude above launch in feet and is reportedly good for +/- 1ft which is 0.5% error over 400ft but read below re atmospheric pressure effects! For info:- Barometric chip bmp280 The height to pressure response is a curve but for our range of altitudes it is linear for all intents. The barometric pressure affects the readings with a drop of 1mb equalling ~28 feet in altitude. The difference between low pressure and high pressure weather can be equivalent to an altitude change of 2000 ft or more! Ideally, you would set the barometric pressure and height above sea level each time its used but this is a faf. To avoid this, I set the height to zero on power up so all altitude change is relative to this point until its reset (as it’s a near enough linear response). Any barometric changes during a 5 minute fight are generally negligible unless there’s a severe storm looming! If it drifts negative before take-off (baro pressure increasing), the software resets this to zero so as it stands my software would need a modification if used on a slope soarer flying below you! The pressure these sensors detect has to be static pressure and not be affected by the air velocity. Whilst this is difficult to quantify, mounting the sensor in an inlet duct or in front of a fan impellor for example isn’t a good idea. If possible, mount it in, say a cockpit that isn’t greatly affected by the airspeed / throttle position. The barometer chip I used is a BMP280 although a BME280 will work as will a BMP280/AHT20 dual module (all must be 5V versions). There are two address for these chips so you may need to edit the line in the code:- bmp.begin(0x76); for BMP & BME 280 which is the normal default bmp.begin(0x77); for the BMP280/AHT20 combined. Some are 4 pin and some are 6 pin. Both work, just ignore the pins not shown in the circuit diagram1 point
-
I purchase the Cessna 120 plan and laser cut parts from Sarik a year ago and it has sat in my cupboard whilst other build projects/repairs have taken priority, with the wet weather just lately, it looks as if this is the last winter project hopefully!! The build instructions are on the plan and a supplied RC Model World build log by Peter Maw, also available is an excellent build blog by Dwain Dibley which can be found in this forum, but once started, I felt the less experience modeler might still have issues with some of the ambiguity in the plan and build logs, so hopefully I will clear up issues as they arise. As with all builds different people will interpret drawings and instructions differently, and I am no exception. I will not be covering the complete build as this has been already done by Dwain Dibley (DD) only issues that may have been overlooked and any improvements that I think will improve the model.1 point
-
What helps me is that if the throttle is on a switch for a particular model, it is the same red kill switch I use for all powered models. So in my mind it is linked to power on or off anyway. After reading some of the comments I will change it to a different switch for redundancy. Good suggestions here, great forum this is.1 point
-
1 min in and eyes were drooping 😌. Not as good as Top Gun Maverick.1 point
-
I would be if I were flying! ....thats my house that is 240Metres AMSL 🙂1 point
-
If you are talking about heat shrink covering, such as Solarfilm or Profilm don't be tempted to just pull it off without using any heat, that's how you end up leaving the colour stuck to the wood, which is then a pain to remove properly. You'll get most of it off smoothly , especially if it's Profilm or one of the better products, Solarfilm can leave a sticky mess and shards of the colour layer stuck to the wood. To get those off, you can use parcel tape, ironed onto the remaining shards of film layer and pulled off at a variety of angles, which can then y-just leave you with the most stubborn bits to pick off with the tip of a knife blade or by sanding. I don't recommend the use of cellulose thinners, especially if you are planning to recover in a different colour, as it will just drive the colour into the wood and you'll never get it out. There's lots of useful information in previous threads, such as here.1 point
-
Chipping away at this project still, maybe 60% of the way there now. Finished the piston and it turned out oddly accurate, actually goes up and down the cylinder, BUT, maybe too slack. There is a lack of real compression, so I might make another to get it tighter. The contra piston is far too loose and follows the piston (oiled) down the cylinder on the down stroke. Sigh... I will need to get some more cast iron bar, maybe tomorrow from Hemmindways. Moving on, did some more to the 'carb' and with the arrival of a 4BA tap and die made the needle valve jet which screwed together well, and then the tank to follow. The tank was machined from the remains of the Alum bar i had over so is a bit small, but it only has to hold a small volume of diesel to prove it runs. It will never get into a plane. Lathe needs a bloody good clean, alum swarf everywhere, very irritating. Question, do I REALLY need a tight fitting piston? 73T 911 Coupe,1 point
-
Very well documented Richard!1 point
-
Rather than using the Tx differential function I start by setting all four servo arms forward to give mechanical diff. as you should do. Each can then be tweaked as needed, 2:1 diff. is a good starting point.1 point
-
I have Ferrari in my team line up... ...without them I would have been last for sure! Well done Top 3!1 point
-
Well done top 3. Didnt go to plan..1 point
-
Looking superb LiPo! Hoping to get back to mine over the Easter period. If I achieve half of the realism of yours, I will be happy. Envious of your manicured grass strip as well! 😀1 point
-
It’s nothing The Holy Hand Grenade of Antioch won’t sort. Lobbest it at thine foe, who being naughty in mine sight, shall snuff it….1 point
-
Sorry to see the test didn't go perfect but it proved your fan setup will work and you have a positive amount of lift. I think you are right that the longer nose sections are creating lift and is causing the cg to need a more forward position. You could think about it like the X-3 is a lifting body with just enough wing added to allow it to take off, well at 40% of mach one..... Bill1 point
-
Thanks Simon it was a good result in the end. To be honest it has taken very little sorting to get it flying well. 1st step was giving the motor a bit of down and right thrust. And a bit of adjustment to the upper wing. I'm well pleased with it now. Very easy and predictable to fly. My first 'big' Lidl foamie biplane rc build below took a good few adjustments before it flew ok. Biplanes are funny creatures! 🤔.....1 point
-
I would have same amount top/bottom, on a beast I wouldn't worry overmuch about differential.1 point
-
At last!....Really pleased for you Bonzo, great result.1 point
-
With previous electric conversions the IC set up is always heavier than the replacement electric set up so I'm very conscious of not creating a tail heavy aircraft, so with my build I will try to keep the tail light whilst not worrying about additional build weight up front as I hate adding 'church roof' after making a lightweight model. After careful pondering and a bit of experimenting, the following changes have been made to the fwd fuselage :- F2 has been replace with 2mm ply former as this will be the fwd frame for the removable windscreen assembly. The 1/32" ply doubler on fwd face of the balsa box sections are replaced with a 1.5mm doublers with extends to support the new F2. F3 has been cut for battery access. The 1/8" ply tank floor has not been fitted. A 3mm ply floor between F4-F5 has been added to support the standard servo's, Rx and battery tray, the servo's have been mounted 'sideways' to allow as much battery movement for CofG requirements if required. The undercarriage was the next issue - the plan shows an UC raked fwd, which in itself is not an issue, but as I had an old UC off a KK Super 60 which had the correct dimensions, it would have been rude not to use it. The supplied UC mount plate was replaced (as it had pre-drilled holes in it) and then positioned it 7.5 degrees tilting downwards at the rear, which then gave my straight UC the required rake. An additional support plate was fitted to the aft face of the mount, that can be seen in the above photo (with the lightning holes in) The removable cowl has been started but until the wings are complete, I'm reluctant to go any further as I will need to check the alignment of the windscreen. The rear fuselage section is straightforward to build, there does seem to be differing opinions on the balsa thickness of the sides! The drawing states clearly its 3/16th and drawn accordingly with sheeting top and bottom of 3/32" , the Sarik supplied upper and lower formers fit giving the required 3/32" clearance each side for the sheeting to abut the fuselage. The only tip I would give is make the formers slightly wider so you can chamfer them to make a proper mating surface. The model is well engineered in places and weak in others (that opinion is based on my flying style, runway state and ability) so with the "keep the tail light philosophy" I put lightning holes in the fuselage which also gives access if required.1 point
-
It’s been just over two weeks into the build - so far the only hurdle to overcome was getting the thick fuselage sides to conform to fuselage former F2 - initially they weren’t having any of it but with patience and brushing plenty of Ammonia onto them I was able to get them to curve nicely around.1 point
-
Last visit to Laser Engines to collect the first and last production V 310 pair. Thanks to Jon for the final push which just leaves me to do this pair justice in a suitable model (DH).1 point
-
Maybe, but there is nothing to stop anyone else starting a company making engines. In part this is why the selling the company chat is a moot point. If it was such a great and profitable idea everyone would already have done it. If anyone does decide to start a new company making engines do let me know. I can become a consultant and charge an exorbitant fee 😄1 point
-
This Is mine Chris, Never had any problems with it. Similar stance to Ron's1 point
-
I also built the Brian Taylor Cessna 120, from the Sarik short kit. My model is based on a real aircraft, which was owned by a friend of a clubmate. A few pics attached.1 point
-
To obtain the 2 degree right thrust, I cut the 3mm off the length from the R/H wall of the box section and positioned the X mount 4mm left of centre to align the prop to centre on the cowling. 1 degree down thrust will be achieved using washers under the X plate. Holes were cut to suit cooling and motor leads. The motor stand off's are around 31mm, but this might change!1 point
-
Quite a scene i find in my inbox this morning. I will get the whinge out of the way first. Please stop trying to order spares. Its not covid times any more and i am not selling loo roll, relax, its all in hand. As already mentioned model shop leeds will be managing spares support and even after the factory closes spares are still going to be in plentiful supply as long as people do not hoard things they do not need. Things like valve springs are dead easy as someone need only phone up the company who make them for us and order a bag. 500 springs will set you back about 2 grand, but you will have your springs and can sell them to all. With that out of the way i would like to say a big thank you to everyone for their messages of support. A number of you have asked what i will be doing with myself and i am quite proud of the fact that i have been offered a position by the Martin Baker Aircraft Company and will be assisting with the assembly of their various aviation safety systems. This is going to be a big change but i am looking forward to this new position.1 point
-
Jaydeez an genulmen, I give you... ...Dusty Crophopper. My 2 year old Grandson has taken a huge liking to the Planes movie. If you haven't seen it, it's really rather good and the aircraft are well represented. To stoke his interest, I've built a flying version that if we ever get some decent weather, he'll be able to see in the air. My usual B&Q laminate flooring insulation depron construction. Glass cloth/ B&Q water based varnish covered and painted with sprayed emulsion. The orange in Valspar matchpot, and a story in itself. I had a picture on my phone, but of course you can't match to a phone image, so I grabbed a B&Q bucket. This was too translucnt, so the match was dark, so we scanned the B&Q apron of the young lady operating the machine! Span is 47", 3536 1200 motor and will use 3S 1500 packs. Weight is just a touch over 2 pounds ready to go. I think it might qualify as a scale model... Graham1 point
-
Well, it’s done. There was some paint pull off the nylon in a couple of places but they’re very very small. They touched up ok.1 point
-
Hi, just to let everyone know that I’ve ordered my piston ring £12 Just proves what a brilliant group this is. Thank you1 point
-
Historic Italian Seaplane from 1925. Just built.1 point
-
Whatever you decide, check the switch for damage regularly. It will be many years before the memory of a clubmate's shaking hands after landing subsides into the haze of old age...his 7kW F5b glider left his hand and a small piece of metal hit the ground half a second later. Yes, that piece of metal was the throttle switch lever. It was previously speculated that the phenomenally over rated drive train wouldn't last much longer than the less than 2 second burst which normally took it to a couple of hundred feet and well over 100 mph vertically but it held together for the 45 seconds or so until the energy limiter used for competition cut in. I can assure you that nobody at the field took their eyes of the model for a fraction of a second during the entire flight - the ballistic missile-like projectile describing gigantic loops in order for the pilot to keep the 2m model in visual range. Can your transmitter have a non latching switch within reach? Could you consider using that?1 point