Leaderboard


Popular Content
Showing content with the highest reputation on 12/04/24 in all areas
-
For the last three years I have been trying to teach my Belgian mate Frans both how to build how to fly. He's built a Ben Buckle Junior 60 and a Radio Queen but I was on the point of suggesting that he had a few sessions with another instructor when he went solo this morning for the first time on the Radio Queen! The weather was perfect, he flew the first two flights with me on the buddy box but I did not have to intervene at all from take-off to landing so I persuaded him to go solo on the third flight which he did. We had a beer afterwards to celebrate the occasion! 😆11 points
-
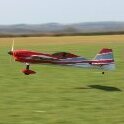
Finally got some video of the FW190 flying in a "finished" state - paint and decals all done, canopy fitted etc. It was very gusty so not ideal conditions but I'm getting comfortable with the plane so the wind wasn't a major problem, except for the wind noise on the camera phone. Resolution isn't brilliant but it's proof of flight at least!6 points
-
Just finished another free-flight model, this time it's a Vic Smeed Tomboy. This was my first attempt at tissue over mylar covering (many thanks to @PatMc for the mylar) with Eze tissue applied using acrylic floor varnish on the wing and some cheap tissue paper on the fuselage. Engine is a Boddo Mills 0.75 Mk2 with Kavan 7x4 prop which should be plenty. First flight will be soon hopefully, once this run of bad weather (must 6 months now!) is finally over.4 points
-
Nice flying Lipo Man - I enjoyed watching that. 🙂 Finally made a start on my FW190 today, just marking the bits up and getting the fuselage doublers glued up to dry overnight. Very impressed with the quality of the laser cutting and rewatching the first few of Ron's build vLOgs.4 points
-
Painting. I never seem to be able to organise myself to start - my Tempest airframe has been in primer for over a year! I've had a lot of distractions this winter so haven't even touched the model since I created the panel lines with masking tape/primer and pencilled in the camouflage pattern last autumn. My radio installs are planned during the build process so it's not a one off task. It does take a lot of thinking through on more complex models. We had a club member once who claimed that his radio installations took "half an hour". He was one of the most prolific crashers I've ever known - I wonder if there's any connection!3 points
-
I'm going to need a triple cat bypass before I can get out of bed this morning 😺😺😾3 points
-
The extra bits have now been painted and attached to the cowl. This is as far as I can get until the engine has been returned from repair. With the uncertainty about how long it would be to get a replacement crankcase, if there was one of the imperial thread type to be found during the Laser Engines clear out, the decision was taken to get one of the experienced LMA machinists to clean up the damaged front face and, if necessary, fit a shim to make good again. Should a replacement crankcase eventually be found, it could still be used. The model will now gather dust again for a while but with the weather now more suitable for painting its on with the next project...........2 points
-
Covering. Have to force myself to start. Whatever method I'm using. I'm fine with woodwork and kit install.2 points
-
Painting is historically the big hold up for me. Largely due to not having had anywhere to do it and never being fully satisfied with a brushed, rather than sprayed finish. I do now manage to do a little bit of airbrush work, but am so concerned about overspray that it puts me off any further attempts at an overall spray finish on all but the smallest models that can at least fit in the mouth of the airbrush "booth".2 points
-
Good luck Frans, from a novice. Bas2 points
-
I expect he is very chuffed indeed. Especially since he built the plane as well. Well done Franz2 points
-
A not so obvious reason why (jet) engines on wings are set away from the fuselage is that the mass of the engines opposes bending moments due to lift and consequent G effects (e.g. the engines get "heavier" while the wings are generating more lift in a turn) so the centre section doesn't experience as much stress.2 points
-
Best not mention shaping the nose with a razor plane or 6 policemen will turn up at your door.2 points
-
Following on from my previous thread about the Li-ion chargebox that I use for fast-charging my LiPos at the patch, I thought it may be useful to do a long term 4C charge rate test on the LiPos that I'm using: cheap-as-chips Turnigy Heavy Duty 6S 3300mAh 60C that were about £38 each when I bought them in 2020. As I tend to have lots of flights each time I go flying, and often fly alone or with only one or two others, my recently introduced charging-at-the-field regime relies on charging at an elevated C rate for a fun day's flying rather than a day hanging about waiting for batteries to charge. A lot of people have told me that this will result in reduced battery life but none of them can say how many cycles I should be getting, nor by how much this will be reduced when charging at high C rates (and I will ask these questions). It seems that nobody's actually tried it to find out, outside of RC buggy bashing where it's absolutely the norm, and much of the info I get quoted at me is from 15-20 years ago when things were definitely different. I want current, empirical evidence! So I went and got me some. I fly aerobatics, so at times I'm using a decent wodge of throttle. In F3A circles it seems that 100 cycles is considered about normal and 200 cycles is good. I had a pair of 3300mAh 6S packs that had about 200 cycles already on them at a 1C charge rate, so decided to sacrifice them in the name of science and immediately formulated a totally unscientific test: that from now on they shall be charged at 12 amps until they die. It's a minute sample size. There's no control. It's anecdotal. It's a really rubbish test but it is a real world evidence gathering exercise, done by Joe Punter having a rummage and sharing what comes up for whatever it may be worth. As my aerobatics aren't as power intensive as they are in F3A I figured that I should aim for double the number of cycles, so the aim of this shoddy, so-called "test" was to put another 200 cycles on each battery, only this time charging at 12A not 3.3A. (Mods - feel free to change the thread title to "Charging LiPos at 3.6363636363636363C" but I don't think it's quite as snappy) The rules: LiPos are only charged to 4.17v (aka "90%" but please use voltages!) and discharged to 3.80v (aka "50%"), which gives me a 7m30s flight +/- 0.05v, with roughly 1750mAh going back in. They are charged immediately before flying and then flown back down to 3.80v, so the whole charge/discharge cycle is about 20 minutes. On Johnny Nomates flying days they are put on to charge as soon as they come out of the plane while I go and fly what's just come off the charger - so no "cooling down" period - then rinse and repeat until brain-fade or nightfall sets in. The idea with the chargebox was that I could fly almost non-stop almost all day on any plane in my vast all-electric hangar while only owning two (sets of) LiPos for that plane. If only I'd thought of it before buying several LiPos for each plane I own... Anyway, going forward, it's definitely the way I'm doing it from now and I'll just have to try and insert a memory block about the dozens and dozens and dozens of LiPos that I never needed to buy over the years. If you're new to electric flight: put together a chargebox and buy one high-C LiPo per plane you own (but only if it takes different batteries to the rest of your hangar!) - it's the best advice I can possibly give you and will save you hundreds of £s - maybe thousands if you ever seriously move on to 10S or 12S - and keep you flying when everyone else is going home because "I've used up my battery". What's that saying... "The answers to all of your questions are written at the bottom of a 100 gallon drum of fuel." (there is no electric version of that quote, so it shall remain forever I.C.) I digress. I started the test in August and so far (11th April '24) they've done: 440 flights in a 6S 60" EF Slick - last year's pulled-the-short-straw autumn/winter hack & the most bonkers plane I've ever flown. Currently modelling the "several oz of mud" scheme. 10 flights in a 12S 74" EF Laser (10x2 packs) 50 flights in a 12S 74" EF Edge (50x2 packs) = 560 cycles ÷ 2 batts = 280 cycles each @ 12A, plus what they started with back in the days of 1C charging, so these two batteries will each be at 500 cycles by the end of this month and there's simply loads of life left in them yet. If this is the reduced battery life that people are telling me about then I'm fine with it - it's 1½p per (6S) flying minute, including charging up the Li-ions, and that's coming down all the time until they finally expire. They're not showing any signs of stress at all yet, though I never bother trying to measure capacity because it's going to take a long time for me to notice any reduction, given that I only use the 50% in the middle anyway. Internal Resistance is 1.1 to 1.2mΩ per cell (@19°C @24v pack voltage), which is what they settled down to after around 20 cycles and have remained at ever since. So, unless I've fortuitously bought the Willy Wonka Golden Ticket LiPos that are full of magic beans, I'm beginning to come to the conclusion that charging at high C rates is doing very little, if any, harm at all, and that battery damage is far more likely to come from charging all the way to 4.2v, poor throttle management, using the wrong C rating for your flying style, or "It says there's 14% left, so that's okay" which almost certainly means that you've actually just ruined your battery (I said use voltages!). I'm not having a go - I've been all of these people, which is why I've bought so many LiPos. You pays your money... I have another test going on, with four Zippy 6S 4500mAh 40C batteries, that's parked at the moment on 40 x 15A cycles each (not flying those planes just now) that is showing identical results, though I'm not drawing any firm conclusions until getting 200 extra cycles on them, which if they manage it will take them over 600 cycles. Tests are ongoing and I'll report back with more interesting info/tedious waffle. A future test will be to try this with a new battery - is it the 200 cycles at 1C that's somehow making it resilient to a higher C charge later on (chemically unlikely, I'd say), or can it sustain this kind of "abuse" from new? In the meantime, I'm trying to find out - ideally in layman's terms (no equations!) - whether the asymmetric process of reversible intercalation is at a fixed or variable ratio. In other words, does a high C rating for discharge automatically equal a proportionately high C rating for charging too? Surface area of the lattice seems to be key, which explains why high C batteries are bigger and heavier, but I'm not sure if the processes are exactly the same, just reversed, for insertion and extraction to/from the lattice because I'm rubbish at chemistry. Any electrochemical engineers out there?1 point
-
Hopefully this will solve the problem of numerous noseovers due to landing gear being too straight. The local engineering works did a great job in breathing new life into the old gear. I will soon find out soon enough when i take the plane to the club flying field at the next available opportunity.1 point
-
It's mine, I've just finished it tonight. Everything in, there's a slight nose down dip at the plan CoG. But she is chunky at 5.2kg/11.4lbs. Great big DLE20 at the pointy end, swinging a 15x7x3, has extended the nose by about 10-15mm with the stock firewall position, which means it's balanced with no nose weight. Lots of engine running in to do whilst I wait for short grass, a dry field and a perfect wind (and another clubmate to finish his Cambrian 109).1 point
-
The T31M has so much built in drag that I doubt the very small spoilers would make much noticeable difference to the descent angle. IMO a better option would be to hold the throttle to a slow tick over & let the prop create the drag.1 point
-
If the model needs me to cut out the formers and ribs then getting started is the rate limiting step, I do not like cutting parts, I find that I am less than accurate. Once over this stage I am OK. If it is a ready cut kit, no issues, straight in and through the build.1 point
-
The bendy needle valve and ratchet spring were used on various Enyas over the years. The “venturi” looks like a piece of brass tube, something home made probably to replace the missing original. Brian.1 point
-
That is an ED Comp. Special, 2cc, late ‘40s. The needle and its fitting aren’t original. They look like they are from an Enya. Also the fuel tank is missing. Here is a picture of one from Mike Clanford’s book. Brian.1 point
-
Well done David - I'm sure that your pal was delighted and really appreciates your help. A couple of glasses of Leffe after such a momentous occasion was most definitely the order of the day. 😎1 point
-
Here here ( hear hear, which ever way it's said ) , nice one Franz. Nice looking weather...unlike UK, biblical rain again...1 point
-
I've weighed it this morning and it comes out at a rather porky 9.62 lbs (or 4.36kg for Paul) without fuel. I can't see any guidelines on the Galaxy site but it flies fine at this weight.1 point
-
Promised the wife I was just going to give my workshop a major spring "tidy up/upgrade" 🤫 1st or 2nd batch - no rush.1 point
-
Thanks all so much for taking time to reply. I now know that it is pretty much as difficult to achieve as I felt! Saying that, each reply had been delightful to read and highlights practical options for me to consider which answers the post greatly. Best1 point
-
These battery checkers were mainly for checking the receiver pack, so typically 4.8v packs, though some slightly fancier ones were switchable between 4.8v and 6.0v packs, with a wee button to put the pack under a fixed load.1 point
-
looks good far better than my current 2nd effort andy1 point
-
Thatz gotta be fake. Evrywon knows its pigs wot fly innit 😝1 point
-
Battery checker.1 point
-
This is how evaporated milk is made.1 point
-
“ When I said I wanted to become a comedian , people laughed at me...They’re not laughing now.” ( Bob Monkhouse)1 point
-
A man tried to sell me a coffin yesterday.............. I said thats the last thing I need!!!!!1 point
-
I may not have the kit yet but the pilot is ready And just in case the scale is wrong, here are his smaller brothers, Tiny Tim and Really Tiny Im1 point
-
Aircraft Aluminium1 point
-
And this is where I am at as I am waiting for some wood to arrive. Steve.1 point
-
When you start out with electric limited flight time seems to be a constant problem. As you progress with more capable planes with a longer potential duration you find what you want to do in the course of the flight is more important than the maximum possible flight time. I suffered from exactly the "duration" problem when I started out in electric where 3 minutes was likely the best flight time for a simple plane. My interest in structures and aerodynamics prompted me to do something about it. Improvement in wing aerodynamic efficiency and weight reduction more than doubled the duration of the same basic plane to 8 minutes, mostly due to the reduced throttle required to simply stay up. The full power duration was little changed. I carried on with this theme with several versions of an improved lighter airframe, more efficient motor and prop with of course a bigger battery. Although keeping to the same span as the original plane a cruise duration of an hour was achieved then a theoretical 2 hours and finally this plane which has a potential "power on" cruise duration of nearly 4 hours. It has a 1200mm (47") span and it weighs 436g (15.4oz) with a 3800mAh 2s. Its maximum duration was never tested as after 2 hours on a flat site I gave up from boredom and a stiff neck. Maybe it ended up to be a rather pointless exercise however I do still fly it on calmer days safe in the knowledge that the one thing I do not have to worry about is how long it has been in the air.😉1 point
-
IMO There is no rule of thumb as its totally dependent on the the way you fly or more importantly how you use the throttle stick! Perhaps flow up to 10 minutes with very gentle throttle stick use or...just leave it WOT plus prop hang it and it might be at low voltage cut off on the ESC in 3 minutes. Set the timer for 3 min, land after the time has gone off and then measure the battery voltage/capacity. Then ease the timer out so you normally land with approx 35% that way if you have to go a go around or two you should not be be below 25% (IMHO anything below that reduces the life of the battery long term). Other opinions will be as relevant as mine. 🙂1 point
-
Well the Hurricane fix up is finally completed. Applying the markings by airbrush and CNC cut vinyl masks took forever, with six colours and three mist coats of each, cleaning the brush between each coat. I'm quite pleased with the results, which worked fine with just a few wee glitches. With that done I set to with adding some panel lines, using my favoured method of HB pencil, accentuated with light grey water soluble artist's pencil prior to a little light weathering with pencil dust applied with the fingers and some localised aluminium dry brushing. Finally locked all that in place with a mist coat of matt WBPU varnish applied with the airbrush. Got the model all dialled into the transmitter today, added the radio antenna wire, set the control throws and sorted the velcro seatbelt for the 3s1p 3200mah pack. Add the prop and spinner for a final check of CG and with the battery in place and secured that is spot on, as per the plan, with no additional ballast needed. Just need the weather for a maiden flight now -and the bench is clear. 😎1 point
-
AUW should be 10lbs according to the plan.. I was starting to worry about weight so weighed the fuselage so far. I know it’s not covered, but under 1 1/2 lbs seems ok to me - hopefully the covering and paint won’t add masses of weight! Then I had to do the bit I’ve been dreading- cutting the fuselage for the wing to fit… doesn’t look as bad as I thought it might! it’s definitely looking like a Beaufighter to me now!1 point
-
Model finished ..flys really nice with the os90 four stroke ..rudder is needed in turns ,but feels very smooth and predictable1 point
-
Main fuselage frame is now made, quite strong but a bit heavier than i had imagined, i chose to leave the paper on the main foam structure to help with the strength of the spine but having removed it on some of the formers i now realise how much weight the paper adds, it is surprising! I am learning as i go on this build so although not as tidy as i would have liked i know how to improve the next model by using what i am learning on this one. I am using Clear expanding Gorilla glue which i was told is quite a bit lighter than hot glue but the spin off is it can be messy as it expands, don`t put too much on! I am only using this on the main structure, the main skins will go on with UHU POR. I will be trying the B&Q depron for the skins to keep the weight down, that will be the next step.1 point
-
The pile of Messerschmitt parts continues to grow, i should have the rest of the parts cut out tomorrow.1 point