Leaderboard


Popular Content
Showing content with the highest reputation on 14/04/24 in all areas
-
Final piece of the jigsaw on this build - I decided to gather my thoughts in a video review. Not done one of these before, and there was a lot of annoying background wind noise, but production values aside it's an accurate reflection of my thoughts about the kit - its' design, the build experience and of course how it performs in the air. It's quite long, so if you just want the highlights - I think it nailed the brief almost perfectly. I'm impressed!7 points
-
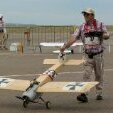
Having not documented the build elswhere I thought I'd share my efforts here, was hoping to maiden today but alas, was not to be..6 points
-
Favorite word of all TV announcers and reporters today " Unprecedented" drives me nut's, some do not even say it correctly.6 points
-
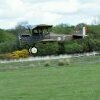
A dream to fly with 2 Saito .45 Specials, 8 years old now.5 points
-
In the last picture above , you can see that a lot has happened since picture one . So lets explain how to follow . (In fact if you visit the FW190 thread , there is quite a lot about weathering effects ). The lines were drawn as you saw . Then the little rivets added . The model would still look too toy like and clean . So what we need to do is make each panel jump out . On the full sized aircraft each panel would sit slightly differently and collect dirt and wind differently . The up shot of that is, that dirt stain would appear downwind of a panel line . So what I do is put a piece of masking tape along the panel line on the "upwind" side and then smudge some charcoal from the tape backwards towards the trailing edge . Sometime a circular motion with your finger works best , going onto the tape to pick up the black dust and then round onto the lower panel. When you pull the tape off , the panel will appear as an individual piece . If the panel line crosses a black stripe or other dark area, you can use white chalk in the same way . The other thing you will notice is the silver . It is just one of those "shaker pens " with a little ball bearing in . The silver sort of runs out like little blobs when you press on a surface . What I do is dot a little paint on , then quickly smudge it for and aft of the model . It simulates the way the plane would wear if people slid over the wings . The edges are also very effective . You just blob the edge , smear it along the edge very fast then drag the paint with your finger toward the middle of the wing . You can imagine pilots and ground crew constantly chucking parachutes with buckles and other scratchy kit onto the wing skin .5 points
-
It’s a shame that some feathers have been ruffled but I’m glad this has worked out well for you Aiden. Personal taste has a lot do do with whether others might adopt your solution but the alternatives have been aired (pun not intended) extensively so it’s time to close the thread here.4 points
-
Can we draw a line under this please. There will always be differences of opinion on forums but we don’t need to resort to sniping at each other. While I understand the frustration of seeing repeated advice seemingly ignored, a new poster will be unaware of past advice so perhaps a little more tolerance would avoid this sort of situation. Please don’t respond to this post (PM me or another mod. if anything is unclear) and let’s return to the subject of sharing information about the Galaxy/Pegasus Hurricane.4 points
-
I think that’s a bit unfair on Jon. The “development” of the boxers was a minor exercise by all accounts and its well documented that he didn’t feel that he was getting the support he wanted from the owner of the parent business which, after Neil’s departure, was felt to be very much of a sideline. I understand that Jon had no financial interest and was purely an employee - admittedly with a keen interest in the product. Any “beef” should be with the owner of the company who made the decision to terminate not only his company, but any (remote) possibility that Laser engines could carry on in different hands.3 points
-
Well the wind has come back again , so its back to painting the Tempest . I quite enjoy this bit as I can do it indoors and its relaxing ! I have some fine indelible black pens . You can buy a whole set of different thickness nibs for about £8 on line . I dont get too hung up on getting the panel lines dead right . Lets face it , I'm not going to meet anyone who actually built a real Tempest am I ? So a three view in A4 size downloaded from the web is fine for accuracy . I already have a scale plan as I needed it for the design stage . I just draw on the main panel lines first in black . Then highlight the lines in some places with a white gel pen (from WH Smiths , about £1.90) . You can see that I've also added some rivets which I do free hand , but you can use a ruler if it helps . The trick with the rivets is to draw a little black "C" about 3mm high. They represents the rivet . The other side of the circle can be completed with the white gel pen as if it catches the light . You do need to be consistent though ,as you are telling people the light is on one side or the other, so all of your black "C"s should point the same way . You don't need to do all the rivets as some would catch your eye and others not . Its very quick to do but to get confident , why not practice on the underside ? If you really cock it up , just paint over it . I'd like at least some of you to have a go at this kind of finish , so please feel free to ask as many questions as you like . You can see that Ive also added the rather neat little cannon blisters which cover the breeches of the 20mm Hispano cannons . Mine are 3d printed (thanks Paul ) , but yours will be vac formed as its quicker for us and gives you a smoother finish . I gorilla glued them on , but painted them first . In the next post I'm going to go into a little more detail about the weathering . You can also see that Ive corrected the red part of my roundel . Your decals will be the as shown with the correct larger red portion .3 points
-
Today, Brian was doing the second wing tube. The ply fillets that Cliff H made are absolutely perfect, well done that man!3 points
-
Let’s all take a step back. There is no place on this forum for personal insults.3 points
-
Finished covering the fuselage and have painted the horizontal stabilisers. now to adding the white base for the invasion stripes… I’ve not decided which particular aircraft I want to replicate yet other than it will be a coastal command aircraft, but the invasion stripes will help with seeing what is basically a blue and grey aircraft against a blue/grey sky! I’ve been researching it and the invasion stripes in one form or another stayed on surviving aircraft from June well into October/November 1944 so I’ve lots to choose from.. 🤔3 points
-
If I were looking for advice on WW2 warbirds of about 5-6 feet in the wingspan, Jonathan Harper would be the first person I would approach. He is a very experienced builder and flyer of this type of aircraft and until he started his new job he was the development engineer for Laser Engines, a British four-stroke which you may have heard of.3 points
-
Thanks all, I've utilised (stolen, plagerised, ripped off or whatever you want to call it) lots of ideas from the many that have shared thier build, not least of all Ron for his videos but LM and many others have been a great help.2 points
-
Like mine,, 😇2 points
-
I’ve removed some of the more inflammatory and provocative posts. Sorry if any good information has been lost but I’m not prepared to waste time editing posts selectively.2 points
-
Hi Toto I understand the issues you've had with glow engines. I have run diesels, glows petrol snd electric. Without doubt, with one recent disastrous exception (my fault btw), electrics have been simply a matter.of plug in and go. Next up, diesels, were the easiest on field equipment, then glow and petrol given the need for glow starts (or on board glows) and ignition systems plus a starter motor. That having been said, I start my OS91FX with a reverse rotation tap with a chicken stick unless it's a cold day when I resort to sn electric starter. Dead sticks have been few and far between but I did get a petrol dead stick on one occssion - again my fault. What you describe leads me to thjnk that your helpers were not well taught as regards setting up and tuning glow engines. It does happen. I relate a situation where a fellow club member had a clutch of helpers who could not get his Irvine 46 started and running. I had spent the morning flying my Irvine 53 powered Wot 4 so at lunch I noticed he was fed up snd depressed. I offered to have a go at sorting ot out since my Irvkne ran very well. After 5 mins, the engine was running and after a further 5 mins we had a perfectly set idle and main jet. He flew the aircraft and was delighted. I suspect having a "committee" trying to stsrt and adjust the engine was not the right approach but as my engines run perfectly it may be that I knew what I was doing. A surprising number of glow engine operators appear not to know about idle jets which control the engine up to half throttle. Once these are correctly adjusted they merely need a tweak e.g. if set on a cold winter's day and then being used kn a hot summer's day - those conditions affect the air/fuel ratio as air density varies. My Wot 4 has a side mounted engine and when I fitted a throttle pipe, that lived underneath between the u/c legs, there was hardly any mess on the aircraft after a day's flying. Just my experience.2 points
-
I think there is not going to be a meeting of minds on the subject. In Aidans last post he tries to close the subject down in a reasonable manner but you are simply coming back baiting him Jon. Especially suggesting that he knows nothing after 40 years experience. The remarks are becoming a bit harsh and I think it may be better just left as Aidan has suggested. I can't add anything to the matter in hand but don't like to see things getting out of hand. I think Aidan is prepared to let matters lie. Maybe it's time to back out. Apologies to both if my comments are unappreciated. Toto2 points
-
Despite the awful look (imo) I would be more concerned about landing and the wheels being pushed back through the wing as at those angles there will be very little, or no, give in the legs. Regarding the CG, it’s correct when the model flies well and you’re not fighting it, irrespective of the actual measurement back from the LE.2 points
-
The pot calling the kettle black. I was more than happy to assist and was quite happily posting away until you kicked off with your snarky 'throttle moves both ways' comment. So perhaps you should consider the way you speak you people if you do not want the same in return. If it was in jest and i misunderstood then fair enough, but i do not have much tolerance for snarky nonsense. Especially when the engine you have has a pretty dreadful throttle. Ok fair enough, but from my point of view once you have flown a handful of 60 ish inch warbirds you have flown them all. The basics are the same for all of them and the lessons from one easily apply to another. For example the H9 109f is a bit of a porker. It always has been and i do not know why it should end up so heavy and its not really a great yard stick to measure by. Seen in isolation it might look ok and fly alright, but compared to a broader range of similar models it is more of an outlier. Regarding Galaxy, they were at their peak in the days before the internet and their kits faded from the lime light by the time it came along so information will the sparse. I used to fly a galaxy mustang and it was a good model which flew well on a 150 4 stroke. They are old designs and their age shows in many respects but they do generally fly well once all is said and done.2 points
-
why does it matter if i ever built one? I have a similar model from another manufacturer and countless other warbirds of varying sizes up to 90 inch. The tldr is that the model you have is a 60 inch and intended for 60 2strokes and 90 4 strokes, and a flying weight of about 9.5lbs. As yours is heavier than that you need to be prepared for it to not be as forgiving as you might hope. That was the point i was trying to make. With that said, i decided to check the spec to see if my memory was not as accurate as i would like. Turns out the model is 66 inch and not 60 as i originally thought, and with that in mind the weight is not quite as much of a concern. Its still very over powered, but at least the prop has a fairly fine pitch. Just keep an eye on the rpm as the limiting speed for master 3 blades is a little low. Not entirely, but after 18 years in the model industry i have had enough of smart alec comments and will be far less diplomatic when responding now i am just a modeller again.2 points
-
My only reason for bumping this blog from BEB is that following his passing I acquired the model and has sat boxed in the workshop awaiting an opportunity to complete. Now in fairness I was not even aware of this blog and only came across it whilst seeking some information about the model on line. It seems that some bits have gone astray but nothing too serious all the major components are still there and included the RCV four stroke motor that Dave had selected. Now as a friend, colleague and fellow club member I will endeavor to get the model completed and flown in the near future to complete the blog in tribute. Linds2 points
-
I couldn't turn up at the field with that model but each to their own 🙂 Not wishing to be a prophet of doom, with the wheels that far forward I think that its likely to be hard to keep straight on Take Off. Hope that it goes well,2 points
-
Decorating finally over ..... hopefully back on schedule for next weekend. The countdown begins to battery charging once again. Toto1 point
-
So now I can glue the wing skin to the bottom of the wing. Pins are used to make sure that the leading edge is level by feeling where the ribs are and pushing down and pinning in place. weight it down to make sure good contact with the glue that was run along all the ribs and spars ect a slow glue I find best as this allows me a bit of time to ensure all is in place and clamped down. I have trimmed off the over hang of sheeting. All that is needed now is the wing tips and Trailing edges. Steve.1 point
-
Excellent review. Well done.1 point
-
In the module section of the transmitter setup, one of the variables is the receiver number. This is a number that you set for each receiver so that the transmitter can warn you if you have the wrong model selected. This also clearly means that you cannot use the same number for different receivers - or different Tx modules using the same receiver. That is what the message is trying to tell you. Simply choose another number that is not already in use, and you should be good to go. If you set the number to zero, then this safety feature is turned off. You could try that for experimental purposes, but don't make a habit of using it!1 point
-
Hi Jim . I have to disagree with you on using a large prop on a small diesel. The leverage from a large heavy prop can and will severly damage a small diesel if it hydraulic locks. Ive seen bent rods broken cranks,split pistons and even broken crank cases all from doing just that.1 point
-
Hi John plenty of small diesels on ebay at very reasonable prices, if you save your searches they will pop up new items for you as they are listed, very handy, the downside is you will quickly have a shelf full of engines 😞1 point
-
Steve, further to my previous postings, I have just done a bit of experimenting. I have some X8R receivers that I have flashed with Mike Blandford’s excellent UNI firmware. One of the additional benefits of doing this is that the firmware comes with a LUA script file called UNI Stats. Running this when the receiver is bound to a transmitter tells you, amongst other things, the exact protocol that the tx is using (ie V1 or V2, EU(LBT) or FCC). Brilliant! Using this I have ascertained that (1) the internal RF module in my tx is V1EU (I did already know that) and (2) that the multi protocol module I have fitted has the facility to be set to all four combinations of D16 protocol, ie V1FCC, V1EU(LBT), V2FCC or V2EU(LBT). I have just bound the same receiver to each of the four combinations in turn and it works fine on any. Therefore, your new receivers will work with the MPM. You set the required protocol on your tx screen. D16 is V1, D16-2 is V2, then select either D16 or EU in the secondary menu. If your MPM is old and doesn’t have the D16-2 option then you’ll need to update it’s firmware version. Brian.1 point
-
Thank you Toto. A man with some manners. I'm just back from the flying field after three perfect flights with my Mustang. The new landing gear didn't change a thing, the plane tracked as straight as an arrow down the runway and it flew as stable as a trainer. When I bought this plane 13 years ago I had to add 60 grams of weight to the nose as I almost crashed it on its maiden flight due to the extreme tail heaviness of the plane. 13 years later and my Mustang is flying just as good. I came up the road in the car singing. Happy as Larry as us proud Irishmen say. Kind regards Aidan.1 point
-
Where do you live Toto? I think I'll open up a model shop at the end of your road.😉1 point
-
Yup, ordered them as well. Thanks for point out though....1 point
-
Under the heading for FrSky Archer receivers on T9’s website, there is a note stating that they only work with V2 ACCST, see below: This suggests that you can’t flash these receivers with the older ACCST V1 firmware. As you don’t want to update the version of ACCST on your tx to V2 (it has nothing to do with the version of Open TX by the way) this means these receivers won’t work with it. One thing you could do is to install an FrSky XJT module in the external port in the back of your Taranis and use this to operate these receivers. A new XJT module would be V2 LBT if bought from T9 (though they are out of stock at the moment). This would not affect any of your other models which would continue to use the internal transmitter module. Brian.1 point
-
A 10 or 11" prop would be ideal. It needs to be quite weighty as it'll need some flywheel effect. The one I had was fitted with a home made wooden prop. It ran pretty well, dead easy to start.1 point
-
Good !1 point
-
The next area that can be a pain , as I mentioned before , Is painting yellow over camo . The mid war British fighters had yellow leading edges to aid recognition in head on attack . They look rather jazzy , so as the eye is drawn to them , they need to be pretty good . So Ive ordered quite a few sheets of solartrim , so that you dont have to ! Lets face it , each strip is 300mm x 20mm . Hardly worth buying a whole sheet and paying the postage . As you're all good lads , I'm going to pop a pair of pre cut leading edge stripes in the decal sets as they go out . Now here is the best way to apply them . Coat the area in PVA first . On the first one , I thought I would cut little snips in the edge every 2" so that the solartrim would accommodate the slight curve . Well, that didnt go well as when I pulled the tape taught it ripped very easy where the cuts were . So , back to super simple : Peel off the back for the first 20mm . Like applying a medical plaster to a cut , align the exposed sticky bit on the inner end of the wing where the invasion stripes stop . Rub it down firmly . Ignore the underside for now and just concentrate on pulling the strip outward as you lay it down while pulling the backing away like a medical plaster . It should only have 10mm roughly showing on the upper surface . The other 10mm can be left hanging in the air out the front. The tape goes on really easy and stretches round the long curve with no problem , a lot like electrical tape . It wont split . Rub it down hard when aligned . It sticks extremely well . Finally flip the wing over and roll you finger round the leading edge to smooth the remaining 10mm under the wing . Doesn't have to be great as people don't look at that bit . You can do all of the above in five minutes , so way longer to explain than do . End result looks crisp and punchy .1 point
-
I assume we are talking user made audio files here rather than system files, they need to go in the root of the audio folder not in the en sounds folder, see attached. a very common mistake to have made. This will all change if/when you upgrade to 1.5.X so fee free to come back and ask again.1 point
-
Our grass is looking rather good, your maintenance team are slipping!1 point
-
Here is my Lightning pusher (built Nov 2022) from the Tony Nijhuis plan RCM&E 2008. Despite following the suggested balsa grades and electrics, she came out at 800g balanced with a 3S 2200 lipo (upper recommended is 700g)! I also saved weight by not fitting ailerons due to their reported over sensitivity and the lack of them on the subsequent EDF version. No lie, it took 29 failed hand launches before she finally flew on the 30th. Not to mention a few knocks and repairs in between. Shame, she looked great after covering, but a casualty of war by the time of the first proper flight. The darn thing just kept flipping inverted until enough speed was gained for effective elevon control, by which time the ground kept rising too quickly. The trick, for me, was to tilt the motor so it effectively pushed the tail down just a tiny bit AND to hand launch it like Tessa Sanderson. Once I mastered the javelin launch it was 5 minutes of high adrenalin fun at around 120 mph. Lasted about 30 flights before an elevon servo failure (Tower Pro 9g IIRC). Blue foam canopy.1 point
-
What a lovely thread! Not the best of pictures - the model was built when the plan came out ( and the utility room floor needed a mop ) and it didn't live long ( It DID however, live fast)Nigel Hawes' Hunter: Power was a Permax 400 with 8 800AR cells as per the mag. It needed a hefty chuck at hand launch but handled quite nicely I seem to recall. Finish was silver Solarfilm, Prymol and Humbrol, and the hinges were all made with Solarfilm. I think this was my first plan build ever. One of these days I might do one with a proper modern setup ( after I have done the TN Lightning and the 3 projects I have on the go right now, two of which are from mag plans. Edited By Stuart Quinn-Harvie 1 on 22/02/2019 02:56:511 point