Leaderboard


Popular Content
Showing content with the highest reputation on 25/04/24 in all areas
-
April 25th I’ve had plenty of flights now with the Elf, still tracking straight and does well in windy conditions. Saito 40 FS is perfect and even with a small 4 oz tank I’m getting 10 minutes with plenty to spare running on half throttle.4 points
-
Work is continuing and Byron has 3d printed a pilot and been working on the cockpit detail and I think it looks good. We did have another 2 flights with it and it is a very smooth flying aircraft. We hope to start spraying this weekend so I hope the next post will have some colour to it!4 points
-
Now all back together. Hole? What hole. A new "heavy" nose cone printed in double wall PLA rather than a single wall in LW-PLA. It also has 5g of lead in it so 13g rather than2. The CofG is now still further forward. It looks crazy but it flew impossibly tail heavy at the left hand mark (25% mean chord). Still flew tail heavy at the middle mark (18%). The right hand mark is at about 12%. I just have to accept that the long relatively bulky forward fuselage compared to the tiny wing creates a substantial nose up pitch at the normal angle of attack for such a light weight low powered plane. The final modification will be to cut down the full span ailerons as the roll sensitivity is much too great. Even the gyro can't control it at the moment.4 points
-
It is 4 years since I did anything on the 335. Why, hmm, it was the exhaust stacks. The RBC plan does not show location or the detail necessary to produce them. I have allowed myself to become distracted on other new models, just now I had started building a He 162, designed a Douglas X3 all from Depron. I have become diapointed with the Depron I now have, finding it a pain and of poor quality (from a modelling perspective). So these went on the back burner. I then started to think about all the models I have not finished for a whole variety of reasons. I the case of the Dornier it was a lack of information of the real aircraft. I have seen the full size, when in Munich, of course I did not note the exhaust or take any pictures. It was the size of the thing, a rather, or is that a vey large fighter. More the size of the Hampden bomber (the one at Cosford). I now have a whole pile of books with details of aircraft in them. It seems that unlike a Spitfire the exhaust stacks do not stick out very much from the body. That there is an internal shroud or baffle that separate the pipes from the the rest of the internals. A external cover then seals the exhaust, with the pipes barely sticking out. I had assumed that pipes were round, but they transition into a rectangle. Eventually I sketched up what was wanted, only to realise that I did not now how to 3d design the things. Rather than seek perfection, I have drawn up as near as I can manage the items and then printed them. Installing them has not been a two minute job of sticking them on the outside. It is about letting the items in. My next job is the Fuel injection inlet. Yet again, a pretty much bulky item. Everything else will just have to wait.3 points
-
Busy couple of days - outer wing panels sorted and attached, its surprising just how big this is! 🤣3 points
-
Lightly loaded aeroplanes just fly better, whether that is a model or full sized B747. They will fly on less power, land and take off at lower speeds. Needlessly adding more materials to make them ever stronger is counter productive because of the weight gain. One complication I am keen on however are flaps, not just for low speed arrivals but to stop the long float in ground-effect before touchdown. Some years ago I remember watching a friend’s Mossie come creaming in over the threshold at low level before floating the length of the strip. Finally he landed in the ‘rough’ and ignominiously ending up inverted. That is when you do need a tough model! Of course he was coming in like a train because of the fear of the dreaded ‘tip-stall’. (I would have done the same) Flaps? A good servo is all you need in terms of added weight, a good trade off I feel.2 points
-
Unfortunately my wife opened the letter with Richard’s Tempest order form in. She said, ‘ Don’t you think you have enough planes in your garage Piers?’ (I think it was a rhetorical question 🤣) Next time Richard mark the envelope ‘HMRC’, she won’t open that! Anyway, cheques in the post, as they say.2 points
-
We 'enjoyed' our first thermal comp (F5J-ish) today. The wind was on our declared limit (14mph) when we started, but by the time we had completed 4 rounds it was gusting 33mph! And yes, there were thermals to be had, whistling down wind past us. No models were damaged so after some celebratory coffee and cake we went home happy 😁 Tom2 points
-
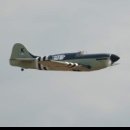
An afternoon dog fighting, nothing like two warbirds buzzing around with 4 strokes.😇2 points
-
I have had a Proxxon for about 5 years, the most useful feature for me is the ability to tilt the cutting blade. This makes cutting strip balsa with beveled edges for planking very easy and fast. Suddenly planking becomes a pleasure 🙂2 points
-
I just used 2 8mm steel washers Brian.2 points
-
Same same but with a TF Corsair. I think it will be a flying brick using the kit wood etc so have largely lost interest. Wife bought it for me from Alans Models in Whitley Bay 30 yrs ago when I first met her. I knew she was a keeper at that point 😂 Its my longest running ‘forever project’2 points
-
... and don't I know it! I've just sent an email to the 8 year-old twin sons of my nephew. They sent us a couple of cards last week and asked what we did at Easter. We didn't do anything but we used to ride a long distance trial (The Land's End), often on a sidecar outfit and I sent them a picture of us winning the sidecar class in 1973 (so long ago) and another of us riding our tandem more recently (1999) - we were nearly 60 then but it's 24 years ago 😞 Neither of us has turned a pedal this year and I haven't flown much either.2 points
-
Andy and I use to fly together at Rivenhall in Essex . So I got to fly some of his models including the Mossie and his very light Chipmunk . The designs are by Ivan Pettigrew and are a bit like the old kiel Kraft stringers and tissue style of construction . Probably a bit too semi scale as Andy says , but amazingly easy to fly when you compare it with the more typical 14lb 72" Mossie . You certainly felt comfortable flying it with every confidence of bringing it home in pristine condition . Going a little more scale will be the answer . But it shows what can be done . The landing speeds were trainer like , so quite modest retracts would suffice . Have a look at his plan as his method of undercarriage was unusual but clever . Thanks Andy .2 points
-
A grumpy old bachelor I used to work with refused to contribute to a collection for someone getting married. He used to say I'm not paying into something I have no chance of getting a return.2 points
-
Surely that should be Boeing? And each plane would have just one. And they wouldn't tell the pilots where it is, what it does or how to turn it off.2 points
-
Maiden flight today 6th March 2024 weather fine a bit blustery. The model tracked well a little bit of toe in on the wheels so no problem. flying on low rates but not low enough so a bit skitty on elevator. Second flight with much reduced rate on elevator it was a different model and turns well on rudder doesn’t need ailerons. The Saito 40 FS is well matched in fact flying at half throttle. looking forward to flying the Elf on calm sunny days this summer. Mike2 points
-
Thanks for all the advice. I need to glue light ply plates inside the foam fuselage. The position is important as they have slots that a ply floor for the battery to slide into. Using gorilla glue sounds a bit risky as it would be difficult to hold the plates securely in position whilst the glue cures. So going to go with UHU POR. Cheers, Nigel1 point
-
You could drill a couple of holes in the plastic thingy and push some carbon rods through the holes and into the foam bridging the broken bits, smear a bit of epoxy on the rods before pushing in.1 point
-
Doing some "fag packet" calculations using figures from the internet with some assumptions on scale fidelity gives wing loading figures in the region of 34 oz/sq foot for Paul's VQ Hurricane, 37.5 oz/sq foot for Ian's and 32 oz/sq foot for mine (before removing the half pound of lead - now a bit less than 30 oz/sq foot). In Ian's favour is that he won't need to carry so much fuel but if there's any weight saving possible (maybe delete a flight battery or put two smaller ones in?) it might pay to make them - at least for initial test flights.1 point
-
Hi next up, glassing fuselage. Drew up and 3D printed a couple of jigs to allow me to ‘spit roast’ it. Will keep a track of the weights from here on in case anyone finds it useful, including me 😀 Gave it a coat of NonShrinkingDope mixed with microballons and sanded down to take the ‘fuzz’ off. Mike1 point
-
Yes, I quite like those Graupner Super Nylon props, but I did find a 12x8" Master Airscrew Electric prop in my drawer and those are not too bad at all - the 13x8" that I use on my PT-19 works really well, nothing like a Master Airscrew IC prop. Anyway, I can make the APC-E work with a couple of chunky washers and so I've now committed the motor mount to being glued in place, now drying overnight. Any further adjustment will need to be achieved with the use of washers.1 point
-
My motor's prop adaptor shaft wasn't long enough for wasbers so I trimmed the spinner backplate (quite a lot) with various dremel bits and files to allow an APC to fit - but the result works ok1 point
-
It weighs in at 4k250, I did some great flying this afternoon with it.1 point
-
Just like to say thank you to @Geoff S for the pictures and description - earlier in the thread - of changing the RTC battery on the Horus - very useful! I've just replaced mine, after getting warnings at startup, and it is indeed a bit fiddly. I managed to chip off a small piece of the plastic surround of the battery holder (it was very brittle) in my ham-fisted attempts to free the old battery but it seems to hold the new battery OK still. I reckon the battery had lasted about 2.5 years, as others have said.1 point
-
POR or Gorilla Glue - if no voids to fill I use the GG clear - it's non-foaming, and I used it to build my foam Hanky-Planky. Tom1 point
-
I’ve had my KS230 for a few years now and it is a really good machine however I wanted something a bit bigger do bought the FET about 2 years ago. That is the only one I use now!1 point
-
Put a couple of washers in there Brian, a lot less faff than cutting!1 point
-
I have "Classic" foamies, Robbe Concorde, Parkzone 49" Mosquitoes, Multiplex Sonic Liner etc. Classic in my mind because they came and went whilst out of the hobby and still survive in various states, some even have limited spares available.1 point
-
Richards furry friends must have spoken to our posties as the order form arrived today! The cheque is in the post. Nigel1 point
-
Dismantling sounds sensible. Once you've gone solo, you WILL damage the Super Cub - we will help you resist the temptation to move on to another model rather than repair it...... When learning, I couldn't afford replacement models, so had to learn how to fix things. Skills acquired like this last a lifetime.1 point
-
Old is just old........ Tim😉1 point
-
A bit of filling and sanding of the wing today. It's getting closer to being finished! More later...1 point
-
Hi all: I am a traditional aeromodeller who like to build from plan. I like to share my latest project which is an enlarged Quaker Flash Specification as follow: Wingspan : 52" (1.5 X enlargement) Plan: Outerzone oz1584 Modification: Electric Powered, Laminated wing tip, Laminated Fin and Rudder LE and TE Motor: 2826 1200kv Propeller : 10 x 6 Battery: 1500mAh, 3S Flight Time : Easily 10 minutes For those who are keen, I can post construction photographs Thank you1 point
-
In a blatant attempt to tip the balance and in good 'Blue Peter' style.............. Here's one I made earlier.1 point
-
Reminds me of when I was asked why I wasn't going to Robbo's funeral. I replied that 'Well, he won't be coming to mine!' * Chris *1 point
-
No, please post lots. Although I don't own any machine tools, and the language goes over my head, it's a fascinating read....1 point
-
That cockpit looks great - well done !1 point
-
Hi folks, still ticking along.... I decided to do the wing fillet using thin ply and curved balsa as I had used the method on other aircraft. First made a template and cut some very thin ply to shape. I glued it on with Gorilla brown glue as it expands and fills gaps nicely. The clingfilm on the wing stops it sticking. Next I used some trusty cereal packet cardboard to make a template and cut out the balsa fillets. Bit of a soak in hot water and some super glue and jobs a good'n' 🙂 Next onto the covering stage. I used Sainsburys brown paper (£1.50 a roll) and Evostick exterior glue for no other reason than I had it on the shelf. This I diluted with about 5% water. What can I say..... it works absolutely beautifully!!!!! Thank you Richard for the technique. It was a stress and wrinkle free process. I painted it on the back of the paper then applied almost immediately, smoothing down with a dry cloth. quick wipe with a damp clothe to remove any glue that gets on the surface then a going over with a hot iron (150) with a sock on. Amazing how it can go round curves, brilliant. when all was dry for a few days I sealed the surface with some Ronseal interior acrylic varnish, once again watered down 5% and applied with a sponge so as not to use excessive amounts. Lovely surface and only used one roll of paper, will definitely use again! I also added a bit of detail to the tail feathers just for interest. . On to the cockpit detail bits. I know that all of this is invisible when you are flying past at 200ft but it is one of the things that I always get huge enjoyment from. It is made from a combination of my 3d printed bits, Weetabix box cardboard and scraps of foam and balsa. All the cockpit parts weighed in at just under 15g which is good. Mr Pilot was a bit short in the body so I gave him a booster bit of foam to raise him up. The gun sight is a bit of food packaging and card. Pleased with how it turned out, he looks happy in his office! In the back ground is my other ongoing project, a Flair Legionnaire being built as a Nieuport 11. Next on the list is to get the vac formed parts glued on and the canopy - then its paint time! Hope you are enjoying your builds as much as I am Cheers for now, Simon1 point
-
Here's another one! Clubmate Steve had never built a model before so this is his first attempt, personally I think that he did fine job. He asked me to maiden it and after adding some nose weight (he was using a 2200 mAh 4s battery) it was ready to go.1 point
-
This is my take on fitting the radiator on the underside of the wing. first I added some extra width to the base that gets glued to the wing. Instead of sanding a V shape on the underside to fit the dihedral, I cut it in half and sanded the top flat. Then I added some extra width to the radiator and sanded to shape. Here I really struggled to get the angles right to blend with the vac formed front scope - it just didn't look right. So I tried gluing on some scrap balsa and sanding to shape. I think I will go with this option. More later...1 point
-
Hello all ! Primer is painted ! Just a few weeks sanding before she gets her camo jacket fitted !1 point
-
More work done.1 point