
Leaderboard


Popular Content
Showing content with the highest reputation on 21/08/23 in Posts
-
i stopped to pick up a hiker who jumped in the car and said...."wouldn't it be funny if you had just stopped and picked up a psycho,serial killer"? ...... i replied "the chances of two of us in same car are remote" like...☠️ ken anderson....ne...1......... hiking department.6 points
-
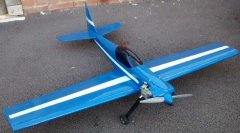
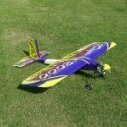
Progress is happening and despite the fact I've been working on it for a few hours every day, it seems dreadfully slow progress. This hasn't been help be the strong winds every time I want to spray a coat of primer or paint. This week, however, I called a stop to rubbing down on the wing and finished it in a coat of grey primer all over. Only to remember that the yellow underside will need white primer. First job this week, trip to the car spares shop for white primer. On the subject of the yellow, I've been in two mind about matt or gloss. The pre /post ww2 all yellow A/C are gloss yellow, and the camo was only added for the war years with little regard for any standard layout. So I think I'm going with gloss on the underside. One small embellishment to the wing, I've added wing joiner capping strips, made from card. One way to recycle the cornflakes box. I will use card to simulate the cockpit & storage box doors, as when you look at them, none are flush with the skin. The same idea will be used for the refuelling panels on the wings as well at some point. The rudder has been refurbished. The covering, which wasn't done as nice as it could have been, was removed and replaced with new Solertex from an old roll I've had for years, originally brought to cover parts of the MB5. The fabric hinge is now replaced with 3 pin hinges, and it's been given a coat of matt yellow for now. Hopefully by the end of this week we will start to add some colour to the rest of her.5 points
-
Well, whatever next! Yesterday I started a little diesel engine for the first time all by myself 😀 A Boddo Mills .75 in dad's 36" Tomboy (rudder elevator). The tank had a 2-min run time, the model climbed slowly then floated down with a few suggestions from the Tx. I have to say it was great fun and I was a bit smitten....5 points
-
Good questions John . I can help do the sums , but basically we should aim for the props to be turning at around 11000revs with no load . That means we can use 6" pitch props which are readily available . For example i have lots of 3300 4s packs , so with a 700kv motor that you can buy for £20 I would expect 14.8v x 700= 10500 roughly . So I could either go up to a 12x7 or use an 800kv motor . At say 4.5lb and realistic performance i would expect 7mins on the above set up . 3s packs can also be used as people have a lot of 2200 packs . Two of those will make a 4400mah battery and you simply choose a higher KV motor like a 1100 or 1200. Also cheap as in the "drone zone" . Flight time similar . Not loads of current used so minimum of 40A , 60 is ample . I recorded an FMS P51 with coarse pitch 4 blade prop drawing 63amps , but that weighed over 5lb and went from take off to a 70 degree climb to the clouds . Flat out in level flight it topped out at 32 amps . Most people go over board on ESCs . A good precaution But experience has taught me that with normal warbirds manoeuvres, you dont draw much .4 points
-
ken anderson.....ne...1...gardening dept.4 points
-
One of these ?.4 points
-
My foamboard and depron Sunderland is just over 1800mm weight about 5.5lb ready to fly, it would fly on two motors as it is way over scale speed at full throttle. The outer motors are 2212 1000kv with 9x6 props not sure on the inner, they came from a Hobbyking B25 and have 9x4 props battery power is 3s 3000 x2 one for the outers and one for the inners. 7 minutes flight leaves about 20 to 30% despite being different motors and props consumption is similar.4 points
-
Back on this at last ! Fuselage has been a bit fiddly but almost there 👍4 points
-
Here is a short video I took of my Gyroo flying off the Cliffs whilst on my Hols. Could of done with more wind to maintain lift without using power and more ballast weight to penetrate. Nice relaxing flying. Rich2 points
-
Denis, Futaba switches have pins inline with the body and are offset to one side. Some modification of the circuit board would be necessary to fit one of the above types.2 points
-
I think 190's need 74 degrees for scale, but electron (a good place to look for retracts) only do 85's so you might have to look at the wing and its mounts or live with a slightly no scale stance on the ground. Sierra offer this set http://www.sierragiant.com/prod45.html for the ESM/YT 190 and they are going to suit any 70 inch 190 pretty well. They aint cheap though, and i have no clue how to get them in UK2 points
-
Completed the small blend area on both sides of the wing root today.....getting to that stage where i need to glass the center section or make the blanks for the undercart doors.2 points
-
I use the pritt stick method, the other option i use regularly is to print/copy the plan/part required with a laser printer. Then iron the part (toner side down) onto your balsa(etc) witn a hit iron and a bit of force. Toner is cured by heat, so the ironing process will transfer toner from the plan to your balsa, leaving a clearly visible "reverse print" directly on the wood ready to cut. In terms of cutting, i cant live without my bandsaw, and also my 12" mitre saw. Is perhaps overkill, but i didnt buy it for modelling. Loaded with a fine kerf 120 tooth blade, it makes short work of roughing ply items down to size, cutting spars, 1/2" balsa etc.2 points
-
Wound up? More like I'm in 'Training' at the moment... But on the back burner just to tease...🤫 So till a lot lot later, choo choo for now..🚂2 points
-
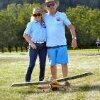
I went to the Cocklebarrow Farm Vintage Model Fly-In yesterday. It was fairly breezy but I managed a flight with the Big Guff, pictured above, which Mark Robinson filmed. A few showers arrived later in the day so most of us left early. Nevertheless about thirty of us actually flew. I've attached a few pictures of the event.2 points
-
Round 1 Tempest and FW2 points
-
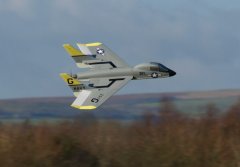
The bigger Venom is now complete. The tip tanks will have to wait until after the maiden. An EDF test on 3s and a control test. https://www.youtube.com/watch?v=-jW4JktEZwk A bit heavier than I expected at 450g but it 'moves' even on a 3s.2 points
-
Mitsi Zero/Wildcat, much better colour options than most of the other suggestions, i know this is where we get divisive but Tempest/Fw190 don`t float my boat, if the kit was cheap and to support Richard i would probably put my hand in my pocket but it would go in the kit queue way down the line unfortunately.2 points
-
Maybe, but personally I am going to wait until the BMFA provides their guidance before deciding how to respond. Hopefully that will be available early next week to give people plenty of time to do so…2 points
-
My latest project2 points
-
Just finished the trim. An Ian Peacock Bootlace (AKA Miss Tangerine) built one in the '70's from a foam wing that Ian sent me and I cut a foam turtle deck myself. Always thought a slightly bigger one might be nice so enlarged my plan to 125% to give a wingspan of 65". Weighs in at 5lb 8oz. This one is all built up though - no foam.2 points
-
Generally speaking i trace the shape, tape to wood, cut outside and sand. Then i invariably wipe off the blood, cyano my wound and give it ten minutes. I would not win builders awards.2 points
-
For a change I wanted a nice simple glider for some relaxing flying. I also wanted it because I have a huge wheat field right in front of the house and a quick flight once in a while in one of those rare gaps we get would be nice. I chose the Orion-E from The Vintage Model Company.Quick and simple to build and it flies like a dream2 points
-
Hi guys, Manny at the BMFA has offered a free stand to demonstrate the art of building models with foamboard and depron. I have said i will man it both days and have my 109, Skystreak and Carvair models for people to look at and to give demos/explain how they are put together, where the materials are sourced from and how you can produce cheap light scale looking airframes using these materials. I would appreciate any help from some of you guys who are masters of the art! Are any of you available to co man the stand/ demonstrate using the materials and bring a few models along? It would be great to meet some of you as well and i`m sure we can all learn something from each other as to the different methods used to achieve the same end.1 point
-
Just to add something that might be helpful as I have been using HobbyRC GNB lipos with good results. Plus there seems to be a bonus with using them, firstly they seem to work well in high load applications (less useful for us, but there is a win there - more later!) and secondly I normally go a capacity up for no weight gain. IIRC a 4S3300 lipo can be replaced with a GNB 4S4000 pack and its lighter with an useful increase in capacity + they are not that much physically much bigger. There is a school of thought that if the lipo voltage doe not sag for the same power then the current is less and on the basis that the battery capacity is in mAh the less amps we pull the longer the battery will take to discharge. The old P=VI equations which I have come across with vey high power set up, the more current drawn the more the voltage sags so there is no more actual power produced...just a hotter more knackered lipo!1 point
-
I like that Linds, good luck with the maiden. Rich1 point
-
Look good. In addition to squares I make great use of Lego bricks to construct various jigs to try to keep things nice and square. They are particularly nice to use with wing ribs, as they can bot keep the ribs plumb and physically support them whilst the glue grabs.1 point
-
What's not to love. 😍1 point
-
Only get the Original Futaba ones, if you break one open you will see why they are so expensive.1 point
-
Ripmax are still trading under a new entity, they have been bought out of Administration by Amrang Ltd who now trade as Ripmax - see the front page of Ripmax.com. or the extensive thread on the subject on this site. They state that Futaba servicing is still operating: http://ripmax.com/AR_Contact.aspx That said +1 from me for Mike Ridley1 point
-
I'm full of admiration for your undoubted courage - still, nothing ventured, nothing gained. 'Interesting' might be an understatement but your other designs fly perfectly well so this wouldn't dare to fail 👍1 point
-
With that combo of the wing anhedral, short moment arm, relatively small v-tail and large fuselage side area in front of the CG, then “interesting” may be an understatement…1 point
-
Funny that you should say that, as I was just thinking the same whilst sanding the wheel pants for my latest build. 50" JU87.1 point
-
I would advise selecting the 'Neither yes nor no' option and putting something in the comment box. I suspect that email comments will end up in the round file.1 point
-
I said "What do you charge?" She said "£20 if you make your own bed" I said "Seems fair" so she chucked me some timber, hammer and nails!1 point
-
I had a quick and late evening test flight of my Swift Glider. I think I need a better motor prop combo. Steve.1 point
-
Can we say Dolly ? Is even "Attractive lady " acceptable ?1 point
-
Ah, found reference to it in the Sabre build forum. 380mm long. Lol, RTFM.1 point
-
I've got a similar model to build. Bought a kit from swapmeet, called Mr. Vintage from Solutions.1 point
-
Almost there ,just a few to add like fake rigging and a quick dust of satin proofer and the inevitable wait for the weather to co-operate 😕1 point
-
Hi Andy, span of the L-39 is 47" all the details in the for sale section. I really wanted to move this model on as mobility problems limit me to the slopes I can easily reach. However, as there was no interest this model will eventually have to earn it's keep. I will block the intakes, and remove the underwing tanks, they look vulnerable. Just a case then of waiting for a good NW wind and drive up to Abertysswg. Made it to the Bwlch a few years back, I remember the F104 well. Sadly not able to do it this year. Ron1 point
-
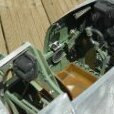
My Hobbico trainer after its rebuild. Strip ailerons converted to flaps and ailerons. Nav lights in the wingtips and a retractable landing light in one of the wing bottoms. Bomb racks with droppable bombs. The bomb racks are easily replaceable with small containers to drop little parachutes, two each side. There's a removable drop box, shaped like a drop tank, that attaches to the fuselage bottom. The wing struts are non functional. To simplify the assembly, there is one Rx in the wing and one in the fuselage. Powered by a Saito 82 it putters around nicely but is quite capable of doing all the basic aerobatics. It's my rendition of a Bird dog.1 point
-
She is a big girl at 90" span.1 point
-
Bought this 1/3rd scale Precedent Turbulent at a bring and buy, going to stick a petrol engine on it, was thinking of a Zenoah 26cc, anyone else here flying one on a petrol, what have you fitted in yours?1 point
-
However something fell off at 1.44 and fluttered down which has not been mentioned - must have been there for some reason and the issue with flight only occurred at the next banked turn. If it had been the right aileron the up going left one would have rolled it in ? - Only a thought and a real shame to see so much effort come to such a sad end.1 point


.thumb.jpg.632415da66ae2d3b91c91514c153e5df.jpg)
